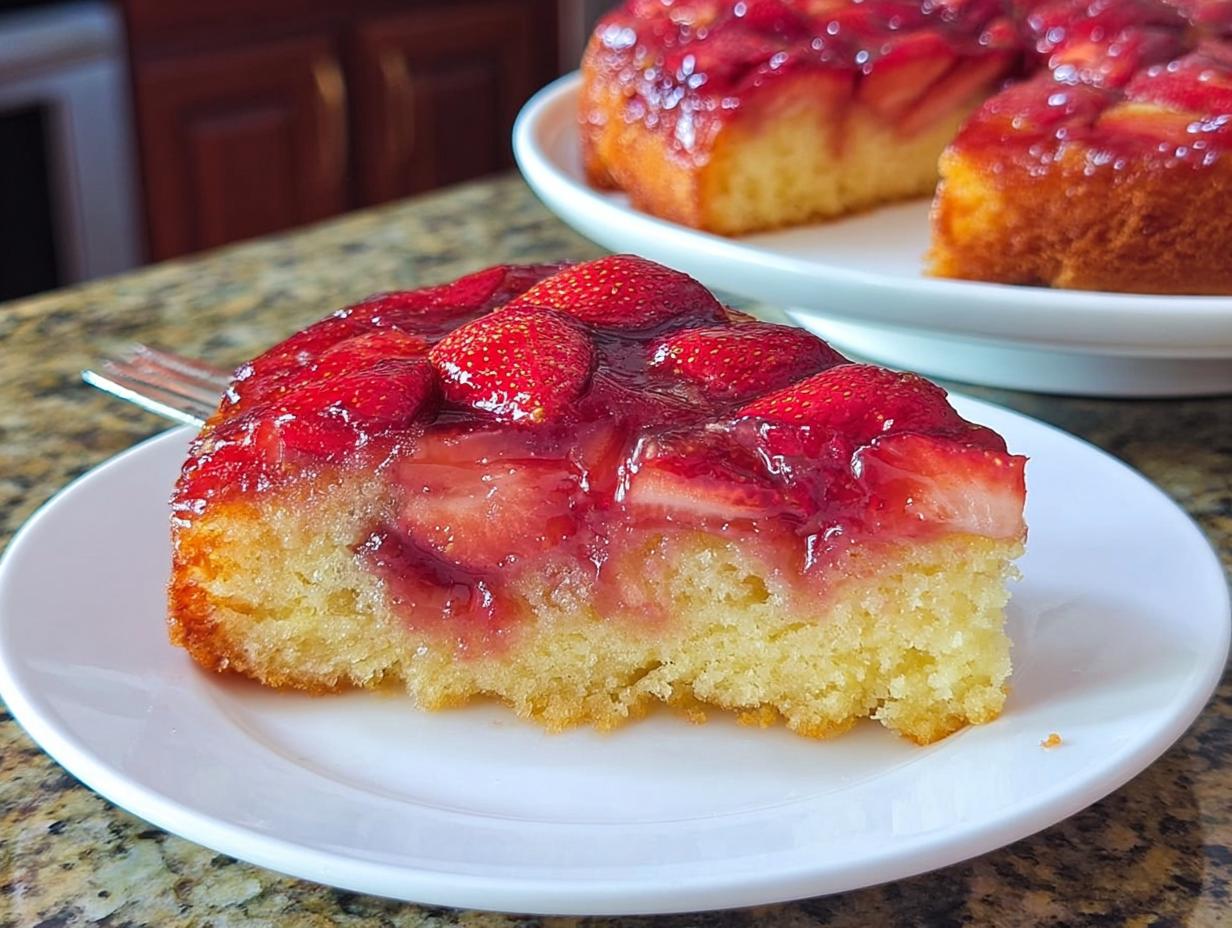
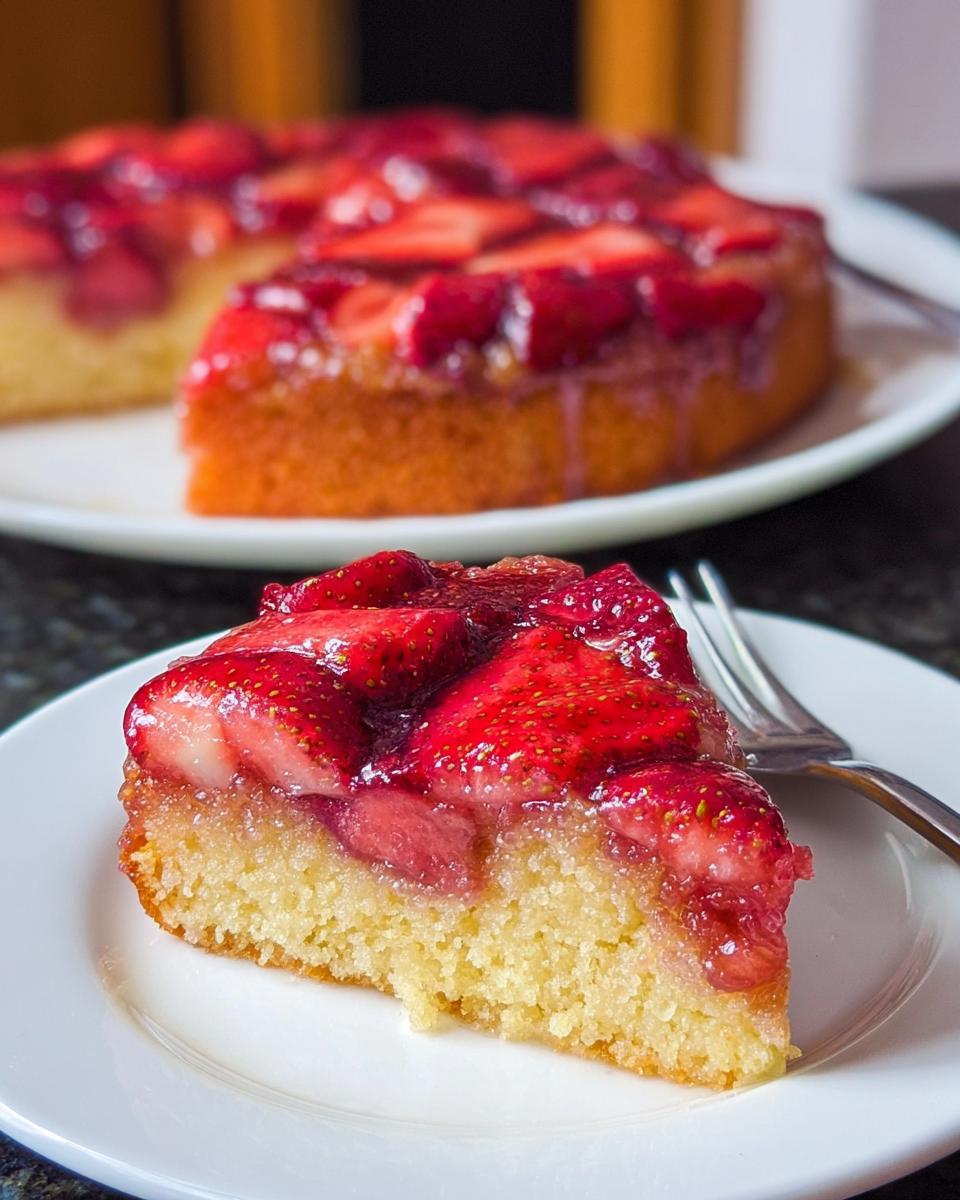
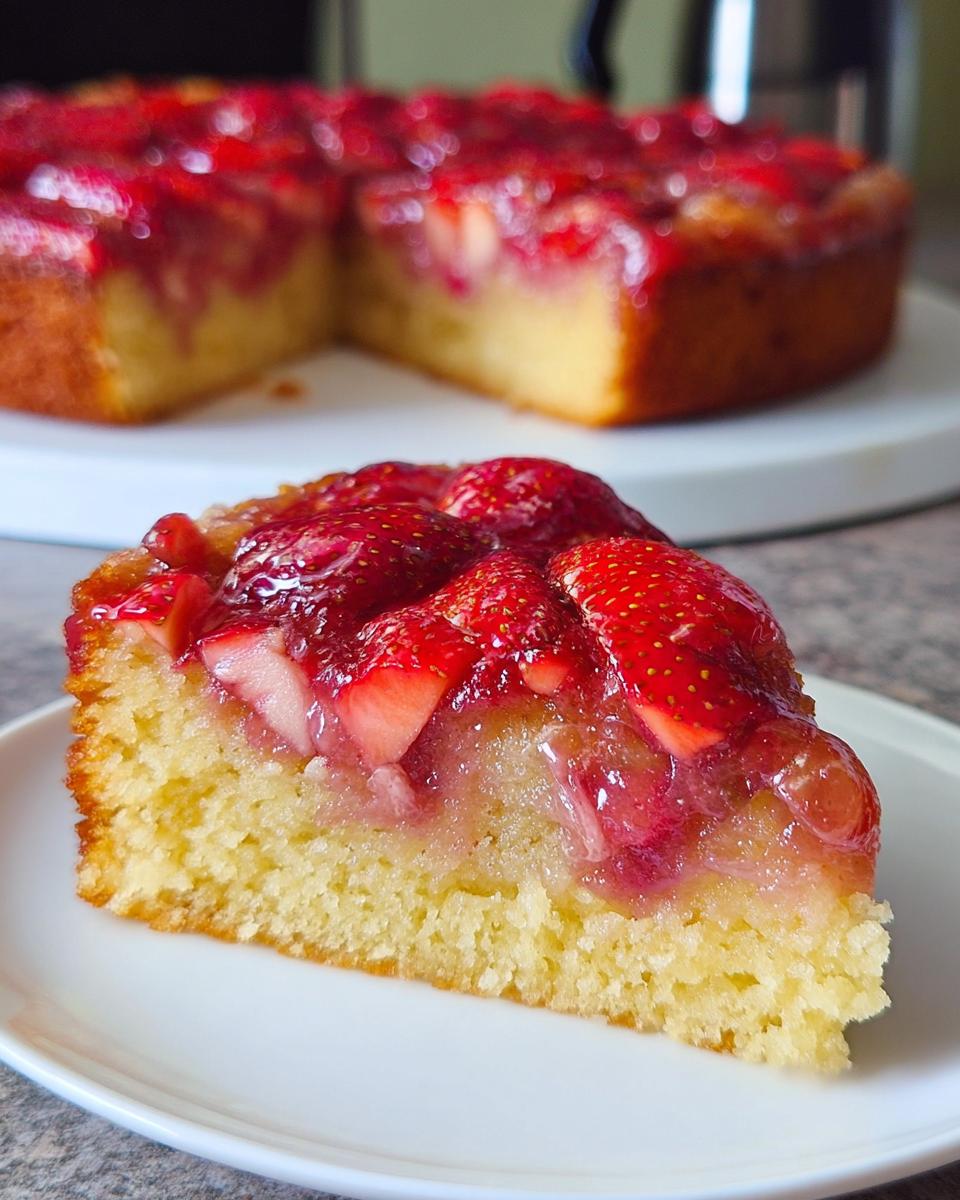
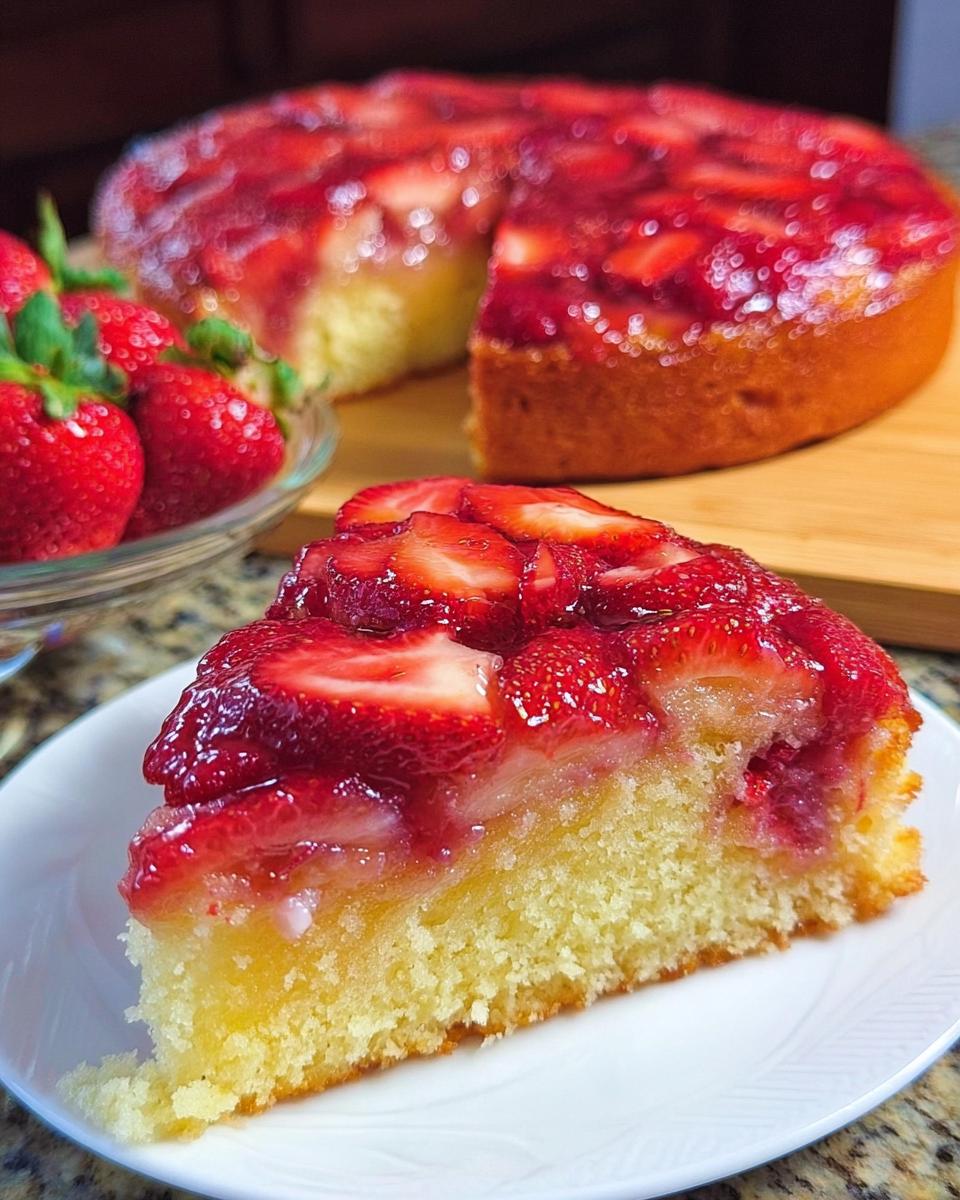
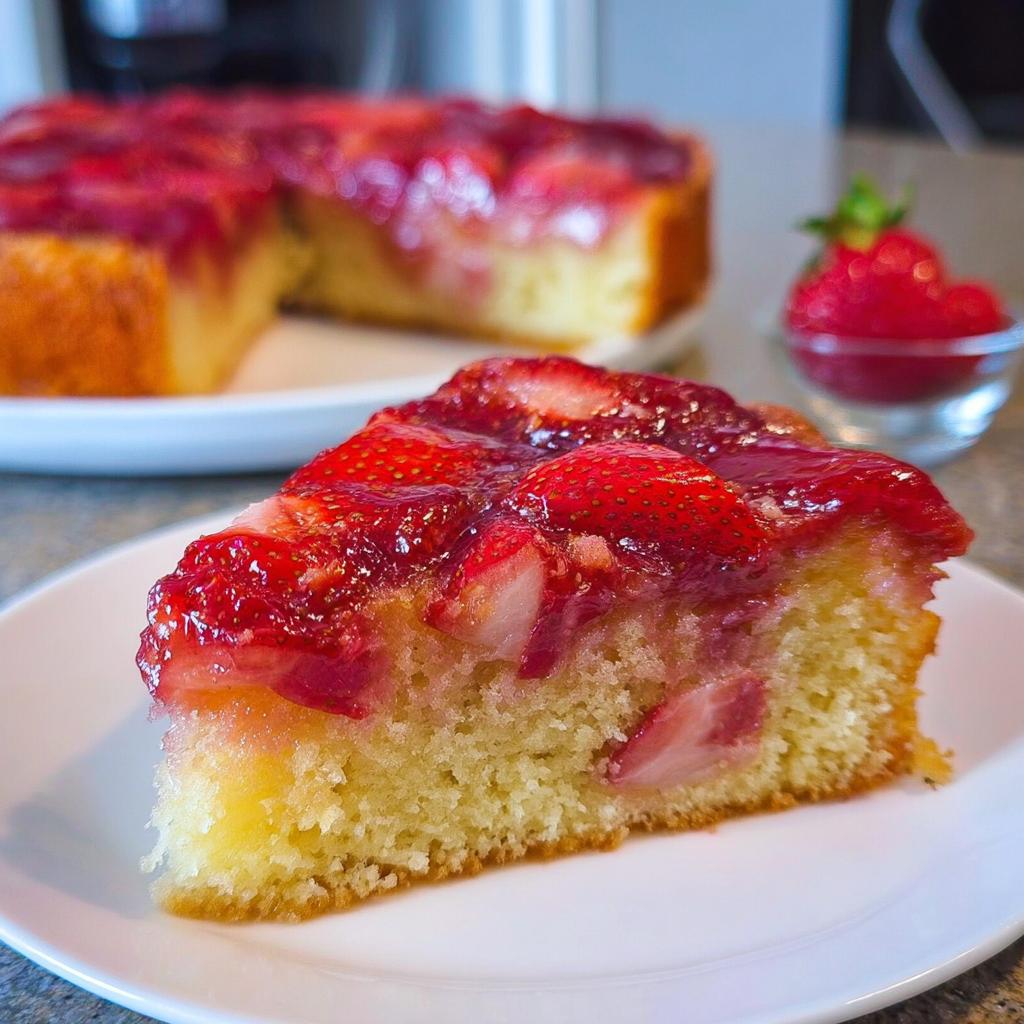
There is nothing quite like that moment when you run a knife around the edge of a hot pan, place your serving plate on top, and flip—the visual payoff is just spectacular! If you love that reveal but think upside-down cakes are too fussy for a regular Tuesday night, well, I have news for you. Say hello to the absolute showstopper that is my Strawberry Sheet Upside Down Cake. Trust me, this recipe takes all the visual drama of those classic pineapple versions and gives it a bright, sweet, fresh strawberry makeover.
This recipe is my go-to when I need something stunning for a potluck or summer gathering, but I don’t want to spend hours fussing over layers. It’s incredibly straightforward, which makes it perfect for family bakers who want minimal fuss but maximum wow factor. Flipping this cake for the first time never gets old—the strawberry layer always makes the reveal worth it! You get the nostalgia of old-fashioned baking but set up perfectly in a simple sheet pan. You can find more of my favorite bright and seasonal fruity bakes right here: check out our other strawberry recipes!
Why This Strawberry Sheet Upside Down Cake is a Must-Try
Honestly, this cake is fantastic because it packs such a giant flavor punch without demanding tricky techniques. It’s built for feeding a crowd easily, which is why it’s a top pick for hosts who want to look like baking royalty without the stress. Plus, the look of that bright, caramelized top just screams summer!
- It absolutely nails that gorgeous Strawberry Cake Design we all love—it’s naturally decorated!
- It’s just so forgiving, making it terrific for potlucks where things might sit out a little while.
Simple Steps for Stunning Strawberry Baking Results
If you think upside-down cakes require fussy arranging in a cast-iron skillet, think again! Because we’re using a sheet pan, the fruit spread is super simple, making this recipe perfect for anyone new to layered baking. It’s fool-proof Strawberry Baking that looks like it took all day.
The Perfect Sheet Cake for Fresh Strawberry Desserts
When you bake those fresh slices right underneath the batter, the sugar caramelizes them beautifully. This concentrates the strawberry flavor in a way that layering fresh berries on top never quite achieves. That gooey, slightly jammy layer is exactly what elevates this from a simple cake to one of the best Fresh Strawberry Desserts you can make.
Essential Ingredients for Your Strawberry Sheet Upside Down Cake
Okay, so like any great baking project, the success of this cake lives and dies by what you start with! Since this cake is so straightforward, your ingredients really get to shine. We divide everything into two parts: what makes that gorgeous sticky fruit bottom, and the fluffy cake that sits on top. Don’t skip paying attention to the fruit slicing!
When you’re measuring the dry goods, especially the flour for that cake batter, remember what I always preach about accuracy. You want to spoon that flour lightly into your measuring cup and then level it off. Too much flour, and your lovely soft cake turns into a brick! Also, when it comes to flavor boosters for things like balancing sweetness, I always check out differences between salts, like taking a peek at kosher salt versus sea salt to see what works best in a pinch!
For the Caramelized Strawberry Base
This is the part that sets the stage for a stunning reveal. Make sure your strawberries are sliced about the same thickness—about a quarter-inch is usually perfect so they don’t turn to complete mush while baking.
- 300g sliced strawberries
- 80g sugar
For the Soft Cake Batter
We use oil instead of all butter here, and honestly, that’s part of what keeps this recipe so tender and easy—no creaming required! Just whisk everything together until it barely comes together for a super light texture in your Strawberry Sheet Upside Down Cake.
- 3 eggs
- 150g sugar
- 120ml oil
- 120ml milk
- 1 tsp vanilla extract
- 240g flour (remember to spoon and level this!)
- 10g baking powder
Step-by-Step Instructions for the Strawberry Sheet Upside Down Cake
Alright, let’s get baking! This is where the magic starts to happen, and I promise you, it’s so much less complicated than it looks. We’re moving fast here, so have your pan ready before you even start mixing the cake batter. Precision counts, especially when prepping the bottom layer for that spectacular reveal later!
I always tell my friends that the secret to a beautiful presentation is doing this while the cake is still warm—not scorching hot, but warm enough that the caramelized sugar hasn’t solidified completely. If you’re looking for other quick tricks in your baking toolkit, you might find some neat little hacks over at my post on perfecting scones; the principles of not overmixing carry over!
Preparing the Caramelized Strawberry Layer
This is your artistic moment! First things first: get that oven warming up to 180°C. Now, take your lined baking tray—parchment paper is your best friend here. Scatter your 300g of sliced strawberries across the bottom. Don’t just dump them in a pile!
Take the 80g of sugar and sprinkle it evenly right over those berries. Try to make sure every berry slice gets a little coating. You want that sugar to melt nicely into a syrup as it bakes. I like to arrange mine in neat little rows or a pretty diamond pattern if I have time. It makes for such a stunning Strawberry Cake Design when you flip it!
Mixing and Baking the Easy Strawberry Desserts Batter
Time for the cake. Grab a bowl and whisk those 3 eggs with 150g of sugar until they lighten up a bit. Then, just stream in your 120ml of oil, the milk, and the vanilla. Whisk that until it’s nicely combined.
In a separate bowl, whisk your 240g of flour and 10g of baking powder. Now, here’s the point where you must stop whisking aggressively! Gently add the dry ingredients into the wet and mix only until you see no more streaks of flour remaining. I mean it—stop when it’s *just combined*. Overmixing is the enemy of light, fluffy Easy Strawberry Desserts, and we want soft cake, not chewiness!
Pour that batter carefully right over the sugar-coated strawberries. Get it as even as you can without pushing the fruit around too much. Slide that tray into the oven for 30 to 35 minutes.
The Crucial Flip: Revealing Your Strawberry Sheet Upside Down Cake
This is the moment of truth! Once the 30-35 minutes are up, remove the cake from the oven. It should look golden on top and spring back gently when you touch it (test it near the center). Let it sit on a cooling rack for about 5 to 10 minutes. That’s enough time for the hot caramel to relax slightly, but not enough time for it to completely set hard.
Place your serving board upside down over the cake pan. Holding the board and the pan tightly together, take a deep breath, and—FLIP! Lift the pan straight up. If you waited that sweet spot of 10 minutes, those gorgeous, glistening strawberries should release perfectly onto your board. If a tiny bit of fruit sticks, just hop it back into place with a little spatula. That’s my expert tip for a clean release!
Tips for Perfecting Your Strawberry Sheet Upside Down Cake
Now that you know the basic steps for making this gorgeous cake, let’s talk about elevating it from great to absolutely unforgettable. Even in simple baking, little details make a huge difference in that final caramelized layer. Remember, we’re aiming for that picture-perfect finish that makes everyone ask for the recipe!
My number one tip involves thinking about fruit sinking—though this is an upside-down cake, we still don’t want the fruit sliding around too much when we pour the batter. If you ever bake things like quick breads or muffins with fruit in the middle, like I do sometimes with blueberries, you probably know the struggle! For this Strawberry Sheet Upside Down Cake, ensuring that initial sugar layer is evenly distributed helps lock those berries in place as the caramel forms. Don’t forget to check out my thoughts on how to keep fruit suspended; those principles help here too!
Another key thing is the quality of your strawberries. Since they are literally the centerpiece, use fruit that is perfectly ripe but still firm. If your berries are too soft or overly mushy, they can break down too much during baking, leaving you with more jam than distinct slices. You want that structural integrity!
A quick note on baking time: always check at the 30-minute mark. Sheet pans vary wildly based on color and material, so use your intuition. If the edges look like they are setting up way faster than the middle, pull it out! A slightly underbaked cake is always fixable by putting it back in for five more minutes, but an overbaked cake is just sad. That blend of soft cake and gooey fruit is what makes this whole experience worth it.
Serving Suggestions for Fresh Strawberry Recipes
Once you reveal that stunning, glistening strawberry top, you might think you’re done, but presentation is everything! This cake has such a beautiful, bright look, it really leans into that lovely, summery Strawberry Shortcake Aesthetic. It’s simple elegance, really, requiring minimal fuss to look incredible.
Because the base cake is already soft and carries a nice sweetness from the caramelized fruit, you don’t need heavy, cloying additions. In fact, I usually prefer something light on top to let those berries sing! If you’re looking for other ways to celebrate strawberries without baking, sometimes I whip up a light strawberry mousse instead, but for this cake, keep it classic or refreshingly simple.
Here are my favorite ways to dress up your freshly baked treat:
- A dollop of freshly whipped cream is non-negotiable for me. Don’t use the stuff from a can if you can help it—just heavy cream, a touch of sugar, and a splash of vanilla whipped until soft peaks form. It mimics that fluffy cloud feeling of a true shortcake.
- If you want a bit more texture, crush up a few shortbread cookies or even some lightly toasted pecans and sprinkle them over the cream. It adds a nice contrasting crunch to the soft cake.
- For an extra pop of elegance, especially if you’re serving this for a weekend brunch, a tiny sprig of fresh mint right on top of the cream really makes the red strawberries look even brighter. It’s a small touch, but diners notice!
Honestly, this cake is fantastic served warm, right after that exciting flip, but it’s also wonderfully flavorful at room temperature the next day. It’s truly one of my favorite Fresh Strawberry Recipes because it manages to feel both rustic and fancy all at once!
Storage and Reheating for Your Strawberry Sheet Upside Down Cake
So, if you’re like me and tend to bake a little bigger than what everyone can eat in one sitting, what do you do with the rest of this glorious creation? Handling the fruit layer when storing is the most important part here. You want to make sure that beautiful caramelized strawberry topping stays gooey and doesn’t dry out or get weirdly sticky against the plastic wrap!
The rule of thumb for keeping any upside-down cake fresh is simple: patience is key before wrapping. Let your magnificent Strawberry Sheet Upside Down Cake cool completely down to room temperature, maybe even chill it slightly if your kitchen is super warm. If you wrap it while it’s even a tiny bit warm, you seal in steam, and steam leads to soggy cake—and nobody wants that!
Once totally cool, cover it tightly. I prefer an airtight container if I have one big enough, but heavy-duty aluminum foil works wonders too. You don’t want any air getting to those berries.
- Room Temperature: It keeps well covered at room temperature for about two days. Honestly, the flavor is best when it’s not getting too cold and hard.
- Refrigeration: If you need it to last longer, the fridge is your backup. It keeps for maybe four days, max. Just know that cold temperatures definitely stiffen up that caramelized sugar layer, so you might need a little warming up!
If you do refrigerate it, don’t eat it straight from the fridge! That’s a crime against texture. To bring back that fresh-baked softness, place a slice on a microwave-safe plate and blast it for just 10 to 15 seconds. You just want it warm enough to make the cake soft and melt that strawberry topping back into its syrupy glory. It tastes almost exactly like you just flipped it!
Frequently Asked Questions About Strawberry Desserts Recipes
I get so many great questions, and I love helping everyone troubleshoot their bakes! Since this Strawberry Sheet Upside Down Cake is a little different from other fruit desserts, I figured I’d tackle the most common things folks ask about when whipping up their own Strawberry Desserts Recipes.
Can I use frozen strawberries in this Strawberry Sheet Upside Down Cake?
Oh, that’s a tough one, and I usually say no, but I understand why you’d ask! Frozen strawberries hold way too much extra moisture. If you use them straight from the bag, they release all that extra liquid into your sugar layer, making it watery instead of caramelized. Plus, thawed berries are usually super soft.
If you absolutely must use frozen berries—maybe it’s the middle of winter—you need to thaw them completely on a paper towel-lined plate first. Then, gently blot them dry. You’ll need to slice them roughly yourself once they are thawed, though, because they turn to mush fast. Your best bet for amazing Fresh Strawberry Recipes is always using fresh berries, but if you prep the frozen ones well, you can salvage it!
What is the difference between this and traditional Strawberry Shortcake Cake?
That’s a great question for anyone debating between two classic flavors! Traditional shortcake is wonderful, but it’s usually built around a biscuit or a basic yellow layer cake split horizontally, then layered with whipped cream and fresh, often macerated, strawberries in between. It relies on fresh, bright flavor.
Our Strawberry Sheet Upside Down Cake is structurally different. We are baking the fruit *under* the cake, which totally changes the flavor profile. The heat caramelizes the sugar and the berries, creating that rich, jammy, slightly tart layer that melts right into the soft cake below. It’s much more intensely flavored than a quick cream-and-berry topping. If you prefer a lighter, creamier experience that tastes like summer air, go for the shortcake. If you want a beautiful, gooey, caramelized treat, stick with the upside-down method! Either way, you are winning with great strawberry goodness.
I want this to look like a beautiful centerpiece. What else can I garnish with besides cream?
I hear you! If you want to lean into that gorgeous presentation, think about contrasting colors and textures. Since we want an Easy Strawberry Desserts vibe, we aren’t complicating the cake itself, so the garnish is key. I mentioned mint, right? It’s a lifesaver for color!
Another idea for that perfect Strawberry Shortcake Aesthetic is to use lemon zest right over the top of the whipped cream—the tiny yellow speckles look amazing against the red strawberries and white cream. If you want crunch without heavy nuts, try lightly toasting some shredded coconut! When you toast it just until it hits light gold, it adds a wonderful subtle chewiness that elevates any of your Strawberry Desserts Recipes.
Sharing Your Strawberry Sheet Upside Down Cake Creations
Oh my goodness, now that you’ve made this cake and done the big flip, I absolutely need to see the results! Seriously, there is no better feeling than seeing a successful upside-down bake, and the strawberry layer looks so incredible when you finally reveal it.
When you take that first picture of your beautiful, glistening Strawberry Sheet Upside Down Cake, please don’t be shy! Tag me on social media or let me know how it went in the comments below. Hearing from you guys about what you changed, what you loved, or if you even managed to let it cool before slicing into it, really makes my day.
If you’re struggling with a step or if you have a genius variation I haven’t even thought of yet—maybe you used a little balsamic vinegar in the caramel? Tell me! This recipe is evolving all the time, and I rely on my community to keep testing and sharing what works best for their kitchens. Whether you’re rating it five stars or just leaving a quick note about how much your family loved those caramelized berries, every bit of feedback helps us all bake better.
If you run into any questions down the line or want to share a bigger moment, you can always reach out directly using my contact page, but the comments section is where all the fun recipe chatter happens!
Nutritional Estimate for This Recipe
Now, I know some of you are meticulously tracking everything, and that’s totally valid! Knowing what’s in your food is important, especially when it’s so delicious you might want to eat the whole sheet pan yourself (I won’t judge!).
However, I have to be real with you: baking is chemistry, and every little variation throws the numbers off. Did you use slightly larger eggs? Were your strawberries particularly juicy that week? Did you decide to make up a batch of extra thick whipped cream for serving? All those things change the final count!
Because of how much ingredient choice can change the final product for this Strawberry Sheet Upside Down Cake, I can’t give you exact, guaranteed numbers. So, please treat any online estimated nutrition information purely as a fun guideline and not a medical fact. For the most accurate breakdown, especially if you have specific dietary concerns, you’ll need to plug the ingredients you personally used into your preferred detailed nutrition calculator. You can read more about why we keep this section general over on my official disclaimer page. Enjoy the cake, friend, and don’t worry too much about the details!
Strawberry Sheet Upside Down Cake
Equipment
- Lined baking tray
- Oven
Ingredients
Bottom Layer
- 300 g sliced strawberries
- 80 g sugar
Cake Batter
- 3 eggs
- 150 g sugar
- 120 ml oil
- 120 ml milk
- 1 tsp vanilla extract
- 240 g flour
- 10 g baking powder
Instructions
- Preheat your oven to 180°C.
- Place the sliced strawberries and 80g of sugar at the bottom of your lined tray.
- Prepare the cake batter by whisking the eggs and 150g of sugar together. Add the oil, milk, and vanilla. Mix in the flour and baking powder until just combined.
- Pour the cake batter evenly over the strawberries in the tray.
- Bake for 30 to 35 minutes.
- Flip the warm cake onto a serving board to show the caramelized strawberry top.