
You know those classic layered bars that everyone raves about? The ones that are perfectly gooey and hit every texture note possible in one bite? Well, I took that tried-and-true recipe and gave it the upgrade it deserved. Seriously, sometimes the best innovations are the simplest ones!
Meet the ultimate sweet and salty hero for your next get-together: the Peanut Butter Magic Bars. Adding that creamy, salty peanut butter into the mix just felt like a natural move—simple, familiar, and incredibly effective if you ask me. If you’re a dessert fan who loves layers and layers of sweet, sticky goodness, you’ve found your match. Trust me, this recipe will quickly become one of your go-to Easy Treats for when you need something impressive with almost zero effort.
If you love the concept of these easy, layered desserts, you should definitely check out my post on the original 7-layer bars to see where the journey began! And for even more bar inspiration, feel free to browse all bar recipes over at Betty Crocker.
Why You Will Love These Peanut Butter Magic Bars
Honestly, once you make these, you might never go back to the original recipe! I know that is a bold claim, but these bars are pure comfort food baked into a perfect little square. They are what I turn to whenever I need a quick, impressive bake.
- They nail that perfect sweet and salty balance. The saltiness of the peanut butter cuts through the sweetness of the condensed milk beautifully.
- Talk about Easy Desserts With Few Ingredients! Seriously, you just layer everything right on top of the crust.
- They are practically foolproof. If you can press crumbs and pour, you can make these! It’s the best kind of “dump-and-bake” magic you can ask for.
- These are incredible for parties or bake sales. They travel so well and everyone goes absolutely crazy for them—definitely an award winner among Easy Desserts For A Crowd.
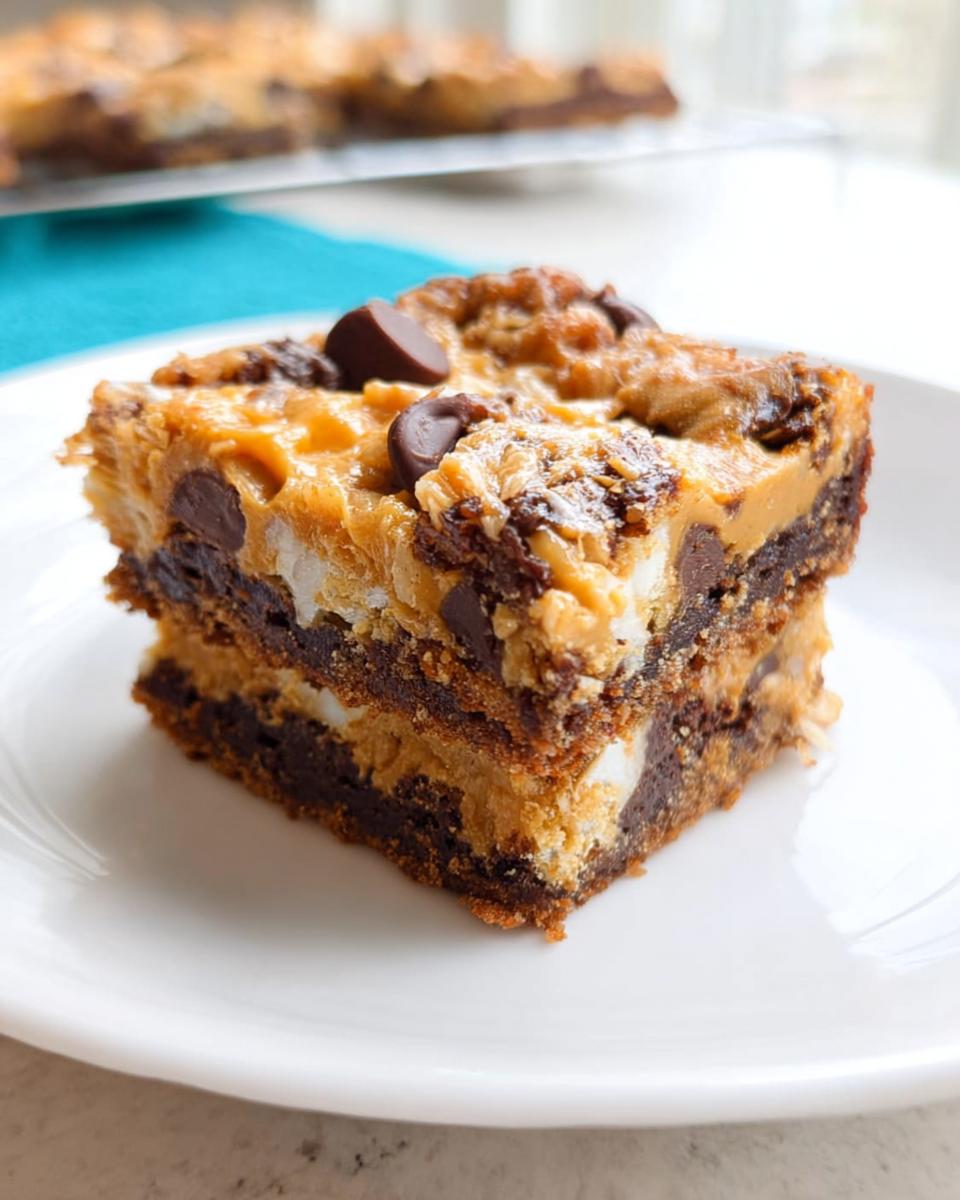
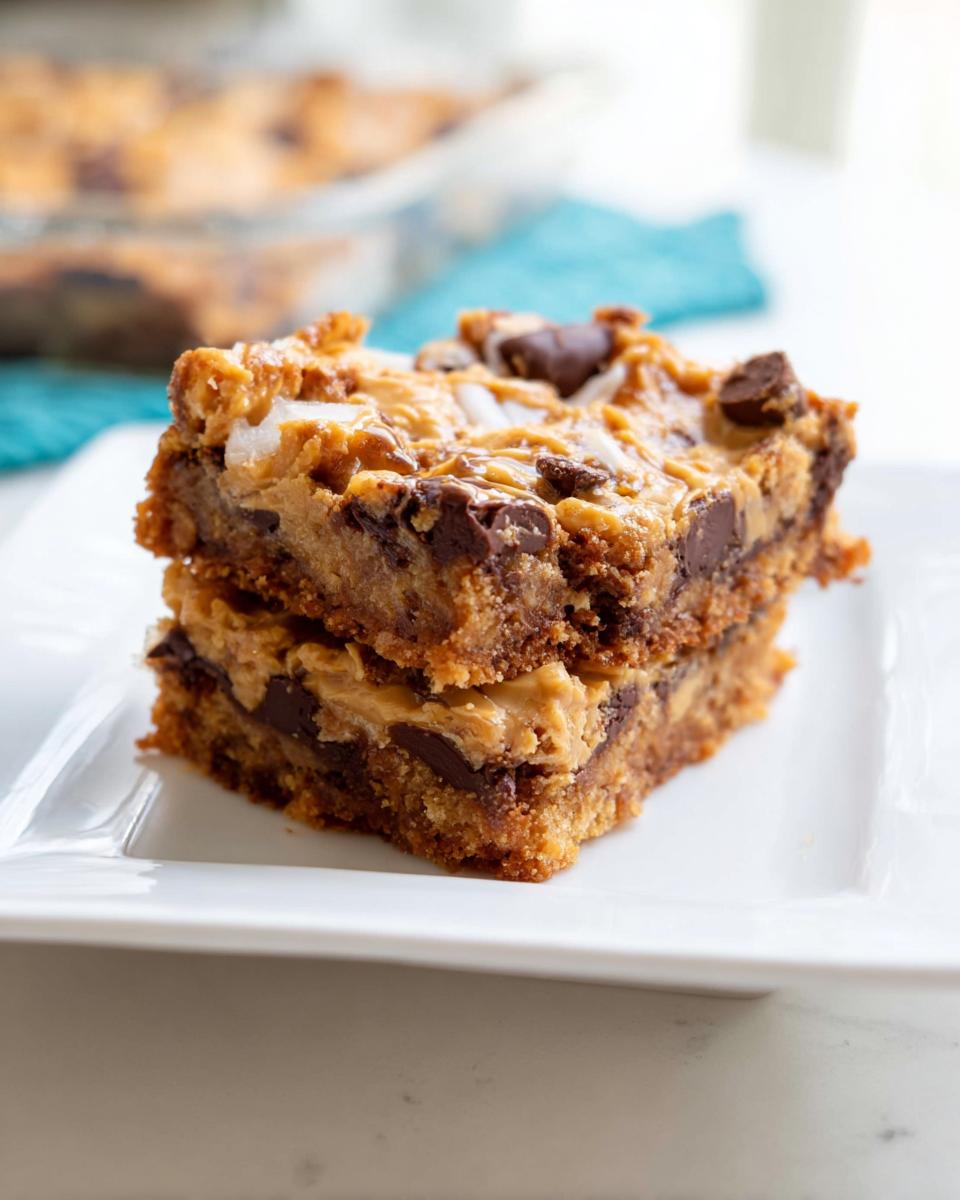
- The texture is everything: a crunchy crumb base, a soft, gooey middle, and that slightly chewy toasted coconut top. So satisfying!
- They require almost no special equipment, keeping them firmly in the category of great Easy Dessert Ideas for busy weekdays.
Essential Ingredients for Perfect Peanut Butter Magic Bars
We’re keeping this recipe super simple, which is why it qualifies as one of the best Easy Desserts With Few Ingredients. You’re relying on just a handful of items to create all those amazing layers. But just because it’s simple doesn’t mean we slack off on quality!
A huge factor in these Peanut Butter Magic Bars succeeding is the peanut butter. Seriously, use a brand you love to eat straight off the spoon. That flavor is going to shine right through the richness of the condensed milk. Trust me on this one! If you are debating between sea salt or kosher salt for sprinkling on top (optional, but highly recommended!), I have my thoughts on that right here.
For the Crust
The base needs to hold up all that gooey goodness, so we keep the crust classic and sturdy. You just need two things:
- 200g graham cracker crumbs—I just pulse leftover crackers in the food processor until they look like sand.
- 120g melted butter, poured right over those crumbs!
For the Gooey Layers of Peanut Butter Magic Bars
This is where the magic happens! After that sturdy crust is set, we start piling on the sweet stuff. Laying these ingredients out makes assembly lightning fast. Remember that I always toast my coconut slightly before adding it, but that’s just my preference!
- 400g sweetened condensed milk—this is the binder and the sweetness backbone.
- 120g peanut butter—the star of the show!
- 150g chocolate chips—milk or semi-sweet, whatever makes you happiest!
- 100g shredded coconut.
Tips for Success Making Peanut Butter Magic Bars
Even though these are some of the easiest Simple Desserts you’ll ever make, a couple of tiny steps can take them from just good to absolutely legendary. Having made these dozens of times now, I’ve learned a few little secrets to keep them from falling apart when you try to cut them. You want gooey, not totally liquid goo, right?
First thing is that crust. You have to press it down firmly. I use the bottom of a measuring cup to really pack that buttered crumb mixture into the pan. If it’s loose, the whole bar structure fails later on. Give it a good, solid press! I even accidentally learned that using a chilled metal spatula helps press it flatter than my fingers ever could.
Second, don’t rush that peanut butter layer. When you drizzle the condensed milk over the crust, it’s thick, but the peanut butter is even thicker! Before you sprinkle on the chips and coconut, take a spatula and gently spread the peanut butter out evenly over the milk layer. You don’t want huge pockets of peanut butter dominating one side of the pan. You want that salty-sweet presence in every single slice.
But here is my golden rule, the one that ensures you get clean squares and not a crumbly mess for your Homemade Desserts platter: You simply *must* let them cool completely. I know, I know, the smell coming out of the oven is torture, especially when they are bubbling hot! But honestly, they need at least two hours on the counter, or better yet, chilling them in the fridge for an hour after they’ve cooled down at room temperature. Chilling is the real secret to cutting perfect squares that don’t stick to your knife. For more advanced baking tips that will help with any recipe, check out my post on baking secrets. And if you’re looking for other great bar inspiration, Pillsbury’s bar collection is fantastic for ideas!
Step-by-Step Instructions for Peanut Butter Magic Bars
I absolutely love that these Peanut Butter Magic Bars come together so fast. It’s the ultimate confidence booster in the kitchen because the assembly is totally intuitive. You basically mix the crumbs and then just start layering everything else right on top. It’s such a fun technique, which is why these are such great Baking Ideas when you have minimal time.
Remember, we bake these at 175°C (350°F). Since this recipe relies on melting and setting rather than actual rising, temperature control is key to getting that perfect gooey center. Make sure your oven is fully preheated before that dish goes in!
Preparing the Base and Baking
First things first, let’s make that solid foundation. In a bowl, just toss together your 200g of graham cracker crumbs and the 120g of melted butter. You want this mixture to look like wet sand—truly saturated. Press this mixture down into the bottom of your prepared baking dish. Really pack it in there tightly so it holds up later!
Next, go ahead and pop that crust into the oven for a little head start, maybe 8 minutes or so, just to set it up nicely. Once it comes out, we are ready for the layers to go on top for the remaining 25 to 30 minutes of baking time. Keep a close eye on the edges!
Layering and Finishing Your Peanut Butter Magic Bars
As soon as that crust is lightly baked, pull it out. Now, drizzle that entire can of 400g sweetened condensed milk evenly across the whole base. This has to be the most satisfying part! Then, dollop spoonfuls of the 120g peanut butter over the milk. Use a spatula or the back of a spoon to gently spread the peanut butter until it mostly covers the milk layer.
Time for the fun toppings! Sprinkle the 150g of chocolate chips and the 100g of coconut right over the top. Bake until it’s all bubbly and golden brown on top. The absolute last step—and please, this takes commitment—is letting them cool totally, preferably until they are chilled, before you slice them. I might have a recipe detailing my love for the Caramel Magic Cookie Bars, but the cooling rule applies to both!
Variations on Classic Peanut Butter Magic Bars
Part of what makes these Peanut Butter Magic Bars so great is how easy they are to tweak based on what you have on hand or what flavor combination is calling your name that day. They are already pretty perfect, honestly, but I love experimenting a little bit! These simple changes make them endlessly customizable for your next run of Easy Dessert Ideas.
If you’re looking for an extra layer of texture or flavor complexity, I have a few go-to swaps that I rely on. Sometimes I need extra crunch, and sometimes I just crave a different kind of meltiness. I’ve even turned this entire concept into a different format—you can check out my recipe for Peanut Butter Cookie Bars if you want a slightly cakier texture base instead of the graham crust!
Here are a couple of simple ways to make these your own:
- Swap Out the Chips: While chocolate chips are a must for me, feel free to mix them up! Try using butterscotch chips—the buttery flavor plays unbelievably well with the peanut butter. Or, half chocolate, half white chocolate is always a winner if you like things extra sweet.
- Add Some Crunch with Nuts: This is a perfect spot to use up any leftover nuts you have. About half a cup of chopped peanuts or pecans mixed in with the chocolate chips adds a lovely, satisfying crunch. Just make sure they are roughly chopped so they get coated nicely by the milk layer underneath.
- The Toasted Marshmallow Twist: This one is a little more decadent, but seriously worth it. After you sprinkle the coconut on, instead of baking right away, arrange a layer of mini marshmallows on top before baking. Watch them closely, though! Marshmallows go from golden perfection to burnt charcoal in about three seconds flat.

Whichever way you try them, these small additions keep this recipe fresh and exciting while still delivering on that major gooey payoff that makes them such a fantastic go-to dessert.
Storage and Serving Suggestions for Peanut Butter Magic Bars
These Peanut Butter Magic Bars are packed with so much delicious goodness that they actually keep really well, which is great news because you will definitely want to save some for later! Remember that chilling step I stressed earlier for cutting? Well, that chilling really helps them maintain their structure for storage too. Don’t worry about trying to reheat these—they are designed to be eaten cool and gooey right out of the fridge or after they’ve sat on the counter for a little while.
For storage, airtight containers are your best friend. I usually keep mine right on the counter at room temperature if I plan on eating them within three or four days. Since this recipe has no fresh cream or cheese, they are pretty stable at room temp, provided your kitchen isn’t super swampy hot!
If you made a giant batch for a gathering, or if you just want them to stay perfectly firm for slicing, pop the whole pan (or the cut bars) into the refrigerator. Wrapped tightly, they stay fantastic for about a week. When you serve them fridge-cold, they get almost fudge-like, which is a delightful change of texture!
When it comes to serving, these rich bars pair up perfectly with something simple to cut the sweetness. My family always insists on having a giant glass of cold milk nearby—it’s the classic pairing for a reason! They are also wonderful alongside a strong cup of hot coffee in the afternoon. The bitterness of the coffee just lifts all those salty, sweet peanut butter notes. Seriously, these are high on my list of Easy Desserts With Few Ingredients because the flavor payoff is huge for the little effort!
If you are looking for other straightforward recipes that hold up well for parties and potlucks, you must check out my roundup of easy desserts with minimal ingredients. These Magic Bars fit right in!
Frequently Asked Questions About Peanut Butter Magic Bars
I get so many great questions about these bars because everyone loves a good, easy homemade treat, but sometimes the layers can be tricky! I tried to answer the most common things people ask me when they are preparing their batch of Peanut Butter Magic Bars below. If you’re looking for more lightning-fast options, check out my favorite Easy Treats collection!
Can I use natural peanut butter in these Peanut Butter Magic Bars?
That’s a great question about the ingredients! I really advise against using natural, oil-separated peanut butter for this recipe. When you use that kind, the oil doesn’t always mesh perfectly with the sweetened condensed milk layer, and you can end up with a slightly greasy or separated look after the bars cool down instead of that smooth, gooey texture we are aiming for. For the best results and that classic density, stick to the standard, creamy, stabilized peanut butter. It melts much more beautifully into the other layers!
Are these considered Easy Desserts For A Crowd?
Oh, absolutely! These are probably one of the easiest things you can serve at a big gathering. First, you bake them in one large pan, so you don’t have 50 little cupcakes or cookies to worry about arranging. Second, they slice beautifully—especially if you remember to chill them first! They transfer easily, don’t need any special warming plates, and everyone loves peanut butter. They are designed to be scaled up; just grab a bigger pan and increase your ingredient amounts proportionally. They hold up great on a buffet table!
What is the difference between these and standard 7-layer bars?
The standard 7-layer bar, sometimes called Hello Dolly bars, usually uses butterscotch chips and sometimes pecans or walnuts in addition to the chocolate, coconut, milk, and graham crust. For *these* Peanut Butter Magic Bars, we make one major swap that changes everything but keeps the process just as simple: we substitute the butterscotch chips (and sometimes pecans) with a thick layer of peanut butter poured right over the condensed milk. It transforms the flavor profile completely, giving you that phenomenal sweet-and-salty hit that peanut butter lovers crave. It’s a delicious upgrade to a familiar classic!
Estimated Nutritional Data for Peanut Butter Magic Bars
Okay, look, if you are making these Peanut Butter Magic Bars, you already know they aren’t exactly health food! They are pure, gooey indulgence, meant to be enjoyed totally guilt-free for what they are: the best kind of comfort baking. I wanted to give you a ballpark idea of what you’re diving into per bar, based on dividing the whole recipe into 12 servings like we usually do.
This is super important, though: these numbers are just estimates based on standard ingredient brands right out of the pantry. Every brand of graham cracker, peanut butter, and chocolate chip calculates slightly differently, so take this as inspiration, not gospel!
Here is the general breakdown for what I estimate one of these decadent squares to contain:
- Estimated Calories: Around 350 – 390 kcal per bar. Yes, they are rich, but think about all those layers going into one piece!
- Total Fat: Roughly 19g – 22g. This is coming mostly from the butter in the crust and the peanut butter, which gives us that wonderful, satisfying mouthfeel.
- Carbohydrates: Approximately 40g – 45g. This is where the sugar from the condensed milk and chocolate bits really show up.
- Protein: About 7g – 9g per bar. A nice bonus coming from the peanut butter and the small amounts in the dairy and coconut!
My advice? Don’t stress about the numbers too much when you are enjoying one of these incredible Easy Treats. Just know that you made something amazing from scratch that tastes worlds better than anything store-bought. If you want to see how these compare to other fantastic Homemade Desserts, I’d suggest looking at the data for other recipes, but for these bars, I just focus on the flavor!
Share Your Homemade Desserts Experience
Well, that’s it! We’ve taken a classic dessert and loaded it up with pure peanut butter joy. Now that you have these amazing Peanut Butter Magic Bars cooling on the counter, the best part is sharing them with everyone!
I really, truly want to know what you thought. Did you add pecans to yours? Did you chill them exactly how I suggested for the perfect cut? Baking is all about community, and your feedback is golden for helping me refine every batch of these Homemade Desserts for future readers who are looking through my ideas.
Please take a moment right now, head down to the comments section below, and let me know how these turned out for you. Be sure to give the recipe a star rating out of five—I’m always watching those ratings!
If you need to get in touch with me personally for recipe questions or feedback that you don’t want to put in the public comments, you can always reach out through my contact page. Happy baking, and I can’t wait to see pictures of your gooey, salty, sweet squares!

Peanut Butter Magic Bars
Equipment
- Baking dish
Ingredients
For the Crust
- 200 g graham cracker crumbs
- 120 g melted butter
For the Layers
- 400 g sweetened condensed milk
- 120 g peanut butter
- 150 g chocolate chips
- 100 g shredded coconut
Instructions
- Mix the graham cracker crumbs and melted butter together.
- Press the crumb mixture evenly into the bottom of a baking dish to form the crust.
- Drizzle the sweetened condensed milk evenly over the crust layer.
- Spoon the peanut butter over the surface of the condensed milk.
- Sprinkle the chocolate chips and shredded coconut over the top.
- Bake at 175°C (350°F) for 25 to 30 minutes.
- Cool the bars completely before you cut them into servings.