Sometimes you just need a seriously decadent treat without pulling out the stand mixer or setting the oven timer. That’s where these incredible Oreo Cake Pops come in! Seriously, these are the ultimate easy desserts because they use just three main things, and guess what? There’s zero baking involved.
I’m always experimenting with cookie bases because I enjoy adapting Oreo-based desserts because they’re forgiving and always deliver on flavor—these pops are no exception. They pack all that amazing crushed cookie flavor into one perfectly dippable bite. Trust me, once you see how simple these homemade desserts are, they’ll become your new go-to for last-minute sweet cravings or when you need easy treats for a crowd.
Why You Will Make These Oreo Cake Pops Again and Again
Listen, life is too short to fuss over complicated baking when a quick fix tastes this good. These are firmly in the category of Simple Desserts that bring maximum joy. They are also fantastic for anyone who needs Easy Treats for a last-minute gathering.
- No Oven Required: Seriously, it’s all mixing and chilling. Check out all our other no-bake treats!
- Minimal Mess: With just three core items, cleanup is a breeze.
- Crowd Pleaser: Who doesn’t love Oreos dipped in chocolate? You’ll be the hero.
- Fast Setup: You go from pantry to fridge in under 15 minutes flat.
Gathering Ingredients for Your Oreo Cake Pops
The beauty of these Oreo Cake Pops? They qualify as some of the best Easy Desserts With Few Ingredients you’ll ever make. Forget hunting down 15 different things at the store; we are sticking to the core team here. This recipe is so straightforward, it almost feels like cheating! But I promise you, the quality of the outcome doesn’t reflect the simplicity of the ingredient list.
Essential Components for Perfect Oreo Cake Pops
You only need three main players for this magic to happen. Since there’s no baking, you are relying entirely on the quality and condition of these items. For flavor inspiration, check out some of my other favorite dessert recipes!
First up, you need 450 grams of those iconic Oreo cookies. Make sure they’re whole Oreos if you can—filling and cookie together make the perfect base! Next, grab 120 grams of cream cheese, but listen close: it absolutely has to be softened. Room temperature, slightly squishy cream cheese is vital for mixing correctly.
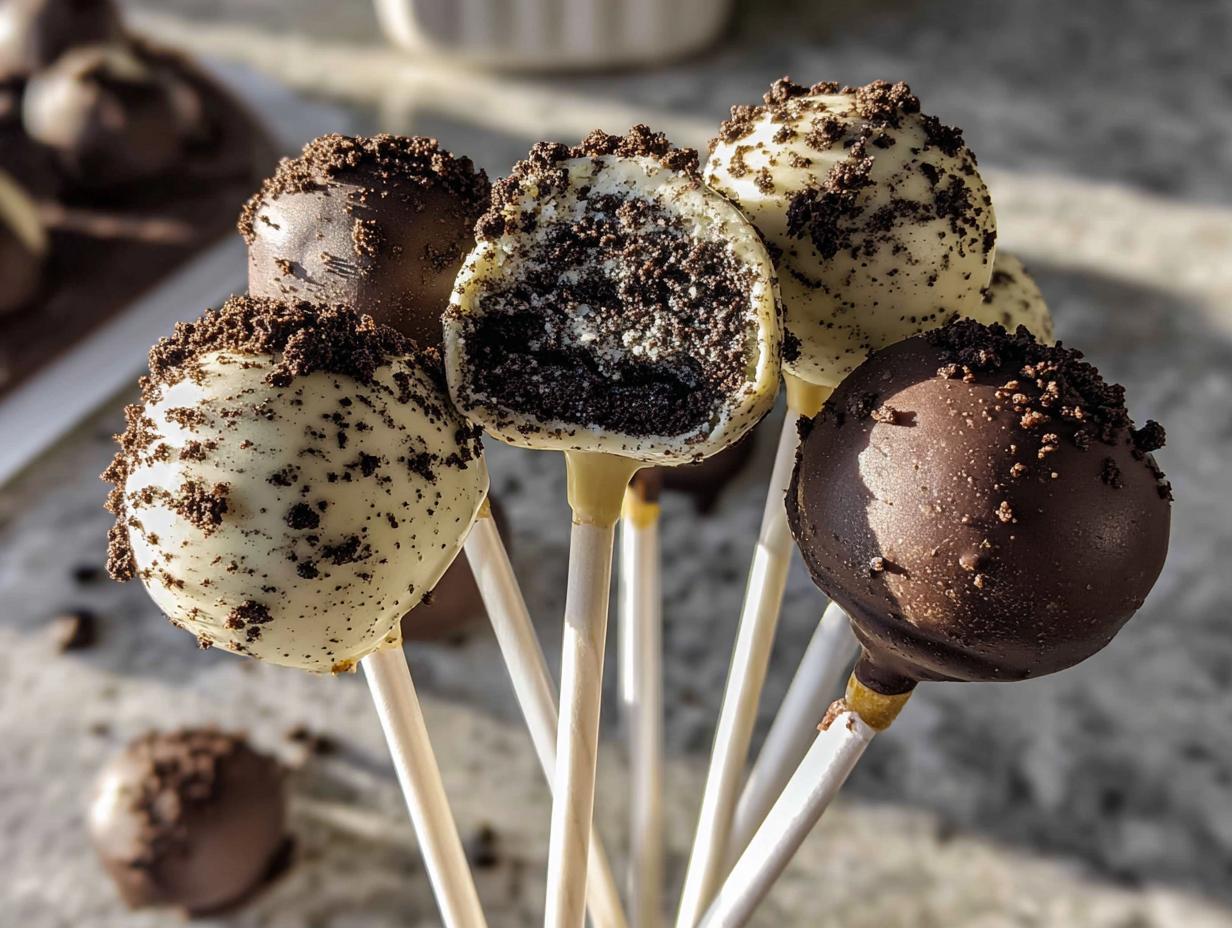
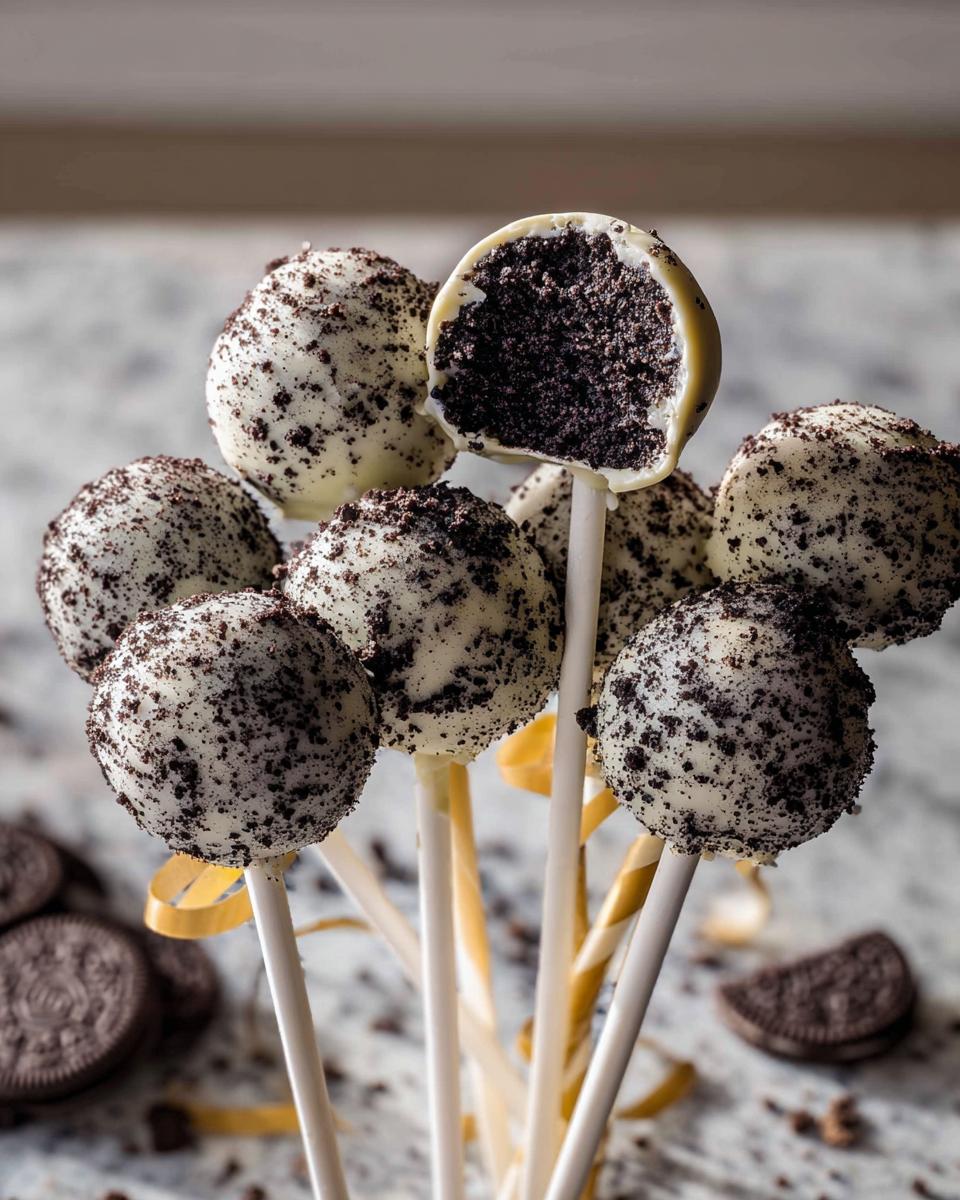
Finally, for the dipping part, you’ll need about 300 grams of white or milk chocolate. I usually lean towards white because it gives you that beautiful, bright contrast against the dark cookie center, but use whatever makes your heart happy!
Equipment Needed for Making Oreo Cake Pops
Don’t worry, you don’t need a special bakery setup for these! Having the right tools just makes the process smoother, which is what we love when we are making quick Baking Ideas.
You’ll definitely need something to crush those cookies—a food processor is fastest, but a sturdy rolling pin and a heavy-duty zip-top bag work just fine! Grab a mixing bowl, a flat baking sheet for chilling, and most importantly, the lollipop sticks for dipping.
Step-by-Step Instructions to Master Oreo Cake Pops
Okay, this is the fun part where we turn simple pantry staples into something super special. Because these are no-bake, the technique here is all about texture and temperature, not oven time. Follow these steps, and you’ll have fantastic dessert ideas ready way faster than you might think! I learned a ton making different seven-layer bars, and those lessons in texture absolutely apply here.
Preparing the Oreo Crumb Base
First thing’s first: we need crumbs! If you have a food processor, toss in all 450 grams of Oreos and pulse until they look like dark, sandy dust. If you’re going old-school like I sometimes have to when the processor is dirty, throw them in a sturdy plastic bag and just go to town with a rolling pin until they are super fine. You are aiming for fine crumbs so that when you mix in the cream cheese, you don’t get any chunks. We want that smooth, homogenous texture, like perfect cookie crumble.
Forming and Chilling the Dough
Now we add our glue: the softened cream cheese. Dump the 120 grams right into the crumbs. Use your hands—it’s the best way, trust me—and mash everything together. You’re looking for a consistency that feels like slightly soft play-dough. It shouldn’t be sticky anymore, just pliable. Once it’s truly combined, start rolling the dough into small, even balls. Uniform size is key so they all look good and set at the same time. Line these little orbs on your baking sheet and get them into the fridge for at least 30 minutes. This chilling time is non-negotiable; cold dough won’t fall apart when you dip it!
Dipping and Setting Your Oreo Cake Pops
While those are chilling, go ahead and melt your chocolate. This is where you need a little patience. To make sure the lollipop stick seals properly and doesn’t wobble out later (the worst!), dip just the very tip of the stick into a little bit of the melted chocolate. Push that chocolate-tipped end about halfway into a chilled ball. Let that little chocolate “glue spot” firm up for just a moment.
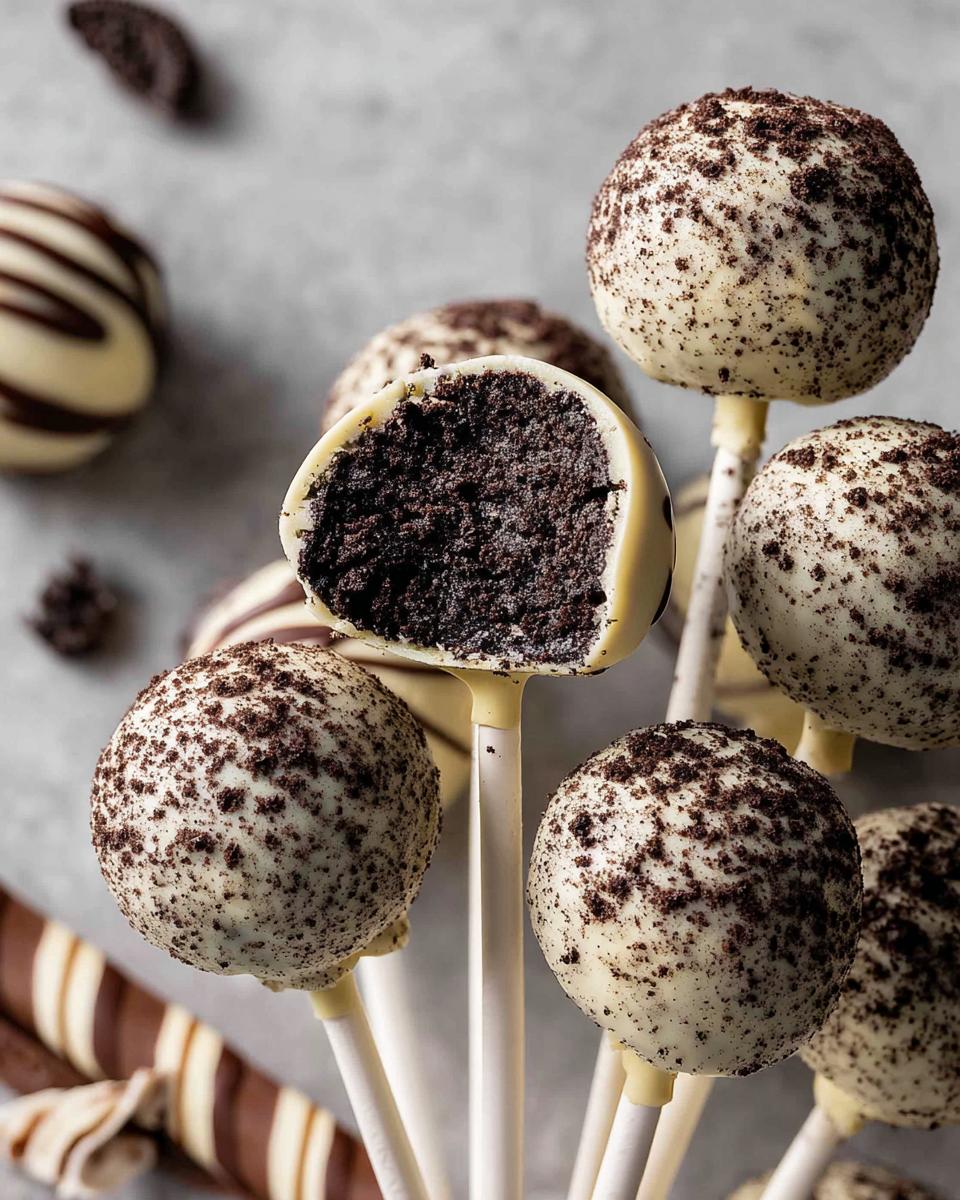
Now for the main dip! Hold the stick and dip the entire ball straight into the remaining melted chocolate. Work quickly, but let the excess drip off back into the bowl. Don’t try to wipe it off on the bowl rim; just let gravity do its work. You can peek at this cookie crumble tip on my other post for a reminder on coating dips! Finally, you have to stand them up to set. Grab a block of styrofoam or a simple cooling rack set over parchment paper, stick them in upright, and let that chocolate set completely hard before touching them again. Done!
Tips for Success When Making Oreo Cake Pops
Even though these are some of the easiest desserts out there, the success hinges on a couple of temperature checks. When you are trying to put together quick Easy Dessert Ideas for a party, you can’t afford any sinking moments! Here are the few things I learned the hard way so you don’t have to.
Let’s talk about dough texture first. If your dough feels too soft or mushy when you try to roll it, it’s definitely still too warm, or maybe your cream cheese wasn’t fully firm enough to absorb the crumbs correctly. You absolutely must return that dough to the fridge for another 15 or 20 minutes if it’s giving you trouble. Cold = structure, warm = messy puddles!

The biggest panic moment for any dipper is when the chocolate suddenly seems thick, grainy, or refuses to coat smoothly—that’s seizing! This usually happens if even a drop of water gets in there, but sometimes it’s just overheating. If your chocolate seems to have seized up, don’t throw it out! Try stirring in half a teaspoon of vegetable oil or a tiny bit of coconut oil. It often relaxes it enough to get a smooth coat. You might want to read up on my general baking wisdom if you’re looking for other little fixes like that.
Another pro tip that really elevates these is using good quality melting chocolate, not just standard chips, if you can swing it. Brands like Ghirardelli or even checking out recipes like this cookies and cream recipe can give you ideas on balancing the richness. A smooth, even coating makes all the difference between amateur and professional-looking Oreo Cake Pops!
Storage and Serving Suggestions for Your Oreo Cake Pops
Since these are so wonderfully simple and decadent, they make perfect Easy Desserts For A Crowd at any party! Now, how you keep them perfect depends on how long you need them to last.
If you plan on serving them within a day, keeping them in a single layer in an airtight container on the counter is usually fine, especially if your kitchen isn’t too warm. However, for maximum crispness and longevity, I always recommend storing your finished Oreo Cake Pops in the refrigerator. Since they have cream cheese in the center, chilling is the safer bet.
Make sure they are covered tightly so they don’t absorb any fridge smells! When it’s time to serve, pull them out about 20 minutes ahead of time. This lets the chocolate coating relax just a tiny bit, enhancing the texture when you bite into that rich, cool center. Enjoy!
Variations on Classic Oreo Cake Pops
While the original three-ingredient version is seriously mind-blowing, these Oreo Cake Pops lend themselves beautifully to customization! This is where you can turn them into truly Unique Cookie Recipes that match any party theme or flavor craving. Don’t be afraid to play around; the cookie base is super forgiving.
The easiest swap is the chocolate coating. If you aren’t into stark white chocolate, go for milk chocolate obviously, but why stop there? Try melting dark chocolate—say, like the ones found in my chocolate lovers’ collection—for a richer, more sophisticated vibe. You could even use colored candy melts in pink or blue for holidays!
Once dipped but before the chocolate sets, get creative with toppings. A quick roll in crushed salted peanuts adds amazing crunch, or you can toss them in gold or silver edible glitter for instant glamour. For flavor variations inside, try swapping the plain cream cheese for 30 grams of peanut butter cream cheese or even mixing in a few drops of peppermint extract before chilling!
Frequently Asked Questions About Oreo Cake Pops
I get so many messages asking about tweaks to this recipe, which makes total sense because everyone wants to make these into their own special Easy Dessert Ideas! Here are the questions I hear most often.
Can I skip chilling the dough balls?
Please, please don’t skip the chilling! It’s essential. If the dough is warm, it’s too soft, and the lollipop sticks will just tear the centers out when you try to dip them. Thirty minutes in the fridge gives the Oreo and cream cheese mixture just enough structure to handle getting dunked in melted chocolate. It prevents total structural collapse, which is never fun!
What if I don’t have a food processor?
That’s totally okay; you don’t need fancy gear for these Easy Treats! The main goal is fine crumbs. Pop those Oreos into a really strong, sealable zip-top bag. Lay that bag flat on your counter, and use a heavy rolling pin or even the bottom of an old saucepan to crush them into a powder. It takes a little more muscle, but the result is the same perfect base for these Homemade Desserts.
Can I use a different kind of cream cheese, like lower fat?
I strongly recommend sticking to full-fat cream cheese here. Since we are relying on only three ingredients, the fat in the full-fat version helps bind everything perfectly and keeps the texture smooth and rich. Lower-fat versions often have more water content, and that extra moisture could make your dough too sticky or soft, which leads to problems during dipping.
Can I use candy wafers instead of melting chocolate for coating?
Absolutely! Candy wafers (like Wilton brand or similar) are often a bit easier to work with than pure melting chocolate because they are formulated to set up smoothly without needing tempering. They are a fantastic shortcut for these Easy Desserts With Few Ingredients, and they tend to set up faster too, which is great when you are making a big batch for a crowd.
Nutritional Estimate for These Homemade Desserts
Since these Oreo Cake Pops are one of our favorite Homemade Desserts, I know a lot of you are curious about the numbers. I always want to remind everyone that my estimates are based on using standard, full-sugar Oreos and standard cream cheese. If you start swapping in lighter versions or dark chocolate, the results will definitely change, so treat this as a guideline!
When we break down the numbers for one serving (which is one cake pop, yielding about 20 total), here is what you can generally expect. Keep in mind that because we aren’t baking, and we are using the whole cookie, these are richer than a standard cake slice, but they’re also smaller than a slice of cake!
- Calories: Approximately 180-210 kcal
- Fat: About 10-13g (It’s all in that chocolate shell and the Oreo cream!)
- Protein: Around 3g
- Carbohydrates: Approximately 20-25g
Remember, these figures are just rough estimates for one pop. If you have a specific brand of chocolate or cookies, the exact macros will shift slightly. Still, for an item that involves zero actual baking and tastes like heaven, I think those numbers are pretty easy to manage!
Share Your Oreo Cake Pops Creations
Now that you have a big batch of the easiest, most delicious Homemade Desserts ready to go, I really want to see what you’ve made! Did you stick to the classic white chocolate look, or did you branch out with fun colors and sprinkles?
I love hearing how these simple recipes work for your events. Did they disappear instantly at your party? Were they a lifesaver when you needed quick Easy Treats?
Please hop down to the comments below and leave a star rating—it means the world to me and helps other bakers know this recipe is a keeper! If you snapped a photo of your perfect chocolate shell or your creative stick display, definitely share it. You can always reach out to me directly through my contact page if you have private feedback or need extra help troubleshooting! Happy dipping!

Oreo Cake Pops
Equipment
- Food processor or rolling pin
- Mixing Bowl
- Baking Sheet
- Lollipop sticks
Ingredients
- 450 g Oreo cookies
- 120 g Cream cheese, softened
- 300 g White or milk chocolate, melted For coating
Instructions
- Crush the Oreo cookies into fine crumbs using a food processor or by placing them in a bag and crushing them with a rolling pin.
- Mix the Oreo crumbs with the softened cream cheese until you form a smooth dough.
- Roll the dough into small, uniform balls. Place these balls on a baking sheet and chill them in the refrigerator for 30 minutes.
- Dip the ends of the lollipop sticks into some of the melted chocolate and insert them gently into the chilled Oreo balls.
- Dip each cake pop completely into the remaining melted chocolate, allowing excess chocolate to drip off.
- Place the coated cake pops upright (using a block of styrofoam or a stand) and let the chocolate set completely before you serve them.