Is there anything better than a chilled dessert when the sun is just merciless? Forget turning on that oven—it’s a crime in July! If you need something elegant, creamy, and incredibly quick, I have your answer: these glorious **No-Bake Strawberry Cheesecake Cups**. They are just the perfect combination of buttery crust, smooth filling, and bright fruit.
I actually created these cups during a summer heatwave when baking felt completely impossible. Watching the layers come together in the glass felt oddly calming, and the first chilled bite was pure relief — cool, creamy, and bursting with that perfect strawberry flavor. Seriously, these are my ultimate summer cheesecake dessert go-to now.
They come together so fast, and since they are portioned out individually, cleanup is a dream. Trust me, once you see how easy it is to layer these up, you won’t go back to slicing a whole pie!
Why You Will Love These No-Bake Strawberry Cheesecake Cups
- Instant Gratification: We’re talking 15 minutes of active work for a stunning dessert. No oven required, which means your kitchen stays cool and calm!
- Perfect Portions: Serving is zero fuss! These no bake cheesecake cups are individually portioned, making them ideal for parties, picnics, or just portion control after dinner.
- Creamy Dream Texture: The filling is unbelievably smooth. Since we whip the cream separately and fold it in, you get that luscious, melt-in-your-mouth texture that baked cheesecakes often struggle to achieve without cracking.
- Bright, Fresh Flavor: That tang from the cream cheese combined with the immediate burst of fresh strawberries on top just screams summer elegance.
- Make-Ahead Marvel: These improve overnight in the fridge, which is a huge bonus when you’re planning ahead for a gathering.
- Foolproof Success: Honestly, if you can mix ingredients, you can nail this recipe. It is nearly impossible to mess up these mini cheesecake cups!
Seriously, once you try this simple method for your next easy strawberry dessert, these will become your new favorite way to end a meal.
Essential Equipment for Your No-Bake Strawberry Cheesecake Cups
The amazing thing about these no bake cheesecake cups is that you don’t need much fancy gear at all! Since we are skipping the oven entirely, we wave goodbye to springform pans and water baths. Yay!
However, the success of that fluffy filling relies heavily on getting the cream whipped up just right. So, my number one essential piece of equipment here is a good electric mixer—handheld or stand mixer, doesn’t matter, as long as it’s sturdy!
You’ll need a couple of mixing bowls, of course, to keep your crust base separate from your creamy filling. And finally, you need the vessels themselves! We are aiming for four perfect servings, so grab four small, sturdy cups for assembly.
Tips for Choosing the Right Dessert Cups
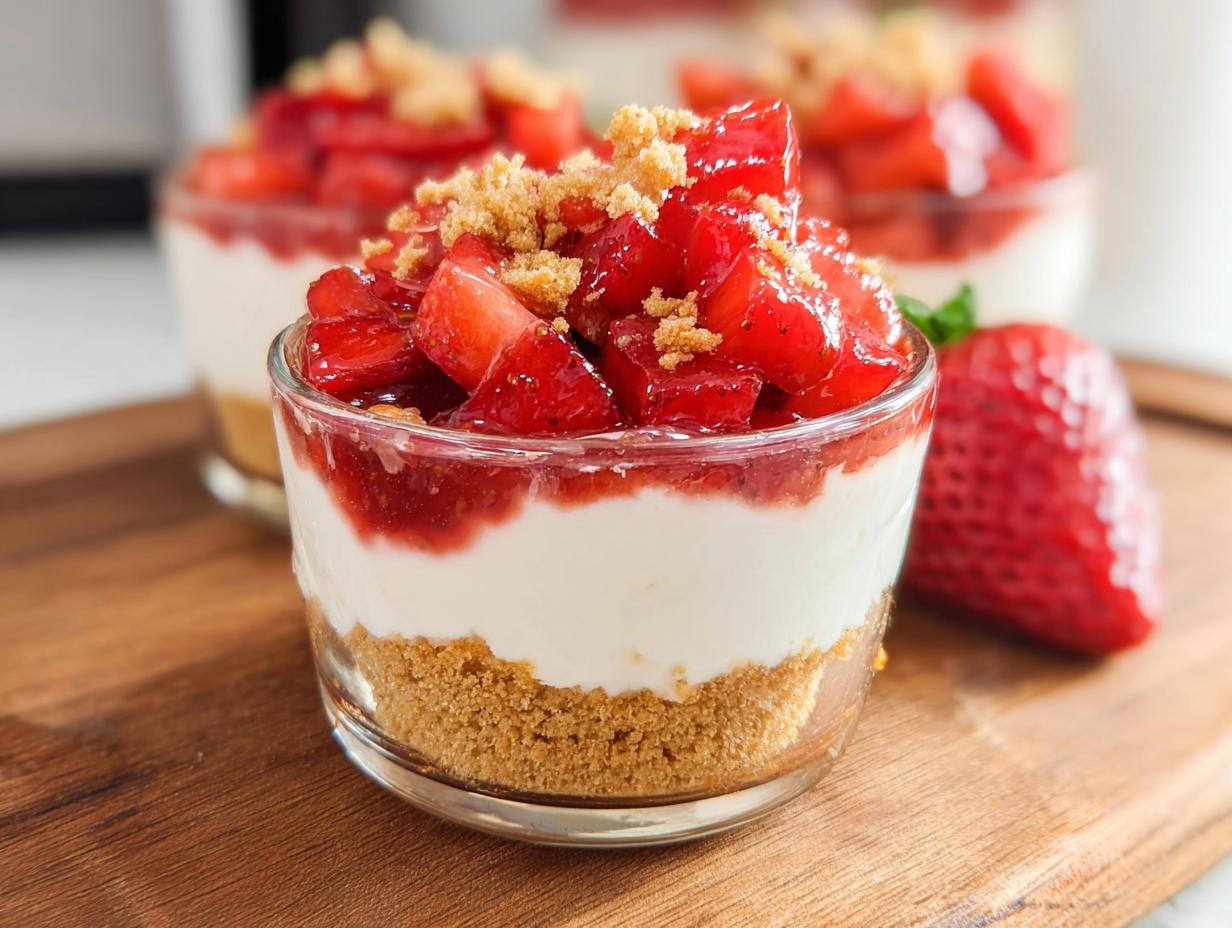
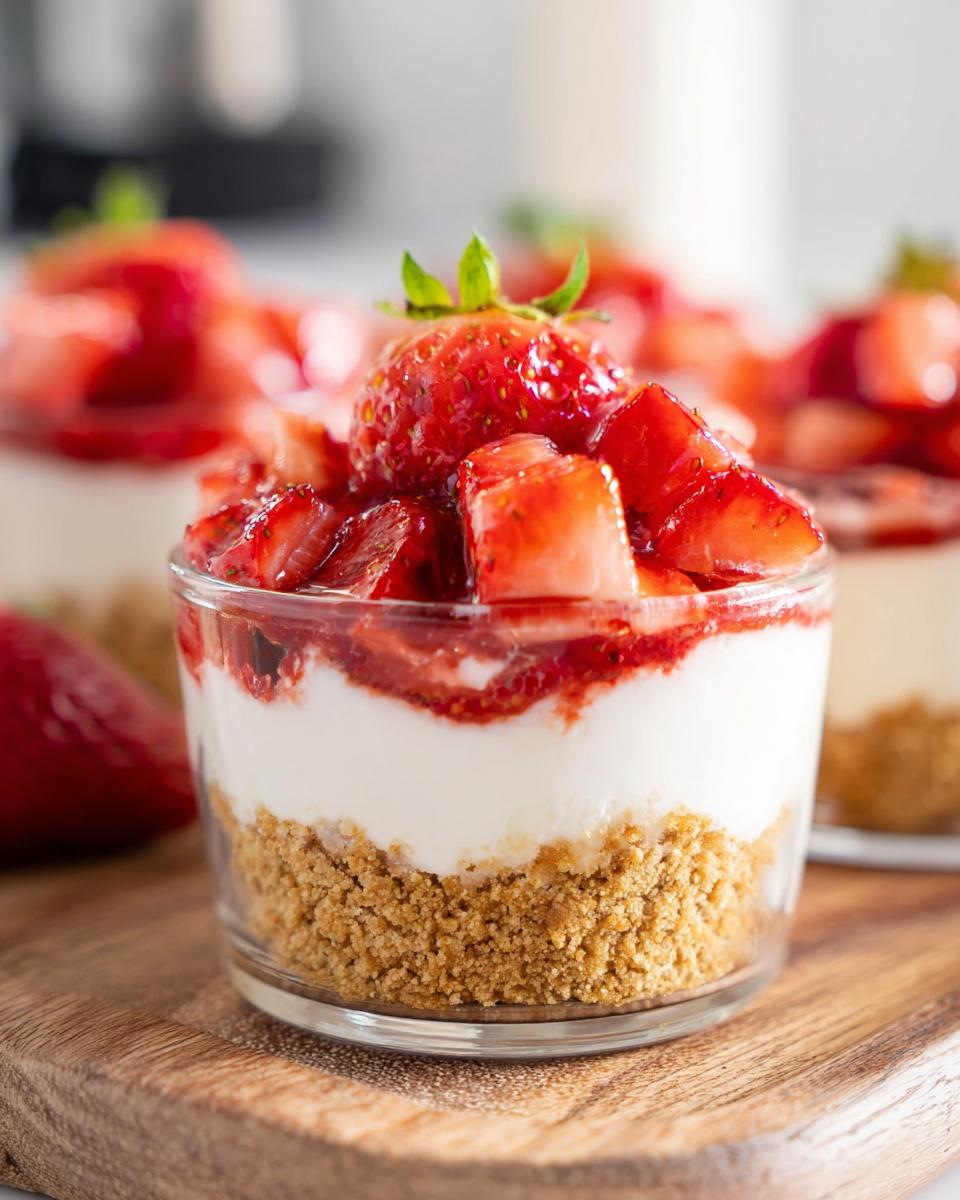
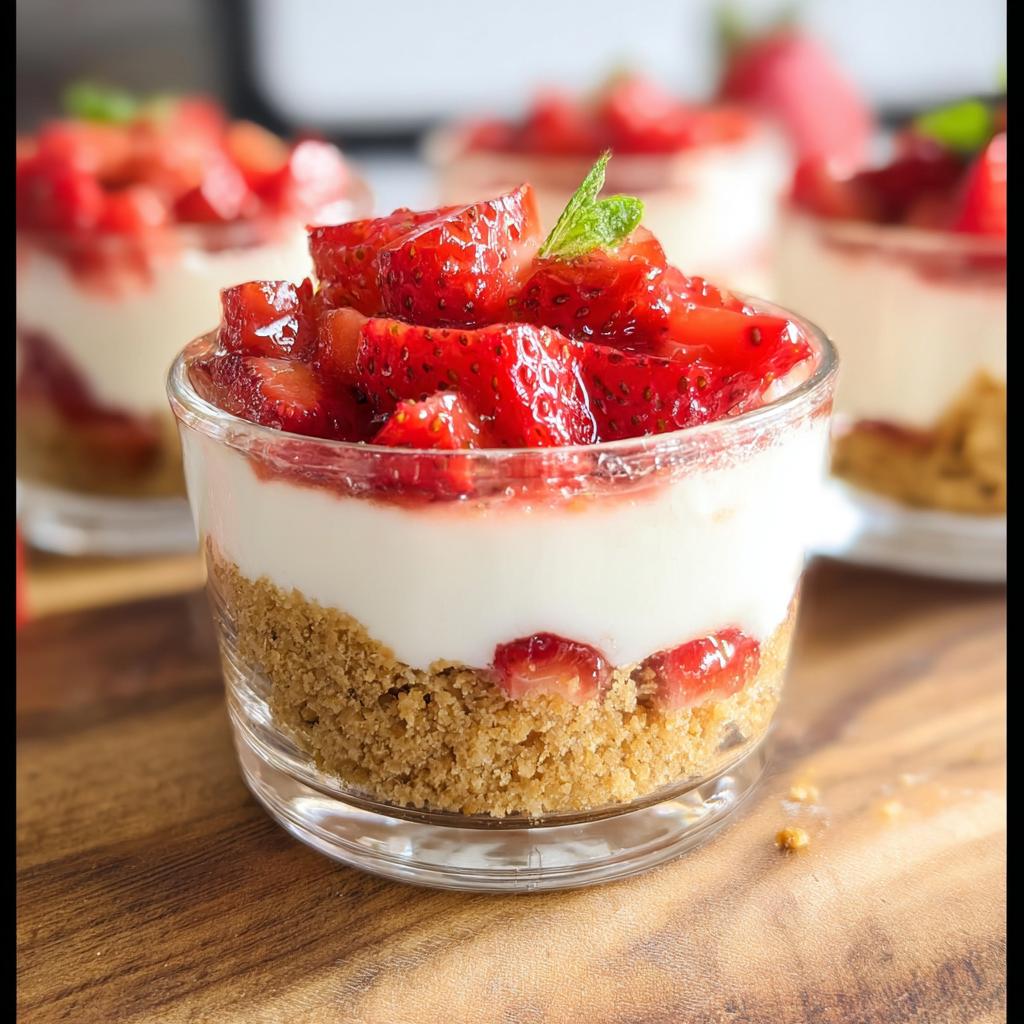
Presentation really makes these little treats shine for any easy strawberry dessert setting. I love using small, clear glass jars or simple lowball glasses. Glass lets you see those beautiful layers—the dark crust, the creamy white filling, and the bright red strawberries!
Make sure whatever you choose holds about 6 to 8 ounces. If your containers are too shallow, you won’t get enough height for a decent filling layer. Just make sure the rim is manageable for spooning in the layers!
Ingredients for Perfect No-Bake Strawberry Cheesecake Cups
Okay, now we get to the fun part—gathering our supplies! Because this recipe is so simple, the quality of your ingredients really shows through. Remember, we are making four gorgeous cups. Don’t fret about exact measurements; aiming for these quantities ensures success every time for your no bake cheesecake cups.
Here is what you need, broken down by layer. If you’re ever curious about how to choose pantry staples, I wrote a little something about salt varieties that might interest you, like knowing when to use kosher salt versus sea salt—it matters even when you aren’t baking with heat! I highly recommend reading up on choosing the right salt for your kitchen!
For the Crust
- 120 g graham crackers, crushed
- 40 g melted butter
For the Cheesecake Filling
- 225 g cream cheese, softened
- 120 ml cold heavy cream
- 80 g powdered sugar
- 1 tsp vanilla extract
For the Topping
- 180 g fresh strawberries, diced
Ingredient Notes and Substitutions for No-Bake Strawberry Cheesecake Cups
A few quick notes here, because skipping these details is where no-bake desserts can sometimes go sideways. First and most importantly: your heavy cream must be cold. Like, refrigerator-cold. If it’s even slightly lukewarm, it won’t whip up into those magnificent stiff peaks we need for the airy texture in our mini cheesecake cups.
For the cream cheese, yep, it needs to be fully softened. If it’s too cold, it will leave lumps in your filling, and that’s just sad. If you’re out of graham crackers, you can substitute them with finely crushed vanilla wafers or even shortbread cookies for a slightly different, buttery base!
If you wanted to get super fancy, you could swap about half the cream cheese for mascarpone cheese. It gives a slightly richer, sometimes tangier result, but stick to the recipe the first time around—it’s tried and true!
Step-by-Step Instructions for No-Bake Strawberry Cheesecake Cups
Okay, let’s get these layered! Since we’re not baking, the process is quick, but paying attention to the steps ensures that gorgeous, stable texture that makes these mini cheesecake cups so irresistible. You want them neat and tidy for serving, right?
If you are looking for other no-bake treats, you absolutely must check out my recipe for no-bake lemon cheesecake cups—it uses a similar technique but with a bright citrus twist!
Making the Graham Cracker Crust Base
First thing: combine your crushed graham crackers and the melted butter right in a small bowl. Stir it until everything looks like wet sand. We need this base to hold up so your little cups don’t crumble when you dig in!
Take that mixture and press it firmly into the bottom of each dessert cup. Use the back of a small spoon or the bottom of a shot glass to really pack it down tight. Set those aside while you tackle the star of the show.

Preparing the Creamy Cheesecake Filling
First up is the base layer for the filling. Get your softened cream cheese, powdered sugar, and vanilla extract into your mixing bowl. Beat this until it is perfectly smooth—absolutely no lumps allowed! You want it fluffy, like soft fluff.
Next, in a separate, clean bowl, whisk that heavy cream until it forms stiff peaks. This is a crucial step that really gives these desserts their lift. Now, take your whipped cream and gently, gently, fold it into the cream cheese mixture. Use a spatula and cut down the middle, then sweep up the side. We are folding in air, so don’t overmix, or you’ll deflate all that lovely volume!
Assembling and Chilling Your No-Bake Strawberry Cheesecake Cups
Time to layer! Spoon that luscious cheesecake filling evenly over the crust layer in all four cups. Try to keep the sides of the cup clean for the best look.
Next, take your diced fresh strawberries and gently distribute them over the top of the filling. Don’t press them down; let them sit right on top!

Now for the hardest part: waiting. You need to refrigerate these for at least two hours. This chilling time isn’t optional! It allows the filling to firm up completely. If you try to eat them too soon, they’ll just be sweet cream soup. For the best results, check out this great guide on no-bake cheesecake techniques if you have any questions about setting time!
Tips for Success: Perfecting Your Strawberry Cheesecake Jar
Even though these are easy strawbery dessert cups, a few little tricks can take them from good to absolutely show-stopping perfection! Since this is a no-bake recipe, success hinges on the temperature and handling of just two ingredients: the cream cheese and the heavy cream. Get these right and you are golden!
My first tip is all about that temperature control. Make absolutely sure your cream cheese is at room temperature—I mean fully soft. You should be able to press your finger into it easily. If it’s cold, you’ll get small, annoying lumps, and nobody wants chunky no bake cheesecake cups!
Secondly, use the coldest heavy cream you can get your hands on for whipping. I keep my carton right at the back of the fridge and sometimes even chill my mixing bowl and whisk attachments in the freezer for ten minutes prior. That chill factor is what allows the cream to whip up fast and hold those beautiful stiff peaks we need for lightness in your strawberry cheesecake jar.
For presentation, avoid over-mashing the strawberry topping when you place it on top. You want distinct, bright chunks of fruit against the smooth white filling. If you want to see more about keeping things light in desserts, check out my recipe for strawberry mousse; it shares a similar philosophy on gentle folding!
Lastly, if you are using glass jars or clear cups, wipe down the inside walls of your cup with a clean, dry paper towel right after you fill it but before chilling. This removes any smears or smudges from the filling process, ensuring crisp, clean layers once they set. If you want to dig deep into general tips for no-bake settings, Joy of Baking has great general guides!
Storage and Serving Suggestions for Your Easy Strawberry Dessert
So you’ve made these fantastic No-Bake Strawberry Cheesecake Cups, and maybe—just maybe—you didn’t eat all four servings right away? Good for you! These hold up beautifully, which is part of what makes them such a stress-free winner.
The most important thing to remember for storage is that because we skipped the baking step, everything stays ultra-creamy. You’ll want to cover your cups tightly before putting them in the fridge. Plastic wrap pressed gently over the top of the cup, or if you used jars, their lids, works perfectly.
They are honestly best served fully chilled. If you let them sit out on the counter for 15 minutes, the filling might get a touch too soft, especially if your kitchen is warm. For that perfect, cool bite, pull them straight from the fridge when you plan to serve them.
If you are looking for ideas on how to present them slightly differently later in the week, maybe try layering them again! I have a fun recipe for no-bake strawberry cheesecake parfaits that uses this exact filling but in a taller vessel, which looks super chic!
Now, let’s talk garnishes for that final presentation touch. The diced strawberries are the classic topping, but if you want to dress them up just a bit more before serving, try these simple additions:
- A Hint of Green: A tiny, fresh mint sprig placed right in the center adds such a beautiful pop of color against the pink and white.
- Extra Crunch: A light dusting of reserved graham cracker crumbs sprinkled over the strawberries gives a nice texture contrast.
- Drizzle Delight: If you feel like making an extra five-second topping, mix a teaspoon of honey into a tablespoon of pureed strawberry and drizzle that over the top right before serving. Yum!
These cups will keep reliably in the fridge for about three days. After that, the fresh strawberries might start looking a little sad, but the filling itself stays amazing!
Frequently Asked Questions About No-Bake Strawberry Cheesecake Cups
I know when I’m whipped after a long week, I have a million questions before I even start mixing! These are the things that pop up most often when people try this recipe for the first time, especially concerning substitutions and timing. I’ve gathered the most common ones right here for you!
If you’re looking for even more inspiration for quick fixes, check out my general roundup of trend dessert recipes—we all need easy wins sometimes!
Can I make these No-Bake Cheesecake Cups ahead of time?
Absolutely, yes! I usually make them the day before I plan to serve them because the chilling time is mandatory anyway. They hold up perfectly for up to two days in the fridge. Just make sure they are covered tightly so they don’t absorb any weird fridge smells.
If you add the strawberry topping right before you chill them, they look freshest. But honestly, even with the topping on, they are marvelous the next day.
Are there dietary alternatives for these mini cheesecake cups?
That’s a great question, especially since people have all sorts of needs these days! Yes, you can definitely tweak this easy strawberry dessert. For a gluten-free version, swap out the graham crackers entirely and use gluten-free chocolate chip cookies or some plain vanilla wafers for the crust base instead.
If you are watching sugar, you can substitute the powdered sugar with a good quality zero-calorie baking sweetener that measures cup-for-cup like sugar. Keep in mind that eliminating the sugar slightly changes the texture because the sugar helps stabilize the filling, but it still tastes delicious!
What is the best way to keep the strawberry topping fresh?
Fresh fruit is always tricky in make-ahead desserts, right? If you are prepping these cups the morning of your party, go ahead and dice the strawberries and put the filling layers on. Then, just before guests arrive—like 30 minutes before—put the strawberries on top. This keeps them looking bright and jewel-toned.
If you absolutely have to put the topping on earlier, toss your diced strawberries with just a tiny squeeze of fresh lemon juice—maybe half a teaspoon for that amount of fruit. That acidity acts like a simple preservative and keeps them from looking dull and oxidized. It’s a trick I learned years ago for fruit molds!

Nutritional Information Estimate
Now, I know what you’re thinking. Since these are so incredibly creamy and decadent tasting, surely they must pack a massive calorie punch? While they are definitely a treat—it is cheesecake, after all!—they come out fairly reasonable because we skipped the heavy bake step and used fresh fruit instead of a heavy sauce.
Here is my best estimate for the nutritional rundown for one of these lovely No-Bake Strawberry Cheesecake Cups (based on 4 servings, using standard supermarket ingredients). Remember that if you use different brands of cream cheese or butter, these numbers will shift a little bit!
I always tell people to view this as a guide, not a strict law, because the passion of baking and eating is more important than the exact count! Any good recipe source will include a disclaimer like this one.
- Calories: Approximately 380-410 per cup
- Total Fat: Around 24g
- Protein: About 5g
- Carbohydrates: Roughly 35g
This estimate uses the full amount of butter in the crust and full-fat cream cheese and cream. If you were looking to lighten this up further, you could try using low-fat cream cheese or even a whipped topping substitute for the heavy cream, but honestly, you’d lose that true, rich cheesecake mouthfeel we are aiming for here in these beautiful mini cheesecake cups.
Share Your Summer Cheesecake Dessert Creations
That’s it! You have officially mastered the quickest, coolest, and most satisfying easy strawberry dessert of the season. I hope making these No-Bake Strawberry Cheesecake Cups brought you as much simple joy as it brings me every time I whip them up.
But the fun isn’t over when you put the spoon down! I absolutely live to see your creations—it makes my day when I see photos of my recipes showing up in your kitchens. When you make these, please take a quick snap of your perfectly layered summer cheesecake dessert!
If you loved this recipe, show the love! Head over to the rating section right below this and give these cups a shining 5-star rating. It really helps other readers find this recipe, and honestly, bragging rights are nice too, right?
Did you try any fun toppings? Did you use a different cookie in the crust? Tell me everything in the comments section below! I read every single one and I love hearing about your little tweaks. And if you want more delicious, effortless strawberry inspiration, you can find tons more ideas over in my strawberry recipes archive. Happy chilling!
No-Bake Strawberry Cheesecake Cups
Equipment
- Mixing Bowls
- Electric mixer
- Dessert cups
Ingredients
For the Crust
- 120 g graham crackers, crushed
- 40 g melted butter
For the Cheesecake Filling
- 225 g cream cheese, softened
- 120 ml cold heavy cream
- 80 g powdered sugar
- 1 tsp vanilla extract
For the Topping
- 180 g fresh strawberries, diced
Instructions
- Mix crushed graham crackers with melted butter. Press this mixture into the bottom of your dessert cups to form the crust.
- Beat the softened cream cheese, powdered sugar, and vanilla extract together until the mixture is smooth.
- Whip the cold heavy cream until stiff peaks form. Fold the whipped cream gently into the cream cheese mixture.
- Spoon the cheesecake filling over the crust layer in each cup. Top the filling with the diced fresh strawberries.
- Refrigerate the cups for at least 2 hours before you serve them.