If there’s one treat I can’t resist making every Halloween, it’s Mummy Brownies. These fudgy, chocolatey bars wrapped in sweet white “bandages” and topped with candy eyes are not just delicious—they’re downright adorable. In this post, you’ll learn how to make these brownies step by step, decorate them like spooky-cute mummies, and even get tips for making them kid-friendly or party-perfect. Whether you’re baking for your kids, a classroom party, or just to treat yourself, these brownies bring smiles every time. And the best part? They’re as fun to decorate as they are to eat!
Table of Contents
Table of Contents
The Spooky Sweet Story Behind My Mummy Brownies
Every October, my kitchen turns into a mini Halloween workshop. There’s something magical about baking during this season—the crisp air, cozy spices, and playful themes. One of the most joyful traditions I have with my grandkids is making Mummy Brownies together. It started a few years ago when I wanted a no-fuss, festive dessert for our Halloween movie night. I had a pan of brownies ready, a piping bag filled with melted white chocolate, and a packet of candy eyeballs sitting in the pantry. Ten minutes later, we had the cutest mummy faces staring back at us from the plate!
These brownies are simple, kid-approved, and bring out everyone’s creative side. The best part? You don’t need fancy decorating skills to pull them off. Just a drizzle here and there, a couple of candy eyes, and boom—you’ve got the perfect Halloween treat that looks like it came straight out of a spooky bakery window.
Making Mummy Brownies also brings back memories of my mom’s Halloween traditions. She always made holidays feel special with themed treats, and now I get to pass that on. If you’re looking for more fun Halloween ideas, you’ll love my Halloween Ghost Brownies and Pumpkin Patch Dirt Cups too—they’re just as easy and festive.
Oh, and if you’re collecting ideas for your Halloween baking board, don’t forget to pin this one! I’m always sharing fun seasonal recipes over on Pinterest, where you’ll find even more holiday inspiration.
How to Make Mummy Brownies at Home
Start With Fudgy, Rich Brownies as Your Base
To make the best Mummy Brownies, it all starts with the perfect brownie foundation. The goal is rich, fudgy texture—not too cakey, not too underbaked. You can use your favorite homemade recipe or a boxed mix. If you’re short on time, box mixes still give you that chewy texture that holds up well for decorating.
Bake the brownies in a 9×13-inch pan and let them cool completely before cutting. This step is crucial because decorating warm brownies can turn into a sticky mess. I usually prepare the brownies the night before and decorate the next morning with the kids—it turns into a sweet family tradition.
Cut the cooled brownies into 12 even squares. The thicker, the better, since a firm brownie makes it easier to apply the “bandages” without crumbling. This also gives you a nice surface for placing candy eyes and creating mummy faces.
Looking for more Halloween dessert inspiration? You’ll love my Halloween Ghost Brownies and Pumpkin Patch Dirt Cups—both are crowd-pleasing, spooky treats that pair perfectly with these mummy brownies.
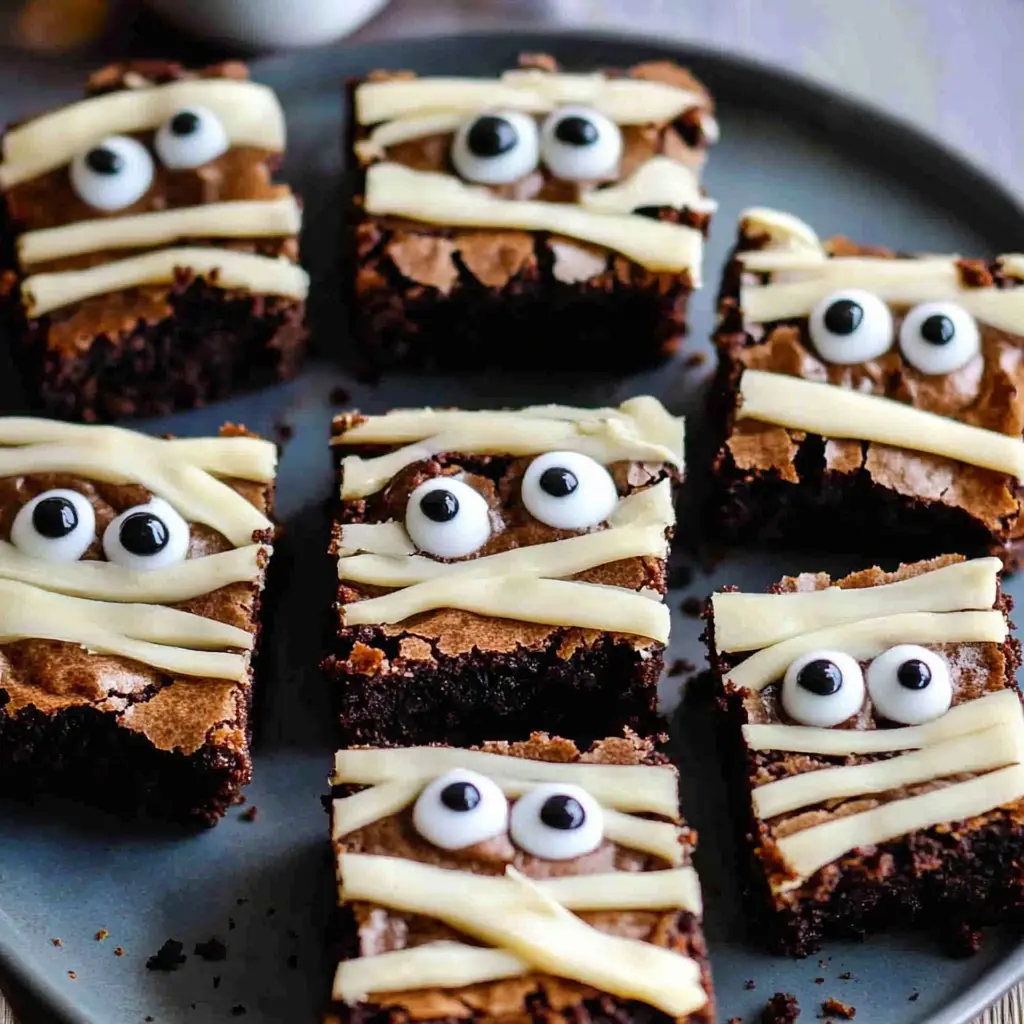
Decorate With Candy Eyes and White Chocolate Bandages
Now for the best part: decorating your Mummy Brownies! Here’s how to give them that iconic mummy look in just a few simple steps:
- Melt about 1 cup (175 g) of white chocolate chips or candy melts.
- Pour the melted chocolate into a piping bag or a small zip-top bag and snip off a tiny corner.
- Drizzle back and forth across each brownie to create mummy-style bandages.
- While the chocolate is still soft, press two candy eyes into the center of each brownie.
Don’t worry about perfect lines. These mummies are meant to look spooky and playful. In fact, the uneven, criss-crossing lines are what give them personality. You’ll end up with brownies that are both adorable and absolutely delicious.
For more creative Halloween baking projects, I also recommend trying my Monster Marshmallow Pops—they’re just as fun and kid-friendly!
You can also find more spooky sweet ideas on my Pinterest, where I share my favorite holiday-themed desserts.

Tips for Serving and Storing Mummy Brownies
How to Present Mummy Brownies for Parties and Events
When it comes to Halloween parties, themed desserts like Mummy Brownies always steal the show. Their spooky appearance and rich chocolate taste make them an instant favorite at school events, bake sales, and family gatherings. The key is presentation. Place them on a black or orange platter, scatter a few candy eyeballs around, and you’ve got a dessert table centerpiece that guests won’t stop talking about.
If you’re hosting a kids’ party, consider wrapping individual brownies in cellophane bags tied with Halloween-themed ribbon. Not only does it keep things hygienic, but it also makes them perfect for party favors. Add a tag that says “Thanks for creeping by!” for an extra festive touch.
For more fun Halloween baking, check out my Halloween Ghost Brownies, which pair wonderfully with these mummies. Together, they create a spooky lineup that both kids and adults adore.
You can even get creative by arranging your Mummy Brownies with other themed treats like witch hat cookies or ghost cupcakes. A dessert board loaded with Halloween goodies is always a hit—and these brownies make a great anchor for the spread.
Best Storage Tips to Keep Brownies Fresh and Delicious
Storing your mummy brownies properly ensures they stay soft and delicious for days. Once the white chocolate bandages are fully set, transfer the brownies to an airtight container. They’ll stay fresh at room temperature for up to 4 days. If you need to keep them longer, refrigerate them for up to a week or freeze for up to a month.
Here’s a helpful storage breakdown:
| Storage Method | Shelf Life |
|---|---|
| Room Temperature (Airtight) | Up to 4 days |
| Refrigerated | Up to 1 week |
| Frozen (Individually Wrapped) | Up to 1 month |
To thaw frozen brownies, just let them sit at room temperature for 30–45 minutes. Avoid microwaving them, especially with the white chocolate on top, as it may melt unevenly or become discolored.
Creative Variations and Allergy-Friendly Mummy Brownies
Make Mummy Brownies Your Own With Fun Flavor Twists
While the classic chocolate base is always a winner, there’s no rule saying you can’t put your own spin on Mummy Brownies. In fact, customizing the flavor is one of the best ways to make them uniquely yours. Here are a few fun ways to switch things up:
- Peanut Butter Mummy Brownies: Swirl peanut butter into the batter before baking for a sweet and salty twist.
- Mint Chocolate Mummies: Add peppermint extract to the batter and use green-tinted white chocolate for a haunting glow.
- Red Velvet Mummy Brownies: For a more dramatic look, try using red velvet brownie mix and white chocolate bandages for high contrast.
You can also play around with toppings like crushed cookies, colored sprinkles, or even candy fangs. Just remember to keep the candy eyes in place—those little guys are what really sell the mummy effect!
If you love creative dessert ideas with fun designs, you’ll also enjoy my Pumpkin Patch Dirt Cups—another Halloween favorite that’s simple, sweet, and a total crowd-pleaser.
Allergy-Friendly Options for Everyone to Enjoy
Want to make Mummy Brownies safe for everyone at your party? It’s easier than you might think to adjust the recipe for common dietary needs without sacrificing taste or style. Here’s how to adapt the brownies:
- Gluten-Free: Use a certified gluten-free brownie mix or your favorite homemade version with almond flour or a gluten-free blend.
- Dairy-Free: Choose a dairy-free brownie mix or substitute plant-based butter and milk. Use dairy-free white chocolate for decorating.
- Nut-Free: Most standard brownie recipes are nut-free, but double-check all your ingredients and candy labels for safety.
For vegan versions, simply use egg replacers like flax eggs and check that your chocolate and eyes are vegan-approved. Many brands now offer allergen-friendly baking products, so you can easily find swaps that suit your needs.
Creating inclusive treats means everyone gets to be part of the fun. Whether you’re baking for a classroom, a party, or your own allergy-sensitive family members, these adaptable Mummy Brownies will deliver festive vibes without worry.
Before we wrap up, let’s tackle some commonly asked questions readers often have when making mummy brownies from scratch.
Frequently Asked Questions About Mummy Brownies
How do you keep candy eyes from falling off Mummy Brownies?
To make sure the candy eyes stick, press them gently into the melted white chocolate drizzle while it’s still warm. Once the chocolate cools and hardens, the eyes stay securely in place.
Can I use a boxed brownie mix for Mummy Brownies?
Yes, absolutely! Boxed mixes work wonderfully and save time. Just make sure the brownies are fudgy and fully cooled before decorating.
What kind of white chocolate should I use for mummy bandages?
Use white chocolate chips, candy melts, or almond bark. All melt smoothly and are easy to pipe. Avoid regular white baking bars as they can be harder to control once melted.
Can I make Mummy Brownies ahead of time?
Definitely. You can bake the brownies a day or two ahead and store them in an airtight container. Decorate them the night before serving for best results.
Conclusion: The Perfect Halloween Treat That’s Scary Cute
Mummy Brownies are everything you want in a Halloween dessert—easy, fun, delicious, and adorable. Whether you’re baking with your kids, prepping for a spooky school party, or just want a creative treat for yourself, these brownies always bring smiles. With only a few ingredients and minimal effort, you’ll have a tray full of sweet, bandaged treats that are impossible to resist.
From rich fudgy centers to their playful mummy wraps, they’re a seasonal staple in my kitchen. And I hope they become a favorite in yours too. Don’t forget to share your creations or save this recipe to your Halloween board over on Pinterest.
Happy Halloween and happy baking!
Mummy Brownies
Ingredients
Main Ingredients
- 1 box brownie mix or homemade brownies
- 2 large eggs
- 120 ml vegetable oil
- 60 ml water
- 175 g white chocolate chips or candy melts
- 24 candy eyes
Instructions
- 1. Prepare the brownie mix according to package instructions or homemade recipe.
- 2. Bake in a 9×13-inch pan and allow to cool completely.
- 3. Cut brownies into 12 squares.
- 4. Melt white chocolate chips until smooth.
- 5. Drizzle white chocolate over brownies in zig-zag patterns to mimic bandages.
- 6. Place 2 candy eyes on each brownie while chocolate is still soft.
- 7. Allow chocolate to set before serving.