Nothing says Christmas like a platter of festive treats, and these Mini Christmas Brownie Bites are my absolute favorite way to spread holiday cheer. I still remember the first time I whipped up a batch—it was during one of those chaotic December afternoons when I needed a last-minute dessert for our neighborhood cookie exchange. I wanted something that looked impressive but wouldn’t keep me in the kitchen all day. That’s when these little gems saved the day! They’re rich, chocolatey, and so darn cute with their Santa hats, elf hats, and Rudolph faces. Best part? You can use store-bought brownies if you’re short on time (no judgment here!). Now they’re a staple at all our holiday gatherings—the kids go wild for the candy decorations, and adults secretly sneak seconds when no one’s looking.
Why You’ll Love These Mini Christmas Brownie Bites
Oh my goodness, where do I even start? These little brownie bites are my secret weapon for holiday entertaining. First off, they’re ridiculously easy—we’re talking 20 minutes from start to finish if you use store-bought brownies (which I totally do when I’m in a pinch). But here’s why they’re absolutely magical:
- Festive AF: Those cute Santa hats? Adorable elf toppers? Rudolph’s goofy face? Instant holiday cheer on a platter.
- Kid-approved: My nieces and nephews go nuts decorating these—it’s like an edible craft project!
- Perfect portion control: No awkward cake slicing—just grab and go (though good luck stopping at just one).
- Customizable: Swap out toppings based on what you’ve got—leftover candy canes? Perfect! Extra sprinkles? Yes please!
They’re basically the holiday version of my Halloween ghost brownies—same easy concept, just dressed up for Christmas. Trust me, these will disappear faster than you can say “ho ho ho!”
Ingredients for Mini Christmas Brownie Bites
Okay, let’s gather our festive supplies! The beauty of these Mini Christmas Brownie Bites is how simple the ingredient list is—you probably have most of this stuff in your pantry already. I like to divide everything by decoration type so I don’t get overwhelmed. Here’s what you’ll need:
Santa Hat Brownie Bites
- 24 store-bought or homemade brownie bites – Go fudgy, not cakey! The dense texture holds toppings better.
- 24 pointed strawberries, stems cut off – Look for berries with nice tapered ends—they make perfect Santa hat points!
- 1 cup whipped vanilla frosting – The light texture spreads easily without squishing our brownies.
Elf Hat Brownie Bites
- 24 store-bought or homemade brownie bites – Same as above, but hey, no shame in buying two packs!
- 1 cup whipped vanilla frosting – Pro tip: Tint some green with food coloring for extra elf magic.
- 24 Hershey’s Candy Cane Kisses – The striped ones make adorable elf hats. Unwrap them first—trust me, you don’t want to be peeling wrappers mid-decorating.
Rudolph Brownie Bites
- 24 store-bought or homemade brownie bites – See a pattern here? Brownies are the gift that keeps giving.
- 1 cup whipped vanilla frosting – Just enough to stick on those adorable features.
- 48 candy eyeballs – The bigger ones are easier to handle when your hands get sticky.
- 12 mini pretzel twists – Break carefully—you’ll get two antlers per pretzel!
- 24 red M&Ms candies – Rudolph’s shiny nose is non-negotiable. Regular red hots work too in a pinch.
See? Nothing crazy—just simple ingredients that transform into holiday magic. Now let’s get decorating!
Equipment Needed for Mini Christmas Brownie Bites
Don’t worry – you don’t need fancy equipment to make these adorable treats! Here’s what I always grab from my kitchen:
- Resealable baggie or piping bag – A simple Ziploc works great if you don’t have piping bags. Just snip a tiny corner off!
- Decorating tip – I use a basic round tip, but honestly, you can skip this and just cut the bag opening slightly bigger.
- Toothpick – Essential for placing those tiny candy eyeballs without getting frosting everywhere.
- Sharp knife – For clean strawberry cuts and pretzel snapping. A butter knife works in a pinch too.
That’s it! No special gadgets required – just everyday kitchen tools you probably already have. Now let’s get decorating!
How to Make Mini Christmas Brownie Bites
Alright, let’s turn those ingredients into the most adorable holiday treats you’ve ever seen! I’ll walk you through each style step by step – it’s easier than you think, promise. Just grab your frosting bag and let’s get creative. Pro tip: Put on some Christmas music first – it makes the decorating process way more fun!
Santa Hat Brownie Bites
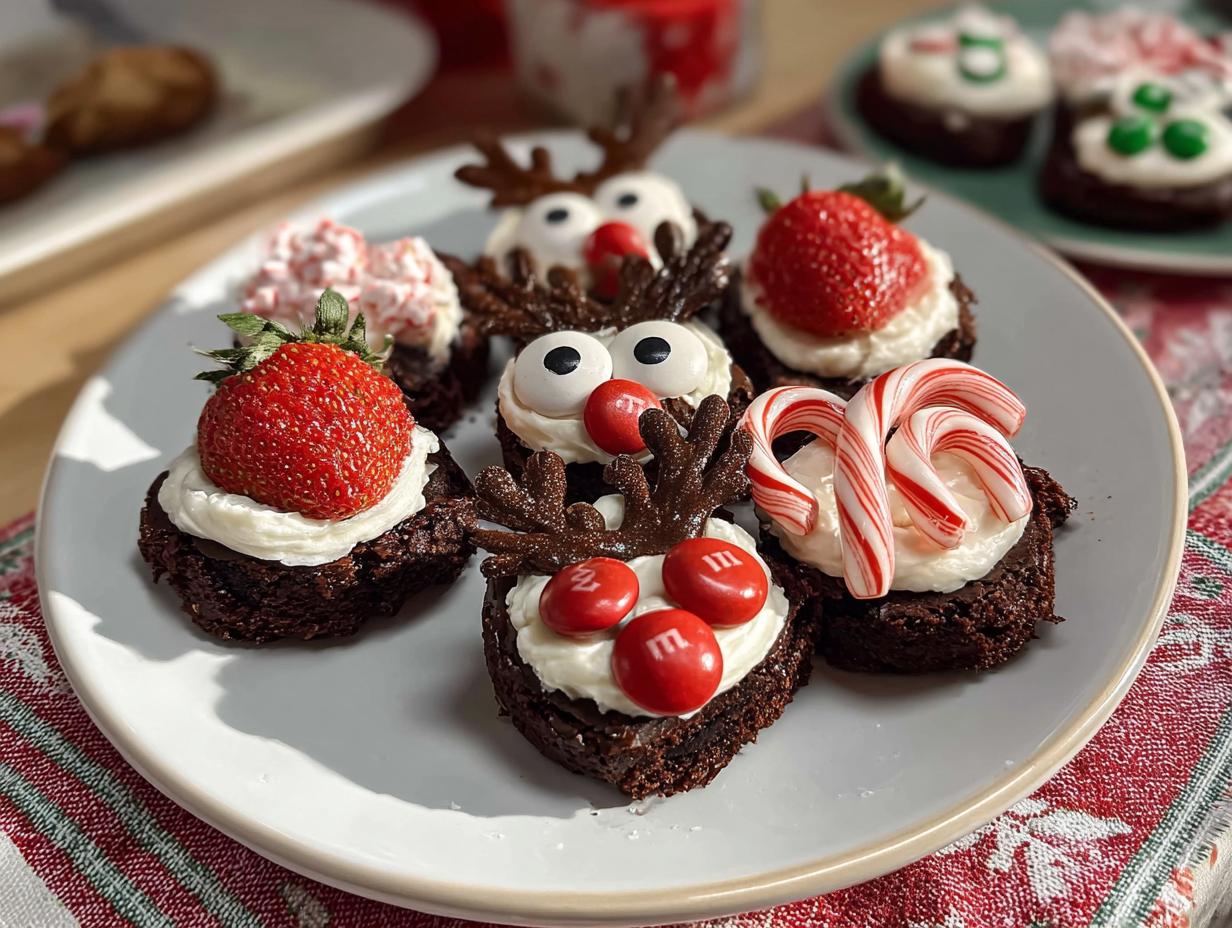
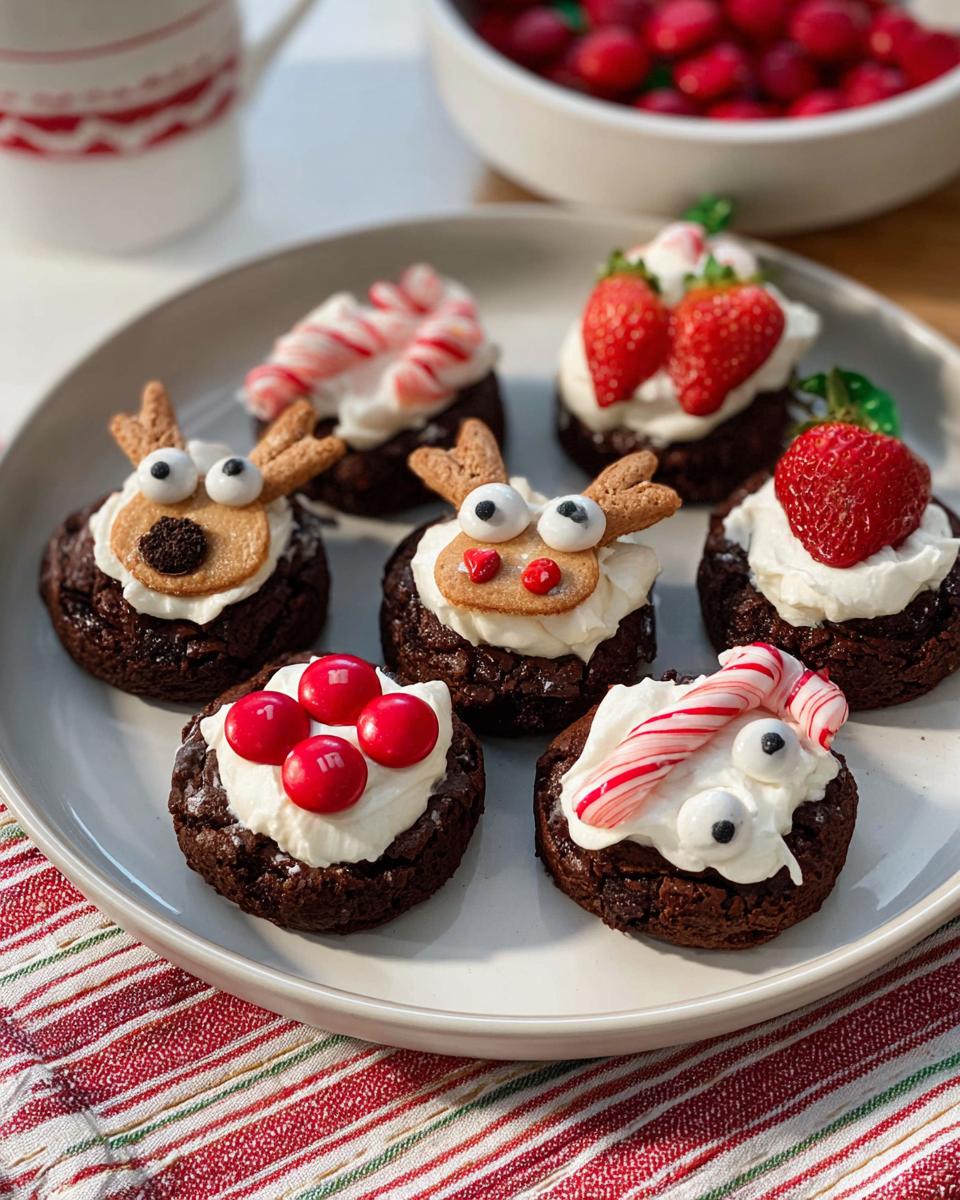
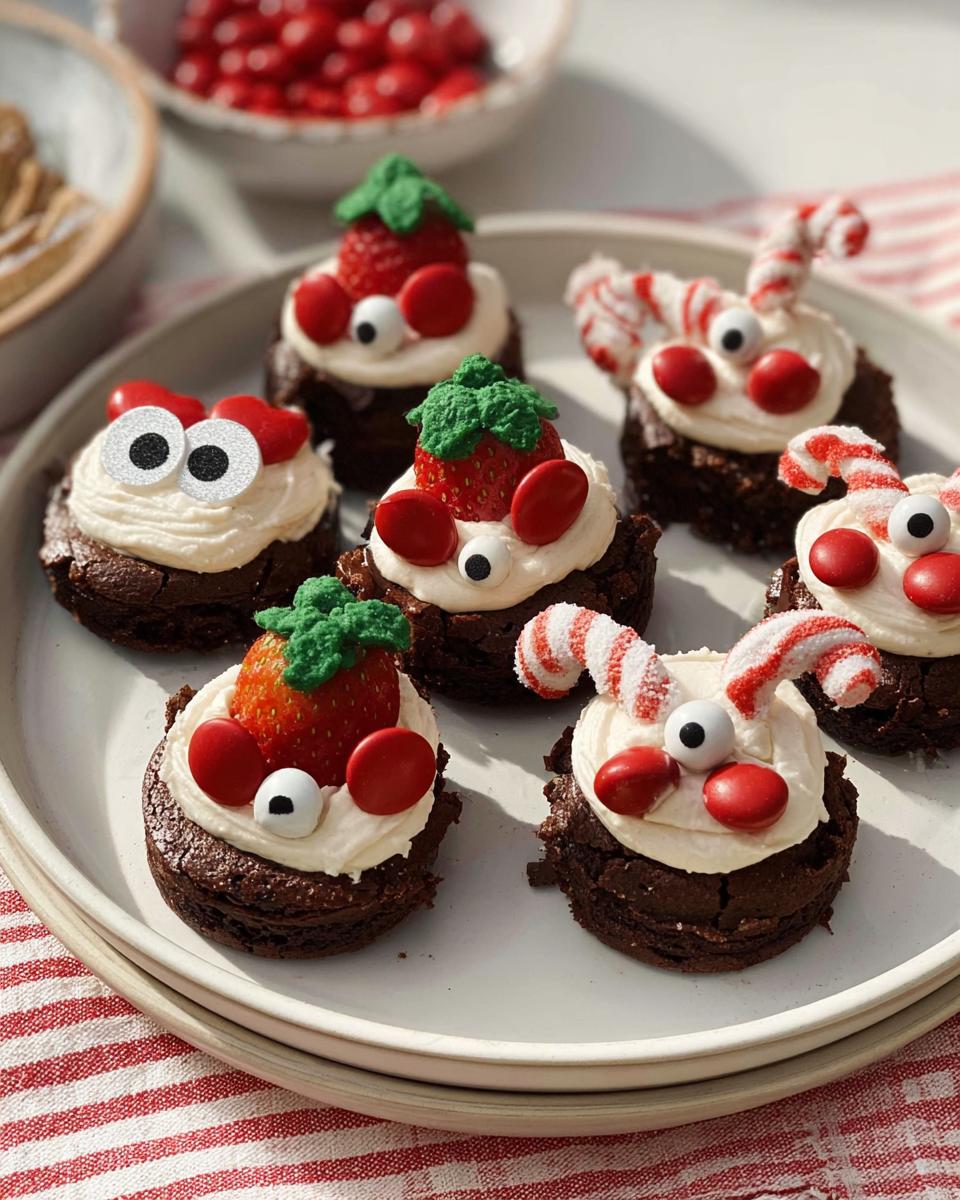
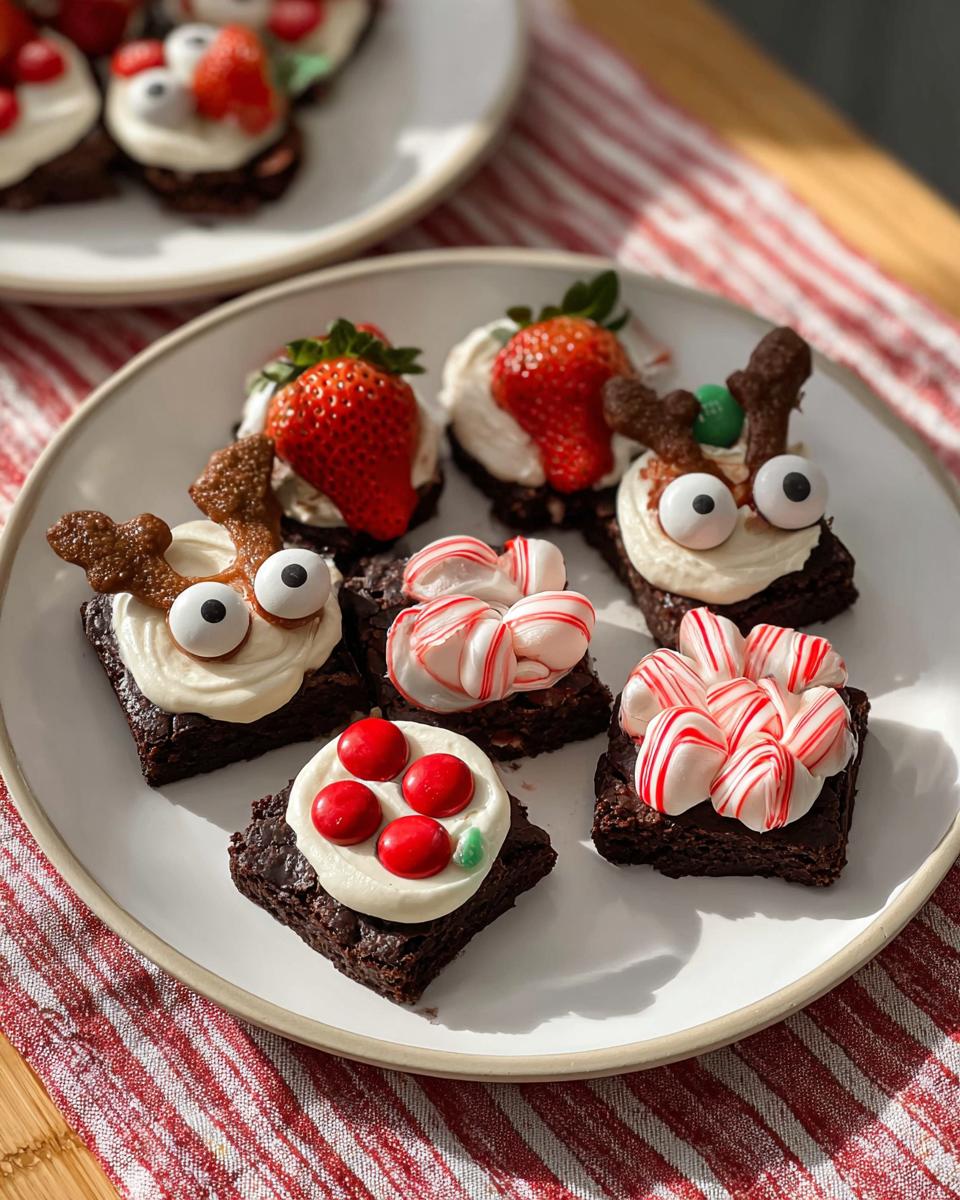
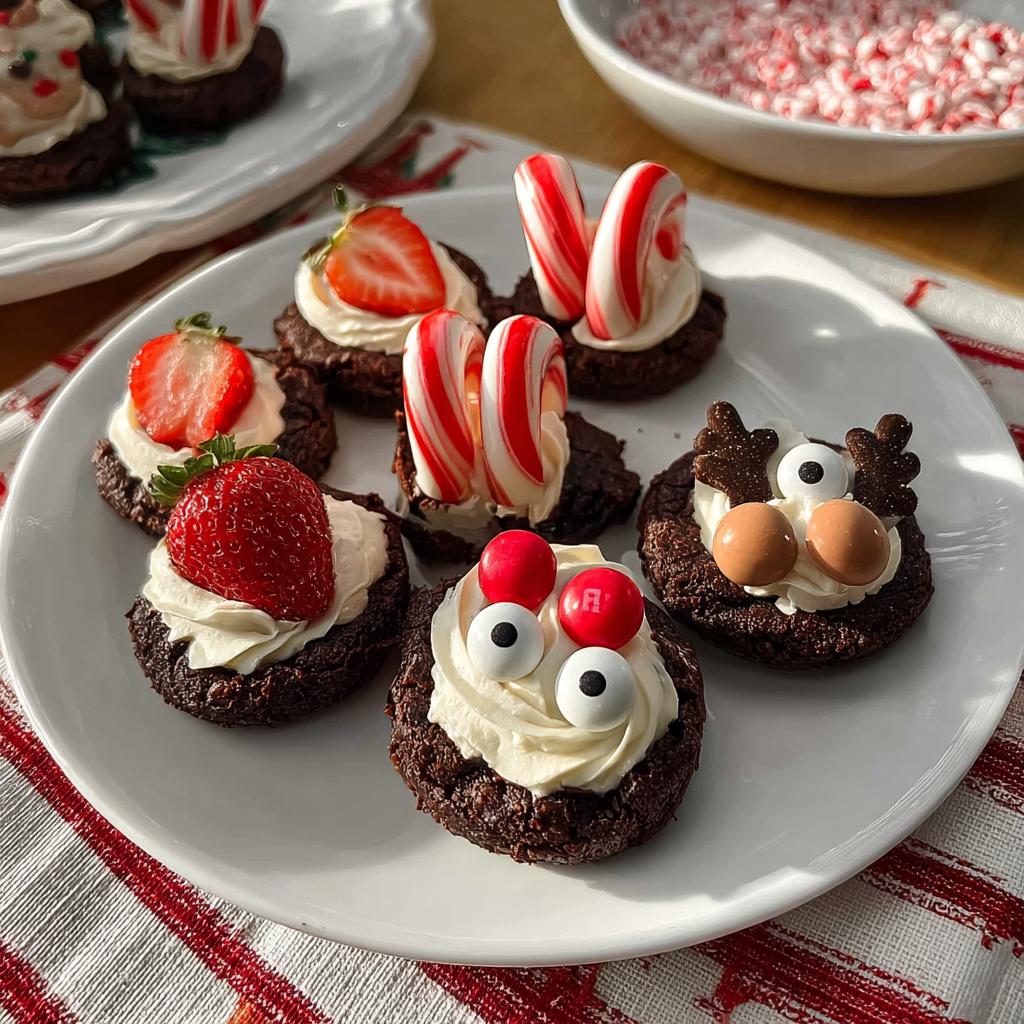
These are my personal favorite – they look so fancy but are crazy simple to make. First, wash and dry your strawberries really well, then slice off the stems so they have a flat base. Now grab your frosting bag (or that trusty Ziploc with the corner snipped off) and pipe a little frosting “glue” onto each brownie bite. Gently press a strawberry on top – pointy end up, of course! Then pipe a fluffy white dollop right on the strawberry tip for Santa’s pom-pom. If your frosting starts getting soft, just pop it in the fridge for 5 minutes. Want them extra snowy? Dust with powdered sugar right before serving!
Elf Hat Brownie Bites
These cheeky little elf hats always get compliments! Start by piping a small frosting circle on each brownie bite – this acts like glue for our hats. Now here’s the trick: unwrap all those Candy Cane Kisses first (trust me, doing it mid-process is messy). Place one kiss diagonally on each frosted brownie so the striped part shows – it should look like a jaunty elf hat! If they keep sliding, let the frosting set for a minute first. Feeling fancy? Add tiny green frosting dots along the base for holly berries. These pair perfectly with my coffee brownies if you’re making a variety platter!
Rudolph Brownie Bites
Kids go wild for these goofy reindeer faces! First, use a toothpick to dab frosting where you want the eyes – this gives you precision control. Gently press two candy eyeballs onto each frosted spot. Now for the antlers: carefully break pretzel twists in half (they’ll naturally split into perfect antler shapes). Push two halves into the top of each brownie at a slight angle. Last step – add a red M&M nose with another tiny frosting dot. Pro tip from Betty Crocker: if your pretzels keep breaking unevenly, use kitchen shears for more control. These always steal the show on my holiday dessert table!
Tips for Perfect Mini Christmas Brownie Bites
After making these adorable treats every holiday season, I’ve picked up some foolproof tricks to make your Mini Christmas Brownie Bites shine. First – work with cold brownies! If they’re too fresh and warm, your toppings will slide right off. I pop store-bought ones in the fridge for 15 minutes first. For decorating, keep a damp paper towel nearby to clean sticky fingers between Rudolph’s eyeball placements. And here’s my secret: assemble them on parchment paper first, then transfer to your serving platter – way less messy! If you’re prepping ahead, store them in an airtight container with wax paper between layers (the frosting stays perfect for 2 days this way). Want them extra festive? Arrange them in the shape of a Christmas tree on your platter – the kids go crazy for it!
Variations for Mini Christmas Brownie Bites
Oh, the fun part – making these treats your own! Once you’ve mastered the basic decorations, try these easy twists to mix things up. Swap the vanilla frosting for cream cheese frosting if you love that tangy contrast with chocolate. Out of strawberries? Use raspberries for Santa hats – they’re smaller but just as cute. For Rudolph, try red Skittles instead of M&Ms if that’s what’s in your candy jar. And here’s my favorite hack: crush up candy canes and sprinkle them over the elf hats for extra crunch and holiday spirit. Gluten-free? Use your favorite GF brownie recipe – the decorations work just the same!
Serving and Storing Mini Christmas Brownie Bites
Okay, let’s talk about showing off these adorable treats! I love arranging them on a tiered dessert stand—it makes them look extra fancy at holiday parties. For a fun twist, group them by character: all the Santas together, elves in another cluster, and Rudolph leading the way at the front. If you’re feeling crafty, sprinkle powdered sugar “snow” around the platter or add some fresh mint leaves for color.
Now, storage is key because we all know holiday baking happens in waves. These keep beautifully in an airtight container at room temperature for 2 days—just layer them with parchment paper so the decorations don’t smush. Need longer? Pop them in the fridge for up to 5 days (let them come to room temp before serving for best texture). Freezing works too! Freeze undecorated brownie bites for up to 3 months, then thaw and decorate when needed. Pro tip: The Santa hats are best assembled the day of serving since strawberries can weep, but the elf and Rudolph versions hold up great overnight!
Nutritional Information for Mini Christmas Brownie Bites
Now, I’ll be honest – we don’t count calories during the holidays in my house! These Mini Christmas Brownie Bites are all about festive fun, not strict nutrition. Since ingredients vary (homemade vs store-bought brownies, different frosting brands, etc.), exact numbers would be tricky. But here’s what I can tell you: each bite packs serious holiday joy! If you’re watching specific dietary needs, check your ingredient labels – the Rudolph version with pretzels tends to be lowest in sugar, while the Santa hats get a fruit boost from strawberries. Mostly though? Just enjoy the magic!
Frequently Asked Questions About Mini Christmas Brownie Bites
I get so many questions about these adorable holiday treats – here are the answers to everything you might wonder!
Can I use homemade brownies instead of store-bought?
Absolutely! My turtle brownie recipe works wonderfully here – just bake them in a mini muffin pan for perfect bite-sized portions. Let them cool completely before decorating though, or your frosting will melt right off!
How far in advance can I make these?
The undecorated brownie bites freeze beautifully for up to 3 months (wrap them tight!). Assembled, the Santa hats are best day-of (those strawberries can get weepy), but the elf and Rudolph versions hold up great for 2 days in the fridge. Just bring them to room temp before serving!
Can kids help decorate these?
Oh my goodness, yes! These are perfect for little hands – my niece loves placing the candy eyeballs on Rudolph. Pro tip: Put frosting in squeeze bottles for less mess. Check out Pillsbury’s ideas for more kid-friendly decorating tricks!
What if I can’t find Candy Cane Kisses?
No stress! Regular peppermint candies work too – just crush them and sprinkle over white frosting. Or use red and green M&Ms stacked like tiny hats. The holidays are all about improvising!
Can I make these gluten-free?
You bet! Use your favorite GF brownie mix or recipe – the decorations are naturally gluten-free (just check your candy labels). The pretzel antlers might need swapping for GF pretzels or thin cookie sticks.
Mini Christmas Brownie Bites
Equipment
- resealable baggie or piping bag
- decorating tip
- toothpick
- Sharp knife
Ingredients
Santa Hat Brownie Bites
- 24 store bought or homemade brownie bites
- 24 pointed strawberries, stems cut off
- 1 cup whipped vanilla frosting
Elf Hat Brownie Bites
- 24 store bought or homemade brownie bites
- 1 cup whipped vanilla frosting
- 24 Hershey’s Candy Cane Kisses
Rudolph Brownie Bites
- 24 store bought or homemade brownie bites
- 1 cup whipped vanilla frosting
- 48 candy eyeballs
- 12 mini pretzel twists
- 24 red M&Ms candies
Instructions
- Wash and dry the strawberries and then slice off the stems.
- Fit a resealable baggie or piping bag with a decorating tip and then fill with whipped vanilla frosting.
- Squeeze some frosting onto the top of each brownie bite.
- Top with a pointed strawberry.
- Squeeze a dollop of frosting on the top of the strawberry.
- Fit a resealable baggie or piping bag with a decorating tip and then fill with whipped vanilla frosting.
- Squeeze some frosting onto the top of each brownie bite.
- Place a Hershey’s candy cane kiss on the frosting.
- Arrange brownie bites on a plate or serving platter.
- Use a toothpick to dab a bit of frosting on the back of two candy eyeballs. Place the eyeballs on the brownie bite.
- Using a sharp knife, cut a pretzel in half. Push the two pretzel halves into the brownie bite just above where the eyeballs are placed for the antlers.
- Add a dab of frosting to the back of one red M&M and place it on the brownie bite as Rudolph’s nose.