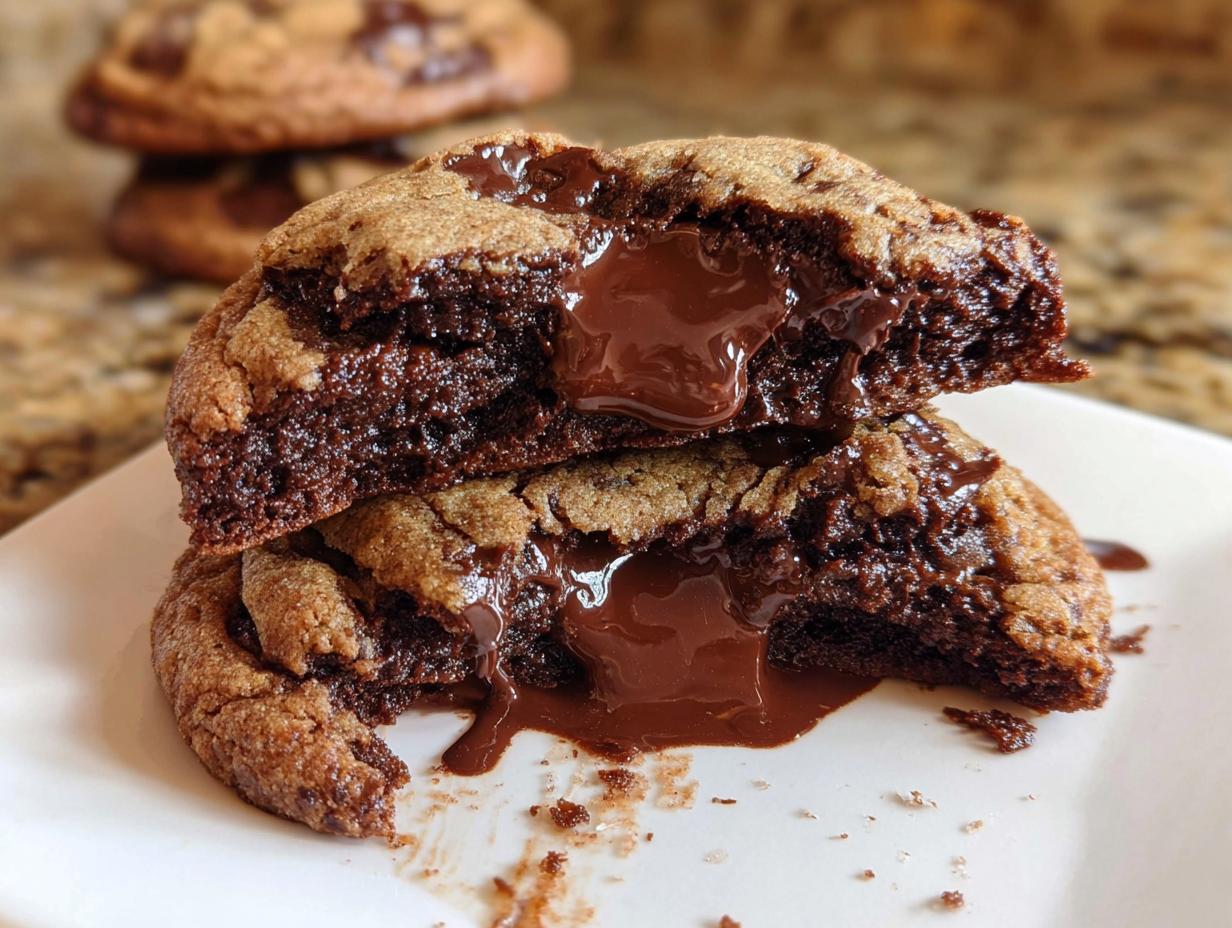
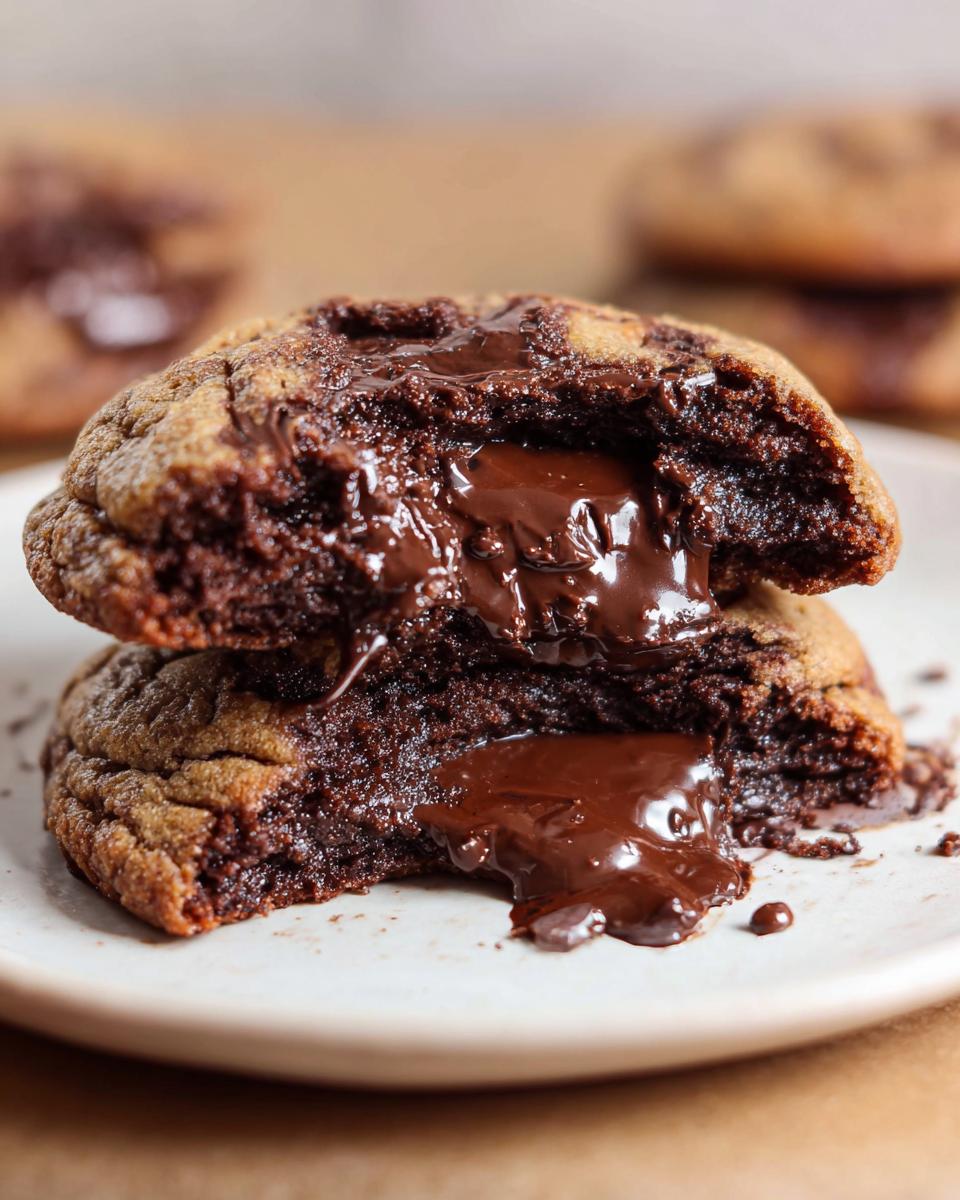
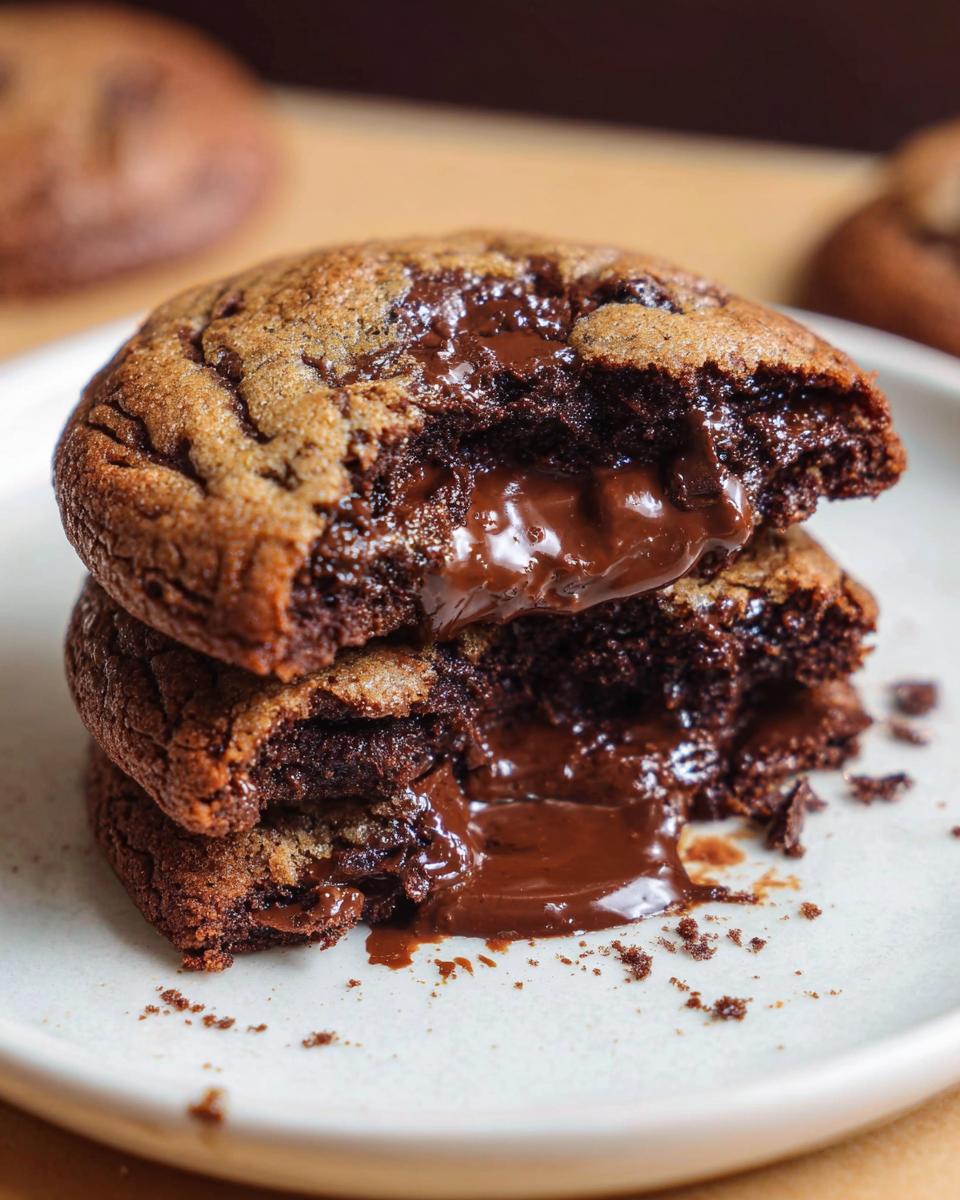
If you think you know cookies, wait until you try these! I’m telling you, the moment that smooth, dark chocolate hits the butter, you’ll realize you’re about to make something seriously different. These aren’t your standard cookies; they are insanely rich, soft, and gooey right in the middle because we use chocolate that is already melted. Trust me, you’ll want to keep an eye on these because they disappear fast! When I first tested these, my kids hovered around the counter waiting for the chocolate to cool just enough to taste. One bite in, and we all agreed they were some of the richest cookies we’d ever made. If you want that perfect, decadent bite every time, these Melted Chocolate Cookies are your new go-to baking project. These were developed with input from Grace Williams, a contributor here at Recipes by Betty.
Why You Will Love These Melted Chocolate Cookies
Seriously, these cookies hit every single happy spot when you’re craving sugar but don’t want a huge baking project. They’re my favorite shortcut when I need something special on short notice. They bake up faster than almost anything else in my recipe box!
- Quick Prep and Bake Times: We’re talking 10 minutes of mixing and about 11 minutes in the oven. You can be eating these delicious treats in under half an hour! It’s baking efficiency at its finest.
- Incredibly Rich Flavor Profile of Melted Chocolate Cookies: Because the chocolate is melted right into the base, you get this intense, fudgy texture. We aren’t messing around with chips here; we want that luxurious, soft center. That’s what makes Melted Chocolate Cookies so addicting.
- Perfect for Easy Desserts With Few Ingredients: I only pulled out seven things from the pantry for these. If you’re looking for Easy Desserts With Few Ingredients, stop scrolling, you’ve found it. No fancy stuff required, just good chocolate!
I love checking out new cookie ideas, but sometimes nothing beats a proven classic that comes together this fast. If you want to see how other people make their favorites, check out my thoughts on what makes those copycat Crumbl Cookies so popular!
Essential Equipment for Perfect Melted Chocolate Cookies
You don’t need a thousand fancy gadgets for these cookies, which is another reason I love them so much. We’re keeping it real simple here. If you’ve got the basics, you’re good to go, which means fewer things to wash up afterward—score!
For this recipe, I only relied on what I usually keep handy:
- A sturdy mixing bowl—I prefer a glass one so I can really see that glossy sheen developing in the chocolate mix.
- A whisk or a sturdy wooden spoon. For this recipe, whisking the sugar and egg actually helps incorporate some air because the base is so heavy from the melted chocolate.
- A small saucepan or a microwave-safe bowl for melting the chocolate and butter. Don’t let it scorch, please!
- A reliable baking tray. I used my standard cookie sheet, the one that’s seen better days but still bakes evenly. Make sure yours is relatively clean and flat.
- Parchment paper is highly recommended. You don’t want that rich, buttery mixture sticking to the pan, trust me.
That’s it! See? Super easy cleanup for such a rich, decadent homemade dessert!
Ingredients for Your Melted Chocolate Cookies
When you’re making seriously rich cookies like these Melted Chocolate Cookies, the quality of your ingredients matters! Because the process is so straightforward—we’re mixing melted things right away—you don’t have much room to hide ingredients that aren’t up to par. You only need seven main things, which is fantastic for keeping baking simple.
Here is exactly what you need measured out before you even turn on the stove:
- 150g dark chocolate, melted (and yes, it needs to be liquid!)
- 80g butter
- 120g sugar
- 1 egg
- 120g flour
- 1 teaspoon baking powder
- 1 pinch salt
I find that when recipes are this short, using good quality chocolate really elevates the final product. It makes all the difference between a regular treat and an amazing homemade dessert.
Ingredient Preparation Notes
Listen, these are the non-negotiables for getting that smooth, fudgy texture we love. If you skip these prep steps, you risk clumping your dough or ending up with cookies that don’t spread right. For the salt, I highly recommend using a coarse salt or making sure your pinch is just right; if you’re looking for guidance on different kinds of salt, I wrote up everything I know about Kosher Salt vs Sea Salt.
First, that dark chocolate! It absolutely *must* be fully melted and smooth—no chunks left floating around when you mix it in later. I usually melt mine gently with the butter right in a saucepan over very low heat, stirring constantly. If you use the microwave, pulse it in short intervals so you don’t burn it!
Also, make sure your egg is at room temperature if you have time, though since we are mixing the hot chocolate base in, it’s less critical than in other recipes. But for successful Melted Chocolate Cookies, keep your dry stuff measured precisely. Baking powder goes flat, so make sure yours is fresh! Every single component needs to be ready to go before step one, trust me on that!
Step-by-Step Instructions for Melted Chocolate Cookies
Okay, this is where the magic happens! These instructions are so straightforward you won’t believe how quick these turnaround. I always preheat my oven to 175°C while I gather my ingredients, so everything is ready to go. Pay close attention to the mixing stages—that’s the key to that perfect fudgy texture in our Melted Chocolate Cookies.
Combining Wet Ingredients for Melted Chocolate Cookies
First things first: melt that gorgeous dark chocolate along with your butter. It should be silky smooth! Then, pour that warm mixture into your bowl. Whisk in the sugar until it’s nicely incorporated, and then quickly beat in your single egg. You want this mixture combined really well, almost glossy, before moving on. Don’t stress about aeration too much; we are aiming for density here, not fluff!
Forming the Dough and Baking
Next up are the dry components. Gently fold in the flour, the baking powder, and that tiny pinch of salt. You need to mix this until *just* combined. If you over-mix cake or cookie batter after the flour goes in, you end up with tough cookies, and we definitely don’t want that! You’ll have a thick, glossy dough, perfect for plopping onto your prepared baking tray. Use a spoon to drop rounded mounds—they should be about uniform dollops. Pop them into that 175°C oven for just 10 to 11 minutes. Believe me, once those edges start to set, they are ready to come out! For more tips on getting cookie textures just right, check out my notes on baking perfect scones—the principles are very similar!
When they come out, they’ll look slightly underdone in the center, which is exactly what you want for that gooey middle. Let them cool completely on the tray before moving them; they firm up a lot as they rest. If you want to check out a classic recipe for comparison, Joy of Baking has a great foundational chocolate chip cookie recipe here!
Tips for Success with Unique Cookie Recipes
Even though these are some of the simplest treats you can bake, there are a couple of little things I learned while testing batches that really turned these from “good” to “MUST-MAKE-AGAIN” status. Since this recipe relies on melted ingredients, we need to be careful not to bake the texture right out of them!
The biggest enemy here is over-mixing after the flour goes in. Seriously, stop mixing when you *think* you’re done, and then give it two more gentle folds. If you work the gluten too hard, you lose that soft, almost brownie-like interior we are aiming for. If your dough feels heavy and sticky instead of slightly tacky, you might have mixed too long.
Another huge point for these rich chocolate cookies is cooling time. When they first come out of the oven, they look incredibly fragile, almost like they’ll fall apart, right? Don’t panic! They MUST cool on that hot metal baking tray for at least five minutes. It finishes setting the edges and lets the center solidify just enough so you can move them without them collapsing into a puddle of deliciousness—though honestly, even a puddle is tasty!
If you’re ever trying to troubleshoot why something isn’t as crispy or chewy as intended in other recipes, I have a whole post about that over here on why your fritters might not be crispy, but the same logic applies sometimes to cookies. For these, though, just remember: low and slow with the dry ingredients is the mantra!
If you want to see how some other major players tackle a chocolate cookie, Bon Appétit has a legendary recipe that is worth checking out when you’re feeling ambitious right here.
Storage and Reheating Melted Chocolate Cookies
Now that you’ve managed to bake these incredible Melted Chocolate Cookies—the hardest part is usually not eating them all immediately! Since these cookies have such a soft, almost underbaked center by design, how you store them is super important to maintain that gooey texture. You don’t want them turning bone dry on you.
First rule: everything has to be completely cool before it even thinks about going into a container. If you put warm cookies into an airtight space, all that residual steam gets trapped, and you end up with sticky, soggy bottoms, which nobody wants. Let them sit on the wire rack until they reach room temperature—this usually takes about an hour for me, and I’m impatient!
Once cool, stack them loosely in a good airtight container. I prefer to put a single layer of parchment paper between batches if I stack more than two high. They seem to stay wonderfully soft and chewy like this at room temperature for a solid three or four days. Because they are loaded with fat from the chocolate and butter, they actually stay quite fresh!
If you happen to have *any* leftovers after that, or maybe you just want to save some for later, freezing is the way to go. You can freeze them baked for up to two months. Just make sure they are snugly wrapped, maybe in a layer of plastic wrap first, then into a freezer bag. When you are ready for a treat, just let them thaw on the counter for about 20 minutes. Or, if you are really keen on that gooey center, zap one for about 10 seconds in the microwave. Oh my goodness, it’s like they just came out of the oven all over again!
Serving Suggestions for Melted Chocolate Cookies
These are fantastic all on their own—truly, they are so rich they almost don’t need anything else! When you’re whipping up these easy treats, you have to think about what kind of experience you want. Do you want to double down on the decadence, or do you want something to cut through that intense chocolate richness?
For me, the classic pairing will always be a giant glass of cold milk. It’s the simplest dessert move, but when you dunk a still-warm, fudgy cookie into cold milk? Perfection. It instantly cools down that intense melted chocolate flavor!
If you’re an adult crowd situation, or maybe just enjoying an afternoon break, these pair beautifully with a strong cup of coffee—especially something dark roast or even an Americano. The slight bitterness of the coffee really brings out the deep notes in the dark chocolate we used. So good!
If you are looking for something a little brighter to balance the richness, try serving these alongside a tart fruit. Don’t laugh until you try it! A few fresh raspberries or some simple sliced strawberries on the side cuts through the heaviness beautifully. It feels lighter, even though you just ate a rich cookie.
For parties or gatherings—since these are great Easy Desserts For A Crowd—I sometimes serve them alongside a nice, non-alcoholic punch. I have a super simple recipe for a festive holiday punch that uses cranberry and orange that just sings next to this deep chocolate flavor. It’s easy to make a big batch, so you don’t have to stress about individual servings!
Honestly, whether you serve them plain, dipped in milk, or next to something fruity, these cookies disappear whether they’re the main event or just part of a larger dessert spread.
Frequently Asked Questions About Melted Chocolate Cookies
When you’re dealing with melt-in-your-mouth desserts, people always have questions! Since these are truly some of the most simple desserts you can make, I want to make sure anyone, even a brand-new baker, can get them right. Here are the things folks ask me most often about achieving that perfect rich texture in their Melted Chocolate Cookies.
Can I make these Melted Chocolate Cookies ahead of time?
That is a great question, especially if you’re planning ahead for party time! You absolutely can make the dough ahead of time. Once you mix up that thick, glossy dough, wrap it up tightly in plastic wrap and pop it into the fridge. It keeps beautifully for about two days. When you are ready to bake, let the dough sit on the counter for maybe 15 to 20 minutes just to soften up a touch so you can scoop it easily. Then, bake exactly as directed! If you chill them too long, they might spread just a tiny bit less, but they’ll still be delicious.
What is the best way to store these for maximum gooeyness?
This is the key to keeping the *melted* part of the cookie around for longer than five minutes! The moment they are completely cool—I mean stone cold—transfer them to an airtight container. I try not to stack more than two layers high, using parchment paper in between just so the tops don’t stick to the bottoms of the cookies above them. Keep them in a cool, dry spot on the counter. Do not put them in the fridge! The fridge sucks the moisture right out of cookies, and that gooey center will turn firm way too fast. At room temperature, they hang onto that wonderful soft texture for days. They are such good Easy Dessert Ideas when you need something quick!
Are these considered Easy Desserts For A Crowd?
Oh yes, 100%! Because they bake so incredibly fast—about 11 minutes each—you can easily pop batch after batch into the oven during an evening or afternoon if you need a huge plate for a crowd. The recipe yields 12 cookies, but if you make smaller spoonfuls, you could easily get 15 or 16. Since they use so few ingredients, keeping the pantry stocked for a big batch of these wonderful Easy Treats is super simple. They are always the first thing gone at potlucks!
If you need more inspiration for simple treats that don’t require a huge supply run, I keep a whole list of fantastic options that focus on minimal steps over at my post about easy snack ideas—some of those cross over perfectly into quick dessert territory!
Estimated Nutrition for Melted Chocolate Cookies
Now, I know some of you amazing bakers out there are keeping an eye on the numbers, especially with how rich these cookies are! Because we are using quality dark chocolate and a decent amount of butter, these are definitely on the indulgent side of things. But hey, that’s why we make them, right? For a treat!
I always run these calculations through a standard nutrition calculator based on the exact amounts listed in the recipe (12 cookies total). Please remember that this is an *estimate*. What brand of chocolate you use, or how much sugar you might sneak off the spoon while mixing, can change things slightly!
For one cookie based on the ingredient list provided, here is a reasonable breakdown:
- Calories: Roughly 210-230 kcal
- Fat: Around 13g (Hello, butter and chocolate!)
- Carbohydrates: About 21g
- Protein: Near 3g
They are definitely a treat, not an everyday snack, but they pack a massive flavor punch for the effort you put in! If you want to compare this to another extremely satisfying, chewy chocolate texture, Martha Stewart has a classic soft and chewy cookie recipe over on her site that you might enjoy checking out when you’re in the mood for something slightly different!
Share Your Homemade Desserts
Now that you have the secret to making truly rich, soft, and ridiculously easy cookies, I really hope you try this recipe out this week! These are the kind of Baking Ideas that make you look like a baking genius without any of the sweat or fuss.
I absolutely love hearing from you all when you try one of my family’s favorite recipes. Did you manage to keep any for the next day? Did you pair them with milk or coffee? I want to see your creations!
If you whipped up a batch of these, please take a moment to leave a rating right down in the comment section below. Five stars just lets me know I’m still on the right track with these simple recipes. And if you snapped a picture of your tray of warm, gooey treasures, tag me on social media! Seeing your beautiful Homemade Desserts makes my day.
Remember, nothing makes me happier than knowing my kitchen secrets are finding their way into yours. If you have any questions about substitutions or if you just want to share a general baking story, don’t hesitate to reach out through the contact page. Happy baking, my friends!

Melted Chocolate Cookies
Equipment
- baking tray
Ingredients
- 150 g dark chocolate, melted
- 80 g butter
- 120 g sugar
- 1 egg
- 120 g flour
- 1 tsp baking powder
- 1 pinch salt
Instructions
- Melt the chocolate and butter together.
- Add the sugar and egg, then whisk these ingredients well.
- Add the flour, baking powder, and salt to the mixture.
- Mix all ingredients until the dough is thick and glossy.
- Drop spoonfuls of the dough onto a prepared baking tray.
- Bake for 10 to 11 minutes at 175°C.