Forget those towering fondant structures that look too perfect to eat! Honestly, wedding dessert trends are finally leaning into that gorgeous, slightly imperfect charm that feels so much more personal. My sister, for instance, got married at a countryside barn last summer, and she asked me to help design her dessert table, and I knew it had to reflect the venue’s natural beauty. I developed this layered berry cake specifically for her special day, using ingredients from a local farmers market and displaying everything on reclaimed wood pieces we found at antique shops. The combination of simple, fresh flavors with rustic presentation elements created exactly the relaxed elegance she dreamed of for her Rustic Wedding Dessert Table Ideas spread. Trust me, this cake is the approachable centerpiece you need—it looks stunning but is totally doable in your own kitchen!
Creating Your Rustic Wedding Dessert Table Ideas with Layered Cake
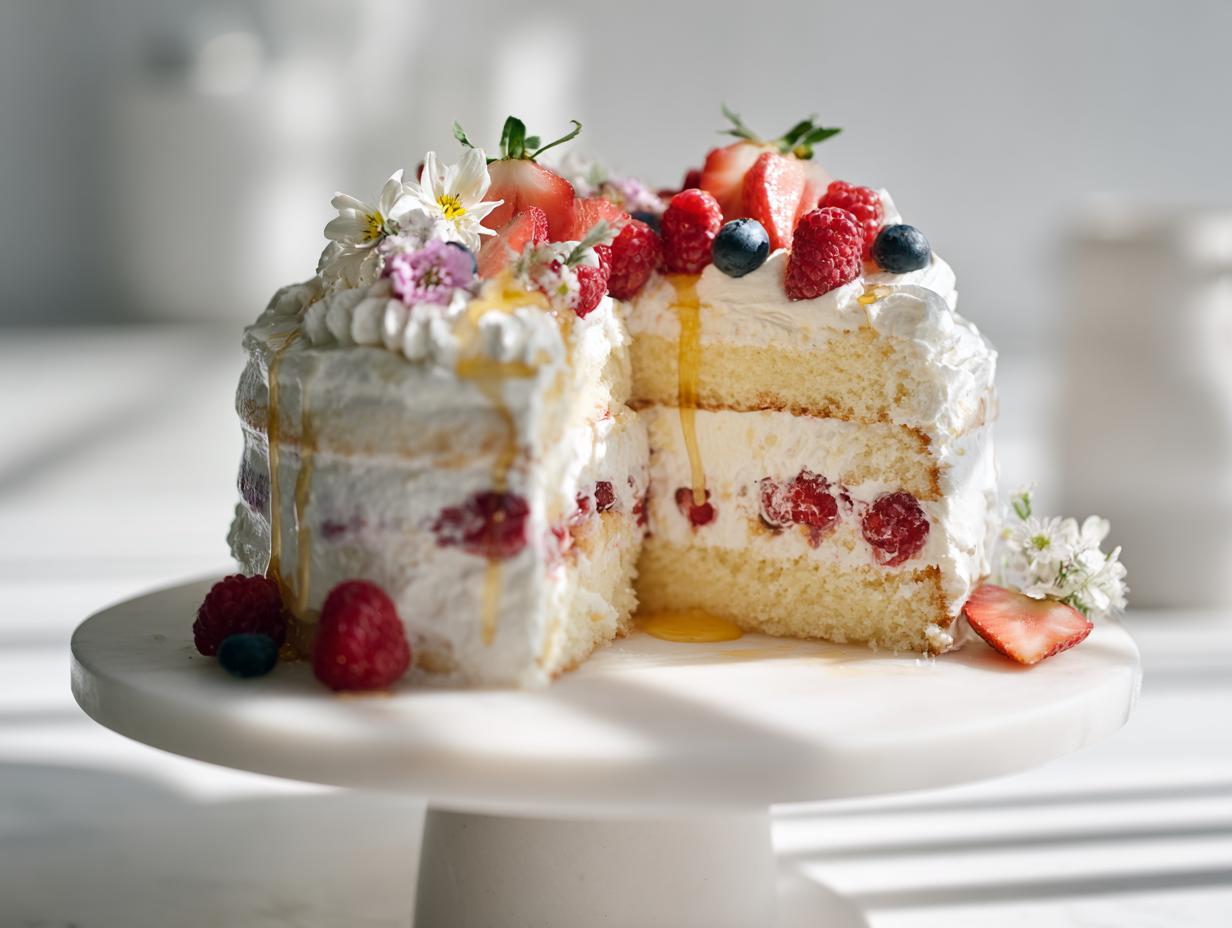
When you picture the perfect spread of rustic wedding desserts, you need a centerpiece that pulls everything together. This berry layer cake isn’t just delicious; it’s built to look amazing sitting on uneven wooden platters! The fresh fruit and light cream mimic the softness of a summer garden wedding, which is exactly what we were aiming for. We want that homemade charm that screams elegance without being fussy.
My biggest tip for authority here is presentation: don’t feel like every cake stand has to match! Mixing metal, glass, and wood brings a truly organic, collected feel to your wedding dessert display.
Essential Equipment for Rustic Wedding Dessert Table Ideas
You don’t need a million fancy tools for this cake, thankfully. Keep it simple, just like the flavor profile!
- Cake pans (for those lovely even layers)
- A large mixing bowl—you need room to work when creaming that butter!
- A sturdy whisk
- Wire racks for cooling—this is crucial! You must let them cool fully before stacking, or hello, sliding cake disasters!
And remember what I said about stands? If you have any mismatched **vintage wedding treats** platters lying around, pull them out! They add instant character that you just can’t buy new.
Ingredients for the Perfect Rustic Wedding Dessert Table Ideas Cake
You see this list of ingredients and you immediately get that homemade vibe, right? That’s the magic! For a cake destined for a **wedding dessert display**, you need ingredients you trust. We aren’t messing around with substitutions here; every measurement plays a role in keeping this layered beauty sturdy enough for display but light enough to eat!
I always double-check that my butter is actually softened, not melted, especially when it’s warm outside planning that perfect country wedding sweets experience. These details really add up when you’re aiming for that rustic wedding desserts perfection.
For the Cake Components
This is the foundation, so pay attention to the fat and leavening here. We need 2 cups of all-purpose flour, and don’t skimp on the flavor with 1.5 cups of granulated sugar. You are using 0.75 cup of unsalted butter, and yes, it absolutely has to be softened! Don’t forget the four large eggs, which provide great structure.
For moisture, we need 1 cup of whole milk and 2 teaspoons of vanilla extract. When it comes to rising, we’re using 2.5 teaspoons of baking powder—that’s a bit more than usual because we want a nice lift, plus half a teaspoon of salt.
For Assembly and Garnish of Rustic Wedding Dessert Table Ideas
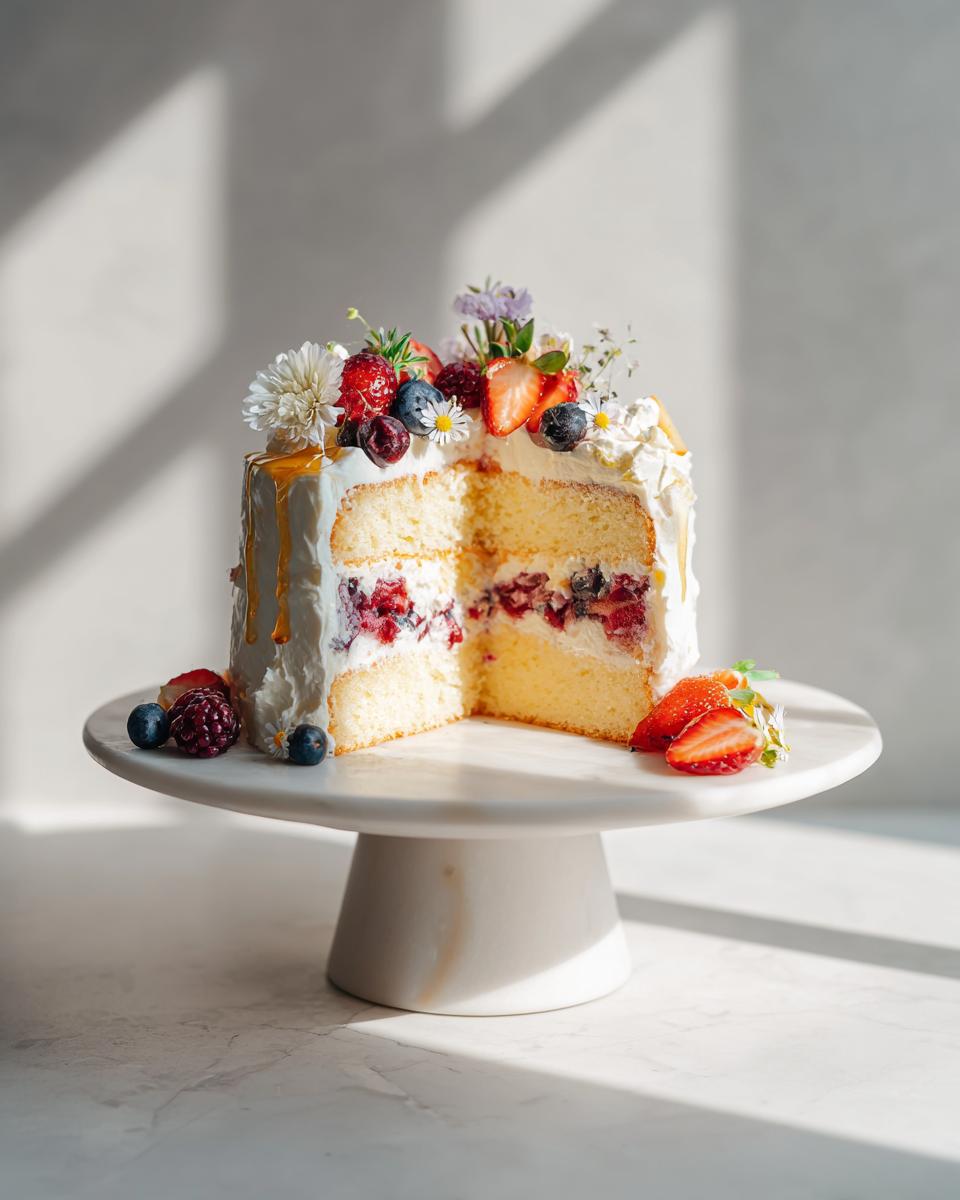
This is where the rustic charm really shines through! You need 1.5 cups of fresh berries—I mean really fresh, go to the farmer’s market fresh! We are loading this up with strawberries, blueberries, and raspberries. For the filling, we whip 2 cups of heavy whipping cream with 0.25 cup of powdered sugar. That whipped cream has to be stiff for stability!
Finally, to give it that stunning appeal for your rustic wedding desserts table, grab as much fresh lavender or edible flowers as you can find, and definitely grab some honey for drizzling right before serving. It looks incredible!
Step-by-Step Instructions for Your Rustic Wedding Dessert Table Ideas Centerpiece
Okay, so you have your beautiful ingredients and the right equipment for your country wedding sweets! Now it’s time to actually make the thing. Take your time here; rushing batter mixing never ends well, especially when you need those layers to hold up beautifully for a wedding day display. We’re going to break this into two main phases: getting those layers baked and then putting the whole gorgeous thing together!
Baking the Cake Layers
First things first, you absolutely have to get that oven cranked up to 350°F (175°C). Make sure your pans are greased AND lined with parchment paper—that’s your insurance policy against sticking! In your big bowl, cream that butter and the 1.5 cups of sugar together until it’s genuinely light and fluffy. This takes a good three or four minutes of focused work, but you’re kicking off that airy texture!
Next, add those four eggs in one at a time, beating after each one joins the party, followed by the vanilla. While that’s happening, whisk your flour, baking powder (the 2.5 tsp!), and salt in a separate dish. Now, this is important: alternate adding your dry mix and the milk, starting and finishing with the dry stuff. Only mix until you see everything come together—seriously, don’t overdo it!
Pour the batter evenly and bake them until your toothpick comes out clean. That usually takes between 25 and 30 minutes.
Preparing the Whipped Cream and Assembly for Rustic Wedding Dessert Table Ideas
Once those cakes are out, get them onto the wire racks immediately. Step seven is crucial: they MUST cool completely. If you even *think* about stacking warm cakes, I promise you that when you whip your heavy cream and powdered sugar later, the heat rising off the layers will melt it into sugary soup before you even add the berries!
Once everything is totally cool—give it at least an hour, maybe more!
- Whip your 2 cups of heavy cream with the powdered sugar until you get those satisfying stiff peaks.
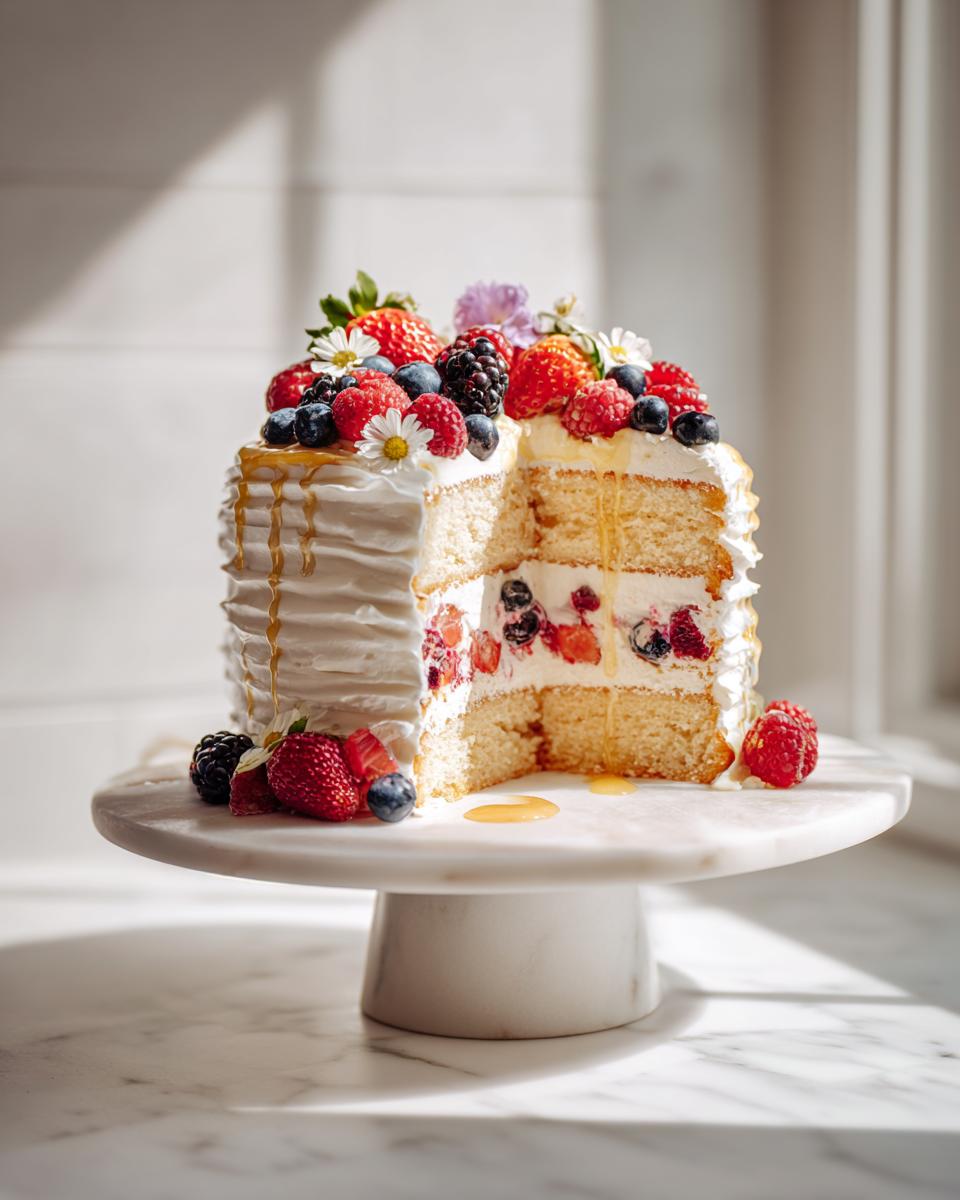
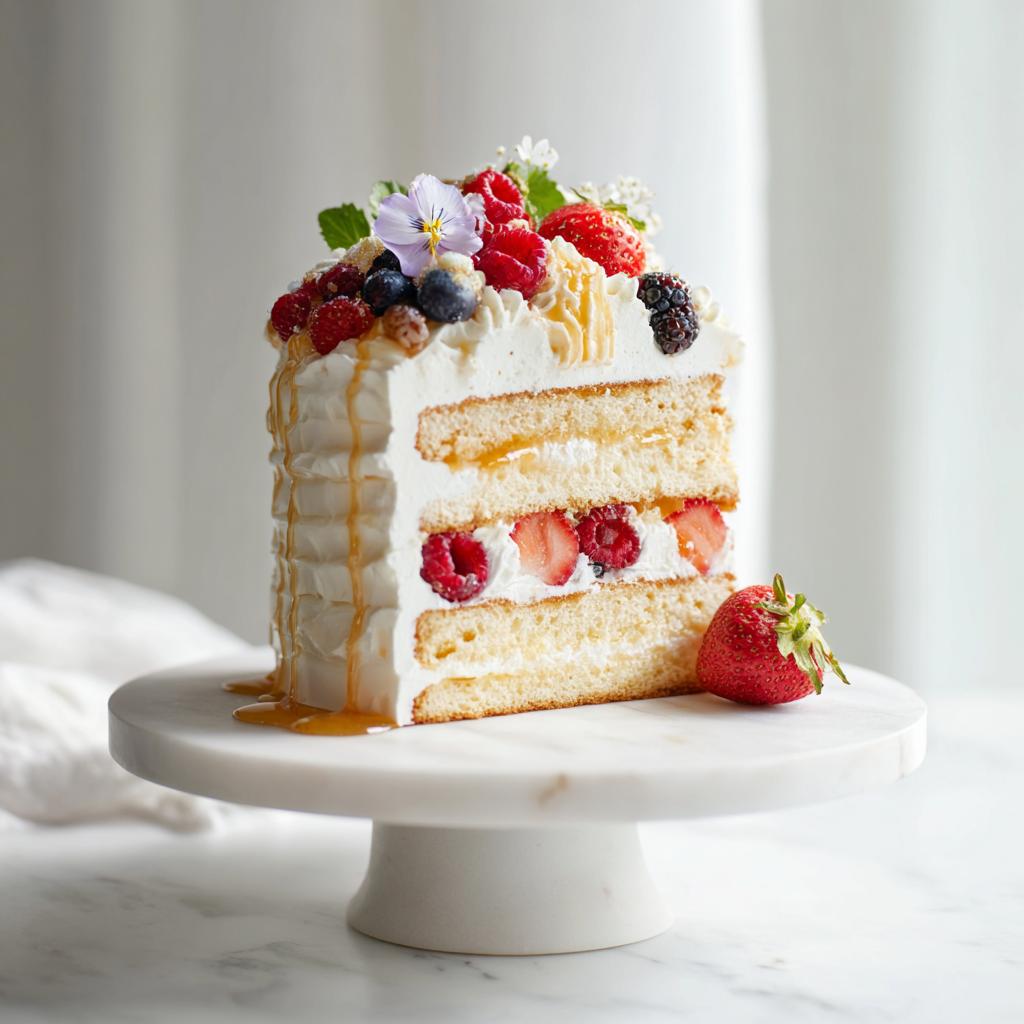
- Start layering! Place a layer down, cover it generously with whipped cream, and scatter about half your fresh berries over the cream. Repeat for your second layer.
- For the grand finale, top the entire cake with the remaining berries.
Finally, garnish with those pretty edible flowers or lavender, and give it a delicate drizzle of honey. Then, get it onto that wooden stand and admire your incredible **rustic wedding desserts** centerpiece!
Tips for Success When Building Your Wedding Dessert Display
Creating a show-stopping **wedding dessert display** means the cake has to look as good at the end of the reception as it did when it first came out of the kitchen! Since this is a cream-and-fruit heavy cake, stability is key.
The biggest piece of advice I can give you for keeping that whipped cream looking pristine under the summer sun is temperature control. Make sure your kitchen, or wherever you are assembling, is as cool as possible before you whip that cream. If you’re worried about the berries shifting when you place them on top, toss your blueberries and raspberries gently in a tiny bit of flour first—this stops them from sinking down into the cream layers when you stack them. Check out my tips on keeping blueberries from sinking if you’re worried about that! A nice, firm cake base makes all the difference!
Also, don’t slice the cake too far in advance. Keep it chilled until about 30 minutes before you want pictures taken, then let it sit just long enough so it isn’t cold when guests start eating it. That hint of coolness against the sweet berries is just perfect.
Variations: Customizing Your Rustic Wedding Dessert Table Ideas
One of the best things about relying on natural, simple recipes like this is how easy they are to tweak based on what’s in season or what you just happen to love! We designed this for summer berries, but honestly, that’s just a suggestion for the most charming **rustic wedding desserts** aesthetic.
If you’re planning a gorgeous fall wedding, don’t feel stuck! You can completely pivot the flavor profile while keeping the structure absolutely beautiful for your **wedding dessert display**. It shows fantastic flexibility when vendors see you’ve thought ahead about the season.
Here are a few of my favorite little adjustments that keep things feeling personal and local:
- Seasonal Fruit Swap: Ditch the summer berries! Try thinly sliced, slightly caramelized apples or pears mixed with a tablespoon of lemon juice instead. They roast beautifully inside the cake layers. Or, if you’re thinking winter, frozen dark cherries are amazing when thawed and lightly sugared before layering.
- Spice It Up: Adding a teaspoon of cinnamon and a quarter teaspoon of ground cardamom to the dry ingredients gives this cake an instant cozy, autumn feel. It pairs wonderfully with the sweetness of the sugar. If you love citrus notes, check out how I combine flavors over in my cranberry orange muffins recipe—you can adapt that zesty idea here!
- The Drizzle Switch: We use honey because it just screams rustic charm, but if you want a slightly bolder, richer flavor that complements spices, substitute the honey with pure maple syrup for drizzling. It adds a beautiful, deep amber color!
Remember, whether you stick to the fresh berries or go autumnal, the cake layers need to be completely cooled before that whipped cream goes on. That rule never changes, no matter how many flavor variations you try!
Serving Suggestions for Barn Wedding Dessert Table
Now that you have this incredible centerpiece for your barn wedding dessert table, you have to think about what else goes out there for those guests who just can’t stop at one slice! A magnificent layer cake is the star, but the supporting cast of **rustic wedding desserts** needs to be equally charming and easy to manage, especially in a high-traffic, perhaps slightly less controlled environment like a converted barn.
You want things that look beautiful sitting on wooden risers but that don’t require a fork and knife if someone grabs one while mingling. Think about pairing the fresh, light flavor of this berry cake with something warm and comforting, or something bite-sized!
Here are a few things that look absolutely perfect next to this cake on any **barn wedding dessert table** spread:
- Gourmet Coffee & Tea Station: This is essential! Offer a rich, dark roast coffee and a selection of herbal teas. The warmth cuts through the sweetness of the cake beautifully. Use mason jars for an extra rustic touch!
- Miniature Crumble Bars: Since my berry cake is light, offering something dense is a nice counterpoint. If you want to make something simple to go alongside, try baking up a batch of my cherry oat crumble bars. They use similar fruit flavors but offer a totally different texture that guests adore. Plus, they are super sturdy for display.
- Simple Vanilla Bean Shortbread: These little treats look lovely stacked high on glass cake stands and are so much easier to keep fresh than elaborate cookies. They look elegant, fit the vintage wedding treats theme, and their subtle flavor doesn’t overwhelm the main event.
The goal for your **wedding dessert display** is abundance without chaos. Keep your supporting cast simple, seasonal, and easy to serve!
Storage and Reheating for Vintage Wedding Treats
Once your beautiful cake is assembled, you need to treat it like the delicate star it is! Since we used real heavy whipping cream for these lovely **vintage wedding treats**, storing this beauty requires a little trip to the fridge. Don’t leave it sitting on the cake table all night unless you are planning to serve it within a couple of hours!
If you have leftovers from the reception, cover each slice lightly with plastic wrap or place slices in an airtight container and chill them. It holds up beautifully in the refrigerator for about two to three days, though honestly, I’ve never seen leftovers last that long!
Reheating isn’t really a thing for a cream-filled layer cake like this one—you want to serve it cool anyway. If you transport leftovers, make sure they stay chilled until you are ready to serve them the next day. It keeps that fresh berry filling vibrant!
Frequently Asked Questions About Rustic Wedding Desserts
I totally get it; wedding planning involves a million moving parts, and worrying about the cake shouldn’t add stress! You want your **rustic wedding desserts** to be foolproof, reliable, and stunning. Here are some common questions I get asked all the time when people are planning their **wedding dessert display**!
Can I make this cake ahead of time for my wedding?
This is a tricky one because of the fresh whipped cream, which holds maybe one or two days max before it starts losing its gorgeous lift. If you want to prep ahead for your **country wedding sweets**, here’s what I do: Bake the layers totally, let them cool, and wrap them tightly in plastic wrap. They can hang out at room temperature for a day, or you can chill them for up to three days! Don’t frost them until the day before the wedding, or even the morning of, if you can manage it. Keeping the components separate prevents any sogginess!
Can I use store-bought whipped topping instead of heavy cream?
Oh, you totally *could*, but honestly, please don’t if you can avoid it! We are aiming for homemade charm in this **Rustic Wedding Dessert Table Ideas** centerpiece, and the stability and flavor of real heavy whipping cream (whipped stiff with powdered sugar) are just miles better than stabilized toppings. Store-bought options often taste artificial, and when you’re presenting something this important, you want that clean, dairy vanilla flavor to shine through with the berries.
How do I scale this recipe up for 150 guests?
Scaling desserts for huge crowds is the biggest challenge for a **barn wedding dessert table**! This recipe is built for one standard cake, maybe 10-12 servings. To serve 150 people, you’re going to need about 12-13 times the recipe if you’re stacking very small layers, but that gets complicated fast. The smart way to handle this is to bake several smaller versions of this cake (using 3-4 layers each) and display them all together on tiered wooden platters. This keeps the baking manageable and looks incredible on the table. If you’re struggling with scaling baked goods generally, I found some great scaling tips over in my guide on how to prevent dryness when multiplying recipes!
Do I have to use fresh flowers on my vintage wedding treats?
Not at all! The flowers are just the icing on the rustic cake, literally speaking. If you have any concerns about pesticides or just don’t like the look, you can lean heavier into the fruit! Pile those berries higher, drizzle that honey more liberally, or even use slivered toasted almonds around the base for texture instead. It will still look absolutely beautiful and fit right into your theme of **vintage wedding treats**.
Sharing Your Rustic Wedding Dessert Table Ideas Creation
Well, I hope seeing this gorgeous layered cake has sparked some inspiration for your own beautiful day! Whether you’re designing a whole dessert spread or just need a stunning homemade centerpiece, this recipe for **Rustic Wedding Dessert Table Ideas** is just the start.
Now, I absolutely want to see what you create! Baking for a big event, especially one as special as a wedding, is a big deal, and I’d love to hear about your experience.
- Did you make any of those seasonal swaps we talked about? Maybe you went with pears instead of berries? Tell me everything!
- Are you planning a **vintage wedding treats** spread, or are you leaning toward something more modern farmhouse? Drop your decorating ideas in the comments below!
- If you made this cake, give it a rating so other folks planning their **wedding dessert display** can see how it worked for you!
If you have any final questions now that you’ve seen the whole process, don’t hesitate to reach out via my contact page. Happy baking, and enjoy showing off your amazing work!
Rustic Wedding Dessert Table Ideas
Equipment
- Cake pans
- Large mixing bowl
- Whisk
- Wire racks
Ingredients
For the Cake
- 2 cups all-purpose flour
- 1.5 cups granulated sugar
- 0.75 cup unsalted butter, softened
- 4 large eggs
- 1 cup whole milk
- 2 teaspoons vanilla extract
- 2.5 teaspoons baking powder
- 0.5 teaspoon salt
For Assembly and Garnish
- 1.5 cups fresh berries (strawberries, blueberries, raspberries)
- 2 cups heavy whipping cream
- 0.25 cup powdered sugar
- As needed Fresh lavender or edible flowers for garnish
- As needed Honey for drizzling
Instructions
- Preheat your oven to 350°F (175°C) and prepare cake pans by greasing and lining with parchment paper.
- In a large mixing bowl, cream together the softened butter and granulated sugar until light and fluffy, about 3 to 4 minutes.
- Add eggs one at a time, beating well after each addition, then mix in the vanilla extract.
- In a separate bowl, whisk together flour, baking powder, and salt.
- Alternately add the dry ingredients and milk to the butter mixture, beginning and ending with dry ingredients, mixing until just combined.
- Pour batter into prepared pans and bake for 25 to 30 minutes, or until a toothpick inserted in the center comes out clean.
- Allow cakes to cool completely on wire racks before assembling.
- Whip the heavy cream with powdered sugar until stiff peaks form.
- Layer cakes with whipped cream and fresh berries, then top with remaining berries, edible flowers, and a drizzle of honey.
- Display on wooden cake stands or slate boards for an authentic rustic presentation.