When Halloween rolls around, I always want fun, spooky treats without spending my entire afternoon wrestling with frosting or complicated baking. Seriously, who has the oven space for that?
That’s why these Halloween ghost brownies often steal the show, but these Pumpkin Patch Dirt Cups (option Halloween) are right there with them! These cups are the absolute definition of quick assembly; you can have them built in under 15 minutes. The magic isn’t in complex cooking; it’s how you put the few ingredients together. I tested these out last week as a themed variation, and the visual effect instantly made them feel special—it’s proof that small design tweaks can elevate simple desserts.
They look way more impressive than the effort they require. If you need something last-minute that screams fall festival or school party, these are your new go-to easy treats!
Why You Will Love These Pumpkin Patch Dirt Cups (option Halloween)
Honestly, when you’re in a pinch during spooky season, you need recipes that deliver maximum impact with minimum fuss. These dirt cups are the perfect solution for those busy fall nights. They are one of my favorite simple desserts because they practically build themselves!
- Speed Demon Assembly: Since there’s absolutely no baking involved, you can whip up six individual servings faster than it takes to boil water. This makes them fantastic easy dessert ideas when you realize you forgot you signed up to bring something tomorrow!
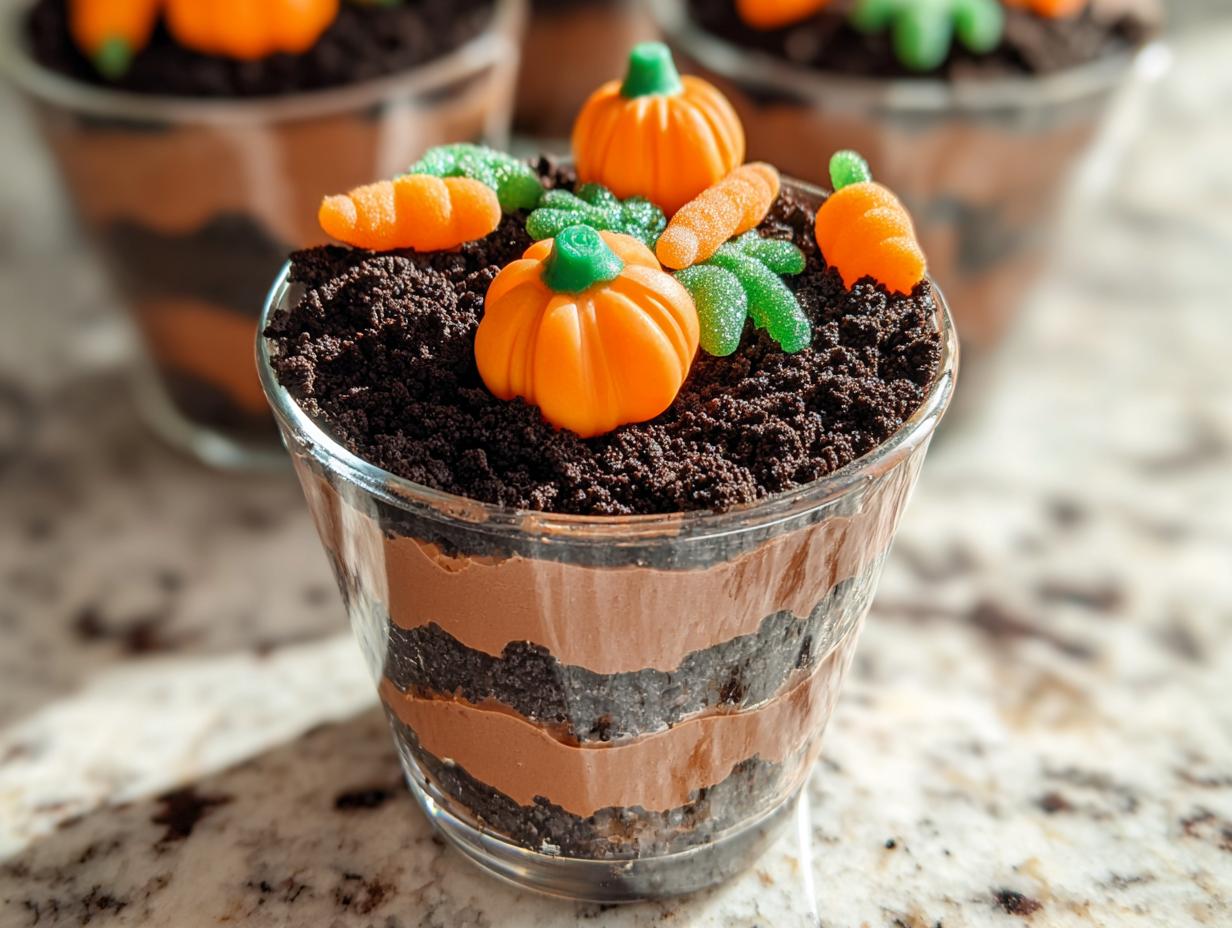
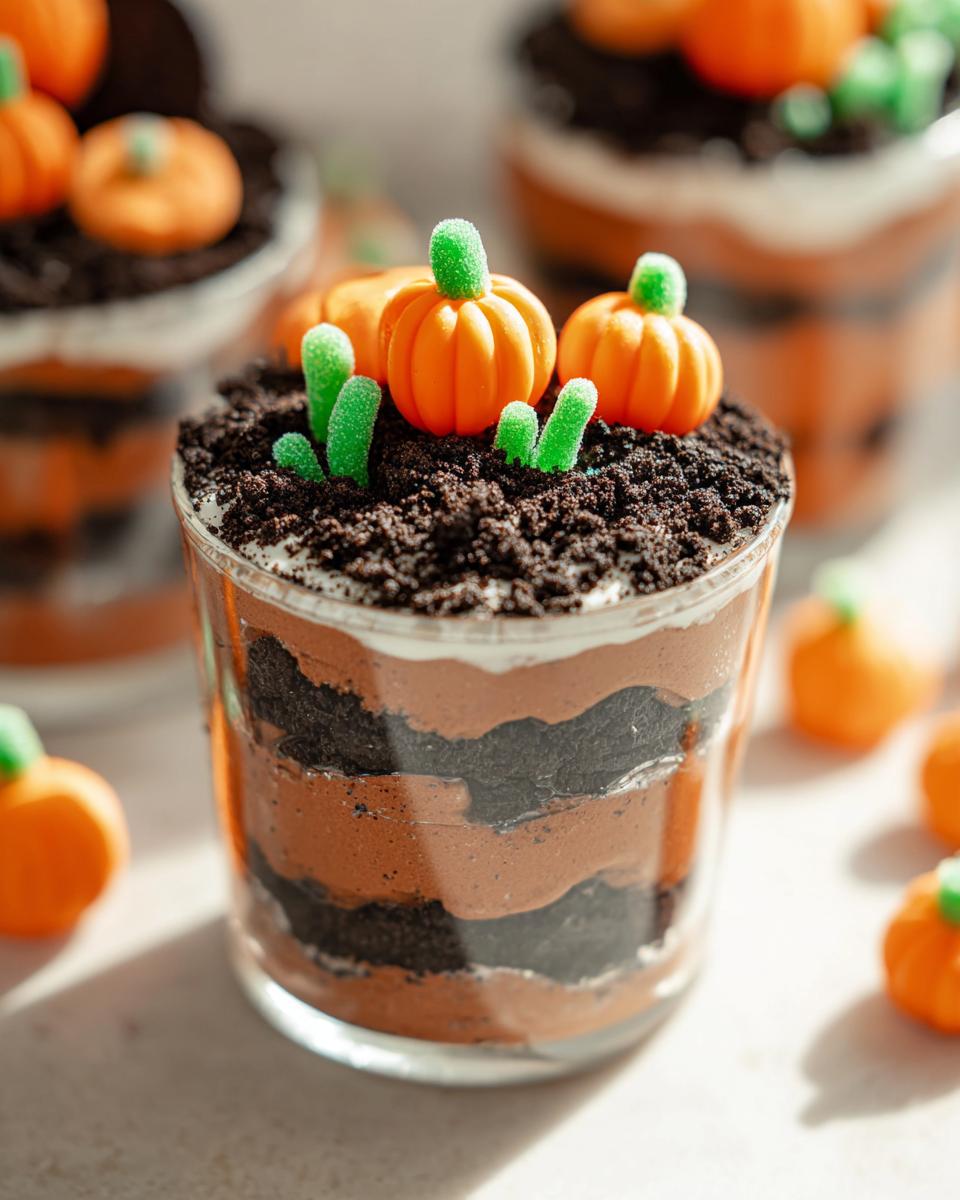
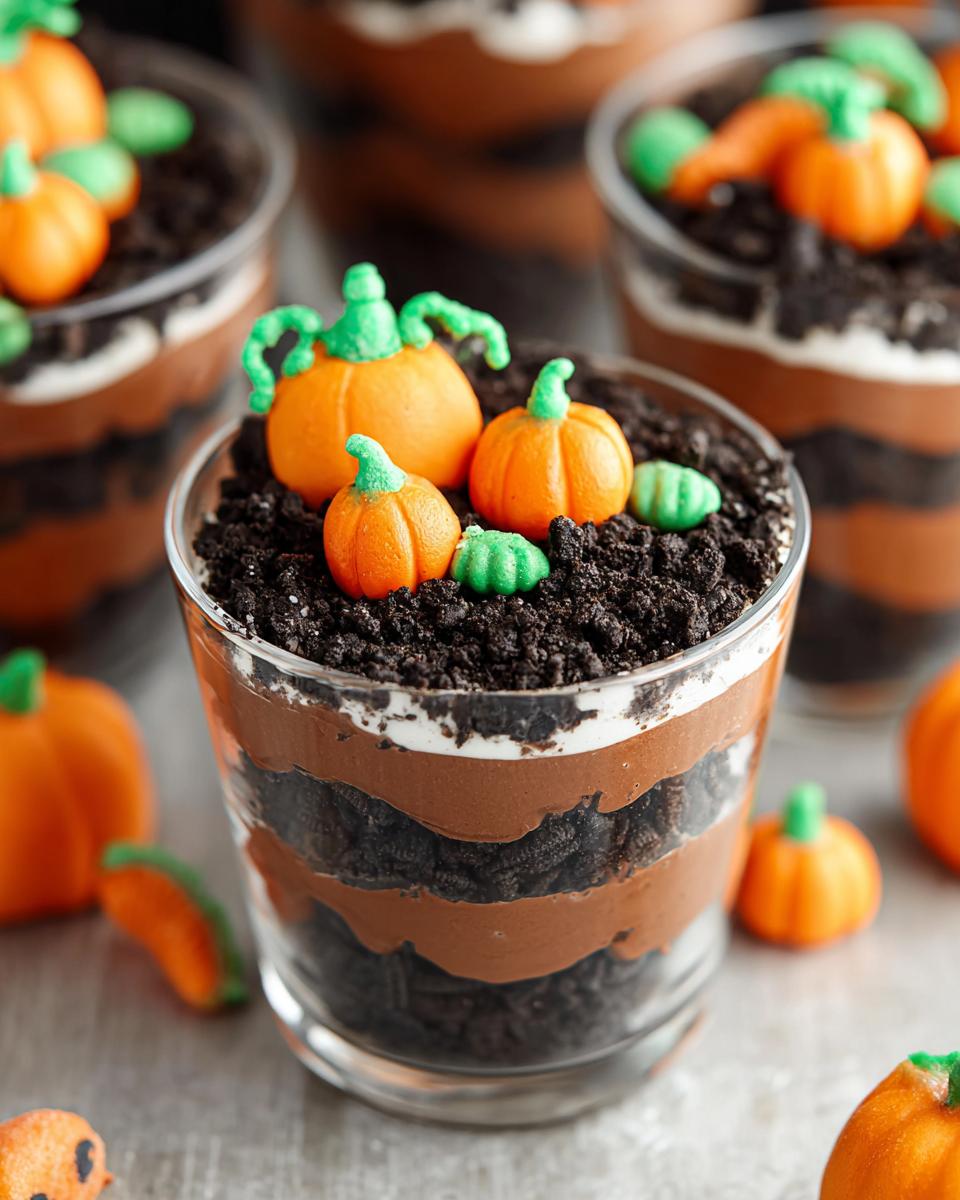
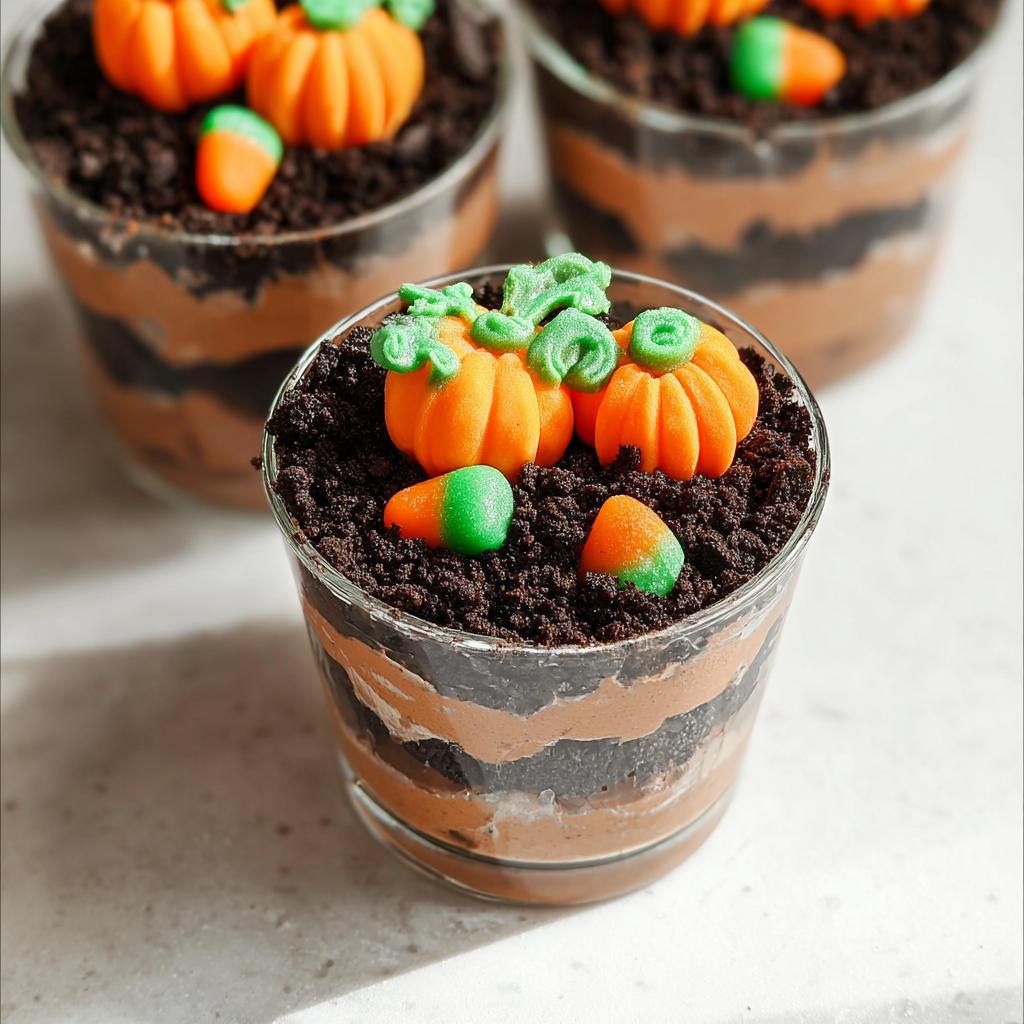
- Visual Wow Factor: Using clear cups is key here. Seeing the layers of dark “dirt” topped with little orange pumpkins sticking out of the ground? It’s instantly festive and so, so cute. They look like they took way more effort than they did, which is always a win.
- Crowd Control Favorite: Since they are pre-portioned in individual cups, serving a crowd is a snap. No slicing, no mess, and everyone gets their own perfect little portion. They are definitely among the best easy desserts for a crowd I’ve ever made.
- Few Ingredients Needed: You probably have most of what you need in your pantry already. We’re talking pudding, milk, cookies, and candy. It’s as easy as it gets for homemade desserts, proving you don’t need a massive shopping list for holiday fun.
If you’re looking for more fun, single-serving deliciousness, you should check out my whole collection of mini desserts in a cup! They follow the same quick principle.
Gathering Ingredients for Your Pumpkin Patch Dirt Cups (option Halloween)
When I say these are easy desserts with few ingredients, I mean it! You don’t need to hunt down specialty items for these Pumpkin Patch Dirt Cups (option Halloween). The list is short, sweet, and focuses on getting that rich, creamy texture first. We rely on simple pantry staples to create that delicious chocolate base that perfectly mimics fresh soil.
Seriously, you can get this whole shopping trip done in five minutes. We’re building flavor layers, not complex structures here. You’ll want to be sure you have clear cups ready to go, but for the building blocks, here’s what you need:
For the Pudding Base
- Chocolate pudding mix: Just one box will do the trick for about six servings.
- Cold milk: You need exactly 500 ml of cold milk to make sure the pudding sets up correctly and quickly.
- Whipped topping: About 250 ml of that fluffy stuff—it lightens the pudding so it’s easy to scoop!
For the Dirt and Decorations
This is where the fun Halloween element comes in. For the dirt, you HAVE to use crushed Oreos. They have the right color and crumb texture. Don’t even think about using generic sandwich cookies; the filling gums things up too much!
- Crushed Oreos: About 200 grams, finely crushed—this is the essential ‘dirt’.
- Candy pumpkins: These are for decoration, naturally!
- Gummy worms: You want them half buried, looking like they’re trying to escape the patch!
If you want another incredibly easy chocolate base recipe, I’ve got a great easy chocolate mousse recipe you might want to bookmark for later!
Assembling Your Pumpkin Patch Dirt Cups (option Halloween)
Okay, the best part about these Pumpkin Patch Dirt Cups (option Halloween) is that we’re not actually baking anything! This is pure assembly magic. Since we are dealing with pudding, structure is important, but honestly, it’s just stacking things in a cup, so don’t stress about perfection. We want them to look a little messy, like unearthed treasure!
Preparing the Creamy Pudding Layer
First things first, let’s tackle the ‘mud.’ Prepare your chocolate pudding mix exactly how the box tells you to, using that 500 ml of cold milk. Make sure you whisk it well so it gets perfectly thick and smooth. You’ll know it’s ready when it starts clinging to the whisk readily. Once that pudding is thickened up—and trust me, don’t rush this part—you need to lighten it up!
Gently, using a spatula, fold in your whipped topping. I mean gently. You don’t want to deflate all the air you just whisked in! Just fold until there are no more white streaks showing. This keeps our base creamy and light, not dense like cement. If you ever want a good example of easy, fluffy folding, check out how I treat the mousse in my no-bake strawberry mousse!
Layering and Creating the Patch Effect
Now for the fun part! Grab those clear serving cups. Spoon that gorgeous chocolate pudding mixture right into the cups. My rule of thumb is to fill them about three-quarters of the way full. Leave some room on top for the dirt and the graveyard decorations!
Next, take your crushed Oreos—that’s the dirt!—and sprinkle a generous layer over the top of the pudding in every single cup. Tap the cup gently on the counter once or twice just to help the crumbs settle in evenly across the surface.
Final Decoration and Setting Time
This is where we turn a simple dessert into a Halloween showstopper! Get your candy pumpkins and gummy worms ready. Stick a couple of pumpkins right on top of the dirt layer. Let those gummy worms peek out dramatically, like they are trying to crawl out of the soil. Seriously, a worm half-buried is way creepier than one sitting flat!
Once they look spooky and fun, pop them into the fridge. They need to chill for at least 30 minutes! This little bit of time lets the pudding firm up properly, which means they hold their shape beautifully when you serve them. That chilling time is key to getting these amazing easy treats ready for your party!
Tips for Perfect Pumpkin Patch Dirt Cups (option Halloween)
Even though these Pumpkin Patch Dirt Cups (option Halloween) are incredibly straightforward, a few little tricks I picked up while testing these homemade desserts can make them look picture-perfect for your party spread. Trust me, presentation matters, especially when you’re dealing with something as fun as edible dirt!
Since you’re looking for easy desserts, these tips focus on maximizing the visual impact without adding any clock time to the assembly process:
- For Goofy Worms, Use Warmth: If you want your gummy worms to look like they are genuinely struggling or half-buried, sometimes they are too stiff to bend naturally. Don’t put them in the microwave! Just hold the worm near the warmth of your hand for about ten seconds before placing it. It gives the candy a tiny bit of pliability so it droops realistically into the pudding, rather than sticking straight up like a flagpole.
- The Crumb Texture: You want fine, dark dirt, not chunky cookie pieces. Make sure you crush those Oreos until they are powdery. I just put them in a zip-top bag and roll over them with a heavy rolling pin a few times. The finer the crumb, the more realistic the ‘soil’ layer looks against the smooth pudding.
- The Clear Vessel is Non-Negotiable: Don’t fall back on opaque bowls just because they’re cleaner! The whole point of these Pumpkin Patch Dirt Cups (option Halloween) is seeing those distinct layers of chocolate pudding and Oreo ‘dirt’ underneath the candy. The visual payoff is huge, so use clear glass or plastic cups, even if you end up needing to wash more dishes later. It’s totally worth it!
- Pudding Firmness Check: This is crucial for texture. Before you fold in that whipped topping, your pudding needs to be well set. If it’s runny, the whole cup will look soupy once you try to eat it. Wait until it’s quite stiff, almost like thick frosting, before incorporating the topping. For more tips on getting textures right even in baked goods, my post on scone secrets has some great overarching advice on mixing patience!
If you are looking for other visually engaging but easy ideas, BHG has some amazing Halloween cupcake ideas that might inspire your next spooky bake!
Equipment Needed for These Easy Dessert Ideas
Since these amazing Pumpkin Patch Dirt Cups (option Halloween) are all about assembly and not actual cooking, you don’t need a drawer full of fancy tools. You really only need two main things to get started, which is why they qualify as such quick and easy treats!
I know people sometimes skip this step because they think they know what they need, but writing it down helps ensure your efficiency actually pays off. For these simple desserts, reliability comes from having the right vessels ready to go. Remember, we aren’t baking, but we still need to mix and present!
- Mixing bowl: A standard, medium-sized mixing bowl is perfect for combining your pudding mix, milk, and whipped topping. You want something big enough so you can fold in the topping without it splashing all over your counter—trust me, I learned that the hard way!
- Clear serving cups: This is the secret sauce for presentation! You need six clear cups, glasses, or even small mason jars. Seeing those layers of chocolate pudding and cookie dirt is what makes these treats so special. If you use opaque cups, they just look like chocolate pudding.
That’s honestly it! Sometimes simplicity is best. If you want to browse more quick recipes that require minimal gear, check out my main page for all things dessert!
Storage and Keeping Your Pumpkin Patch Dirt Cups (option Halloween) Fresh
Even though these Pumpkin Patch Dirt Cups (option Halloween) are usually devoured instantly at parties—because who can resist a gummy worm popping out of chocolate soil?—you might have leftovers. And that’s fine! These are wonderful homemade desserts, and we want to enjoy them later too.
The good news is that since there’s no actual baking involved, storage is super easy. You definitely need to keep them covered and refrigerated. I wrap the whole tray of cups tightly in plastic wrap, or if you are only storing one or two, just use lids or a small piece of cling film pressed right onto the surface of the top layer of ‘dirt’.
Now, let’s talk about the cookie layer. If you make these and put them straight into the fridge, the crushed Oreos, which act as your dirt, will soften up. Trust me, I know this because I always sample them right after assembly! While I personally enjoy the slightly softer, moist cookie crumb after a night in the fridge—it blends into the pudding almost like a cake layer—some people insist on that distinct crunch.
If you absolutely need that crunch to remain, here is the trick: Wait to add the final layer of crushed Oreos and any decorations (pumpkins and worms) until about 15 minutes before you serve them. Prepare the pudding layers, chill those, and then top them right before guests arrive. That way, the ‘dirt’ stays perfectly crisp! If you’re battling dry-out issues in general, maybe check out my tips for preventing pumpkin bread from drying out—the principles of sealing in moisture still apply!
Generally, these cups are best within the first 24 to 36 hours. After that, the pudding will still taste great, but the whole structure starts losing its visual definition, and that’s a shame for such cute easy treats!
Variations for Your Pumpkin Patch Dirt Cups (option Halloween)
While the classic chocolate-and-Oreo combination for these Pumpkin Patch Dirt Cups (option Halloween) is already amazing—seriously, what’s not to love about chocolate pudding?—you can easily tweak these for fun baking ideas or to suit everyone’s tastes! These are super adaptable, which is what makes them such great, simple desserts for any gathering.
Don’t feel locked into the black dirt and chocolate pudding! Feel free to experiment with the layers, especially when you are looking for something a little different than the standard. It’s all about making these easy treats your own, just like adding pumpkin puree to muffins!
Here are a few ways I like to switch things up when making a huge batch for a party:
- Go for Orange Patches: If you want the *pudding* layer to look more like actual mud from a pumpkin patch (instead of dark, spooky soil), use vanilla pudding mix instead of chocolate. Then, here’s the trick: add just one or two drops of orange food coloring to the pudding right before you fold in the whipped topping. It gives you this wonderful, swampy orange hue that looks perfectly eerie next to the dark crushed cookies.
- Change Up the ‘Dirt’: Crushed Oreos are my favorite because they’re so dark and rich, but if you run out or just want a different crunch, swap them out! Crushed graham crackers work beautifully, though they resemble lighter, drier soil. You could even try crushed Nilla Wafers if you prefer a buttery base. Just blend them up finely in a food processor first!
- Cream Cheese Twist: Not every dessert needs to be purely pudding! For an added layer of tang—which is awesome when paired with the sweet candy pumpkins—try replacing half of the whipped topping with softened cream cheese. Beat the cream cheese until smooth first, then gently fold that into your prepared chocolate pudding, followed by folding in the remaining whipped topping. This makes for a richer, slightly firmer base, close to a cheesecake texture beneath the dirt!
These little adjustments keep Halloween baking fun and fresh year after year. If you want to try introducing pumpkin flavor in a baked item, check out my notes on adding pumpkin puree to muffins—it’s another way to capture that fall flavor!
Frequently Asked Questions About Pumpkin Patch Dirt Cups (option Halloween)
I get so many questions whenever I post these simple desserts because everyone wants to make sure they look like a perfect little pumpkin patch! Since these are so easy, people often wonder about adapting them or prepping them for huge crowds. Here are the most common things folks ask about these amazing Pumpkin Patch Dirt Cups (option Halloween).
Can I make these Pumpkin Patch Dirt Cups (option Halloween) a day ahead?
You absolutely can make these ahead of time, which is fantastic for busy parents or hosts! Remember, the pudding layer needs time to set up nicely, so chilling them overnight is actually great for the structure. However, if you want that super crisp, crumbly texture for your ‘dirt,’ you should wait on the final layer.
If you are making them a day ahead—which is perfect for prepping easy treats—go ahead and assemble the pudding and the first layer of crushed Oreos. Then, wrap them tightly and store them. About an hour before you plan to serve them, take them out, add that final layer of dirt, and place your candy pumpkins and gummy worms on top. This keeps the cookie layer from getting too soft!
What if I don’t have Oreos for the dirt?
Oh, that’s an easy fix! The dark color of the Oreo crumbs really sells the “freshly dug earth” look, but if they aren’t in your pantry, you have a couple of great options for these easy dessert ideas:
- Graham Crackers: As I mentioned, crushed graham crackers work, but they will look lighter, more like dry soil. If you use these, you might want to add a tiny drop of black or dark brown food coloring into the crumbs to deepen the color a bit before sprinkling them on.
- Chocolate Wafers: Any thin chocolate wafer cookie will work in a pinch! Just make sure you crush them well. The goal is a fine powder, not big chunky pieces, which helps maintain the look of a smooth patch surface.
You can find more tips on ingredient swaps for incredibly easy desserts with few ingredients over in my big guide on that very topic!
If you still have questions after assembling yours, feel free to jump over to my contact page!
Estimated Nutritional Information
Since these Pumpkin Patch Dirt Cups (option Halloween) are assembly-only desserts made from pantry shelf items, I always tell people that the nutrition facts are just a ballpark estimate. Candies and cookie types can vary wildly, right? But for those of you who like to know what you are serving, here is what you can generally expect per serving (remembering this recipe makes exactly 6 cups).
This is based on standard boxed pudding mix, conventional crushed Oreos, and standard whipped topping. When you make these simple desserts, the sugar content remains the primary focus, but they are generally a quick, fun treat rather than a heavy bake!
- Calories: Approximately 350-380 kcal
- Fat: Around 15g (mostly from the topping and sandwich cookies)
- Protein: About 6g
- Carbohydrates: Roughly 55g
- Sugar: In the range of 35g to 40g (Yep, they are sweet, but it’s Halloween!)
These aren’t exactly low in calories or sugar, but hey, they are a fun, festive treat in a cup, meant for a good time! If you are looking for something a little lighter while still getting that dessert fix, you might want to bookmark my recipe for my healthy energy bites. Otherwise, enjoy these rich, dirt-filled cups!
Share Your Festive Halloween Treats
Well, that’s it! We’ve gone from a boring box of pudding mix to these totally awesome, totally festive Pumpkin Patch Dirt Cups (option Halloween). See? I told you these simple desserts go together like magic!
These little cups are living proof that you don’t need complex baking skills or hours in the kitchen to nail that amazing Halloween theme. They look fantastic on a table spread, and they taste even better when you sneak a spoonful while cleaning up!
I really hope you get a chance to make these easy treats for your next gathering. When you do, please come back here and let me know how they went! Did your gummy worms try to escape? Did you use the orange pudding variation? Don’t leave me hanging!
Give these Pumpkin Patch Dirt Cups (option Halloween) a great big rating—five stars if they earned it—and drop a comment below telling me all about your experience. I read every single comment, and it helps me figure out what other easy dessert ideas you folks are looking for!
If you ever have a question, or maybe you need to reach out about recipe testing, you can always find my contact information right here: Get in touch with us here!
Happy Haunting and Happy Eating!
By Emily Mitchell, Efficiency & Testing Coordinator at Recipes by Betty.
Pumpkin Patch Dirt Cups (option Halloween)
Equipment
- Mixing Bowl
- Clear serving cups
Ingredients
- 1 box Chocolate pudding mix
- 500 ml Cold milk
- 250 ml Whipped topping
- 200 g Crushed Oreos For the ‘dirt’
- Candy pumpkins For decoration
- Gummy worms For decoration
Instructions
- Prepare the chocolate pudding according to package directions using the cold milk. Allow the pudding to thicken.
- Gently fold the whipped topping into the thickened pudding until just combined.
- Spoon the pudding mixture into clear serving cups, filling them about three-quarters full.
- Sprinkle a layer of crushed Oreo crumbs over the top of the pudding in each cup to resemble dirt.
- Decorate the top of the ‘dirt’ layer with candy pumpkins and gummy worms sticking out.
- Refrigerate the cups for at least 30 minutes before serving to allow them to set.