Oh my gosh, planning a baby shower, right? It can feel like you need a degree in logistics just to get the tiny snacks arranged! I always want to make things beautiful for my friends, but honestly, the tables always look a little flat. That’s why, when my best friend announced she was having a baby girl, I knew the dessert spread had to be showstopping. I spent weeks testing different pink dessert recipes and arrangements, eventually realizing that the key to an incredible Pink Dessert Table for Baby Shower wasn’t just making things pink, but creating layers, textures, and heights that made the table feel abundant and elegant.
The joy on her face when she saw the finished display made every minute of planning worthwhile. You can absolutely pull off that high-end, Instagram-worthy look without having a catering background. We’re going to focus on one stunning pink cake base and then use fantastic styling to bring the whole pastel dessert display together!
Why This Pink Dessert Table for Baby Shower Works So Well
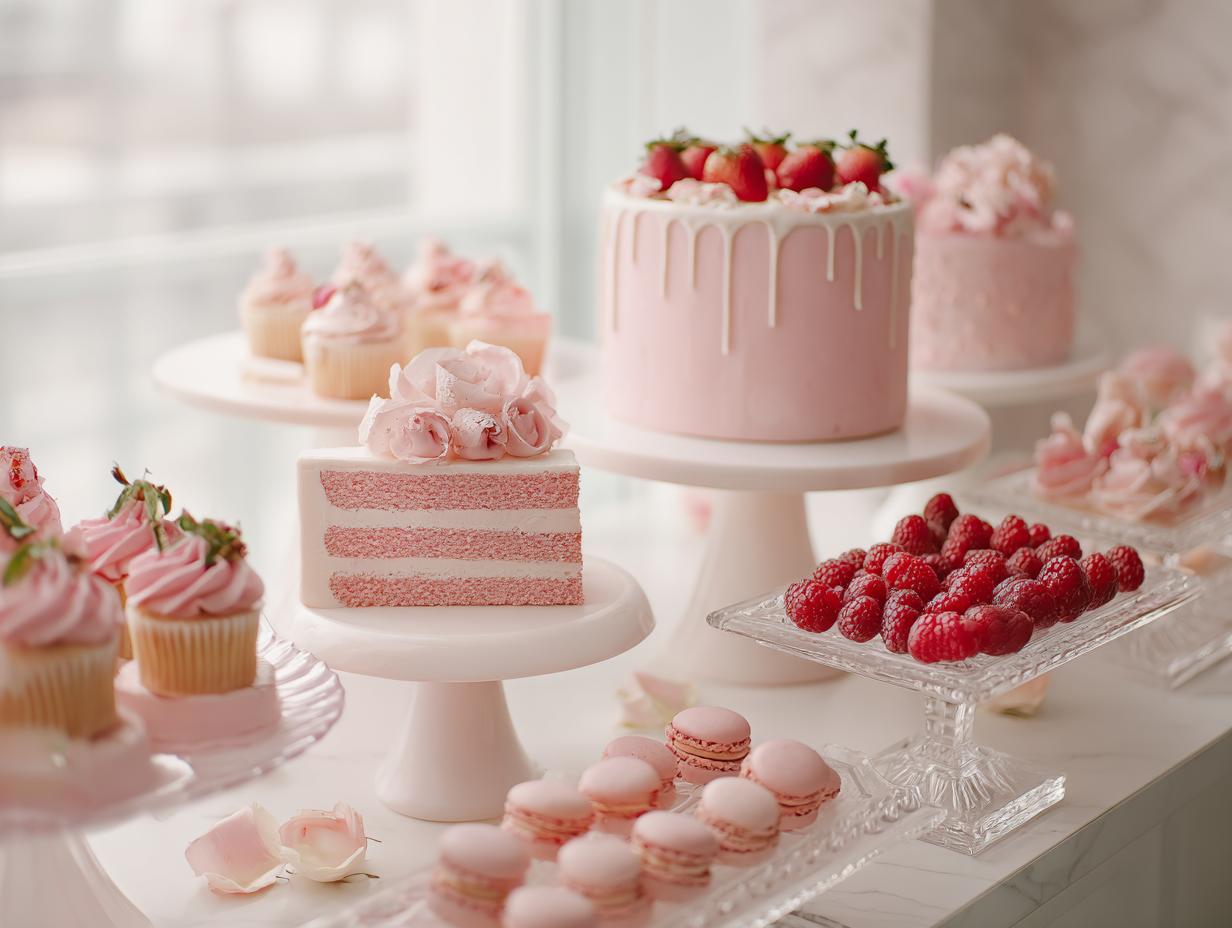
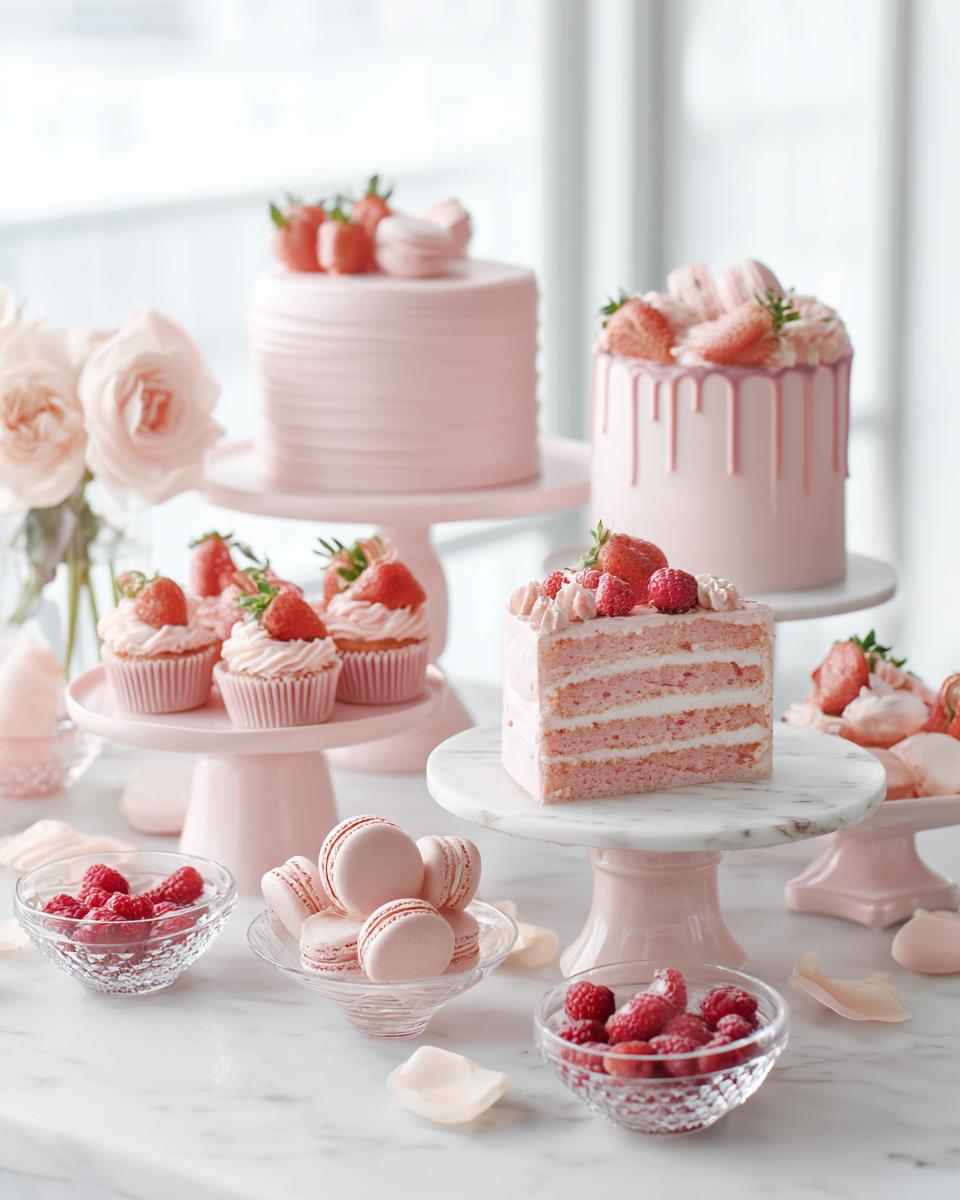
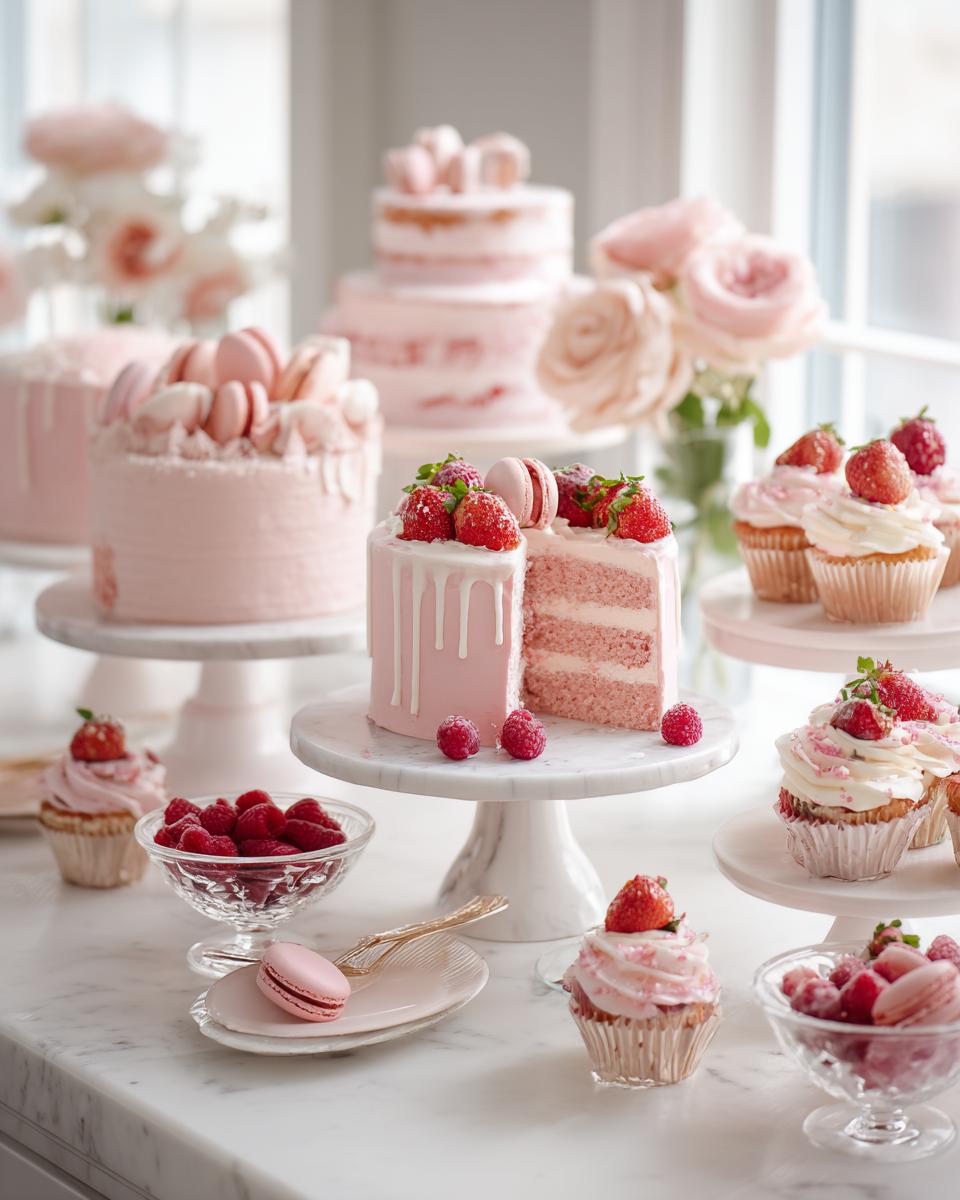
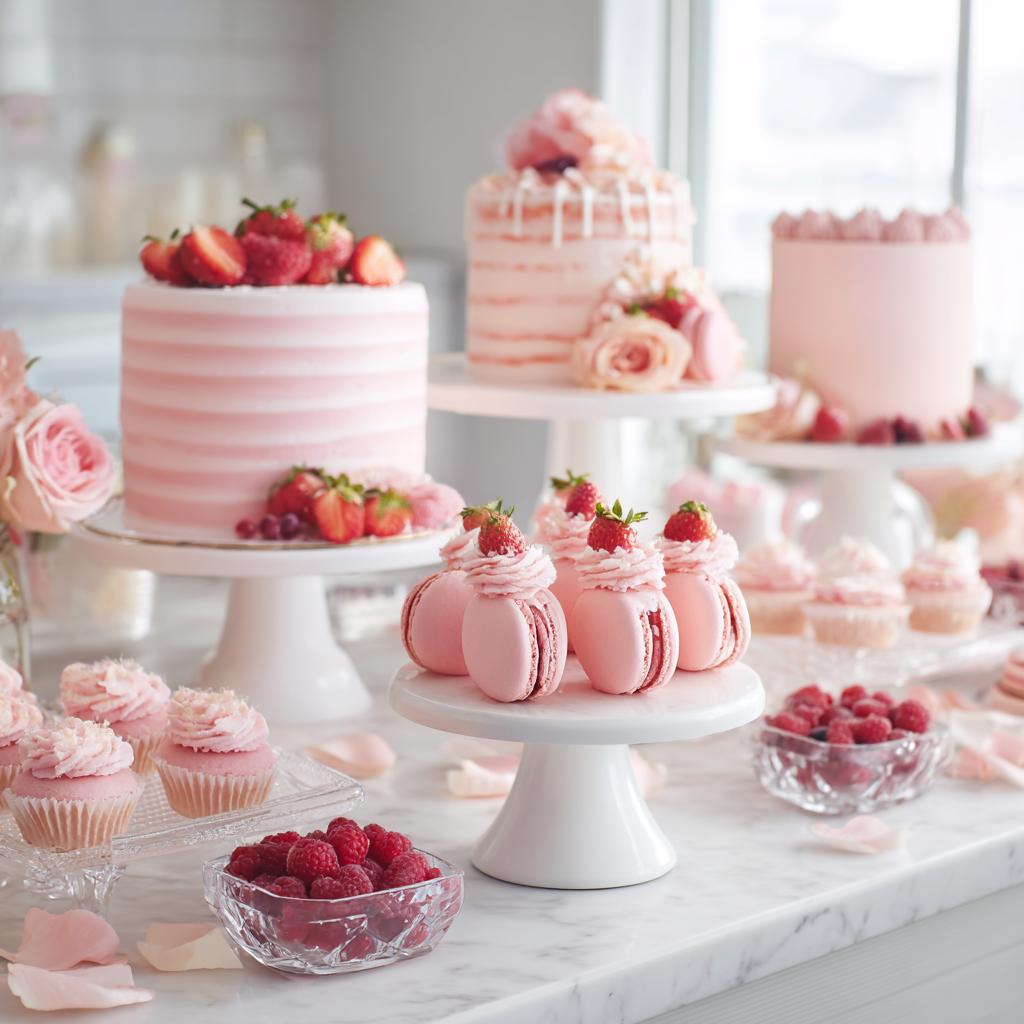
Honestly, you want that table to look like a dreamy pink cloud exploded onto it, right? If everything is just sitting flat on a sheet pan, it looks like someone forgot the party planning. This approach focuses on making every single element look intentional and super luxurious. It’s all about creating those swoon-worthy baby shower dessert ideas that guests will talk about later! Having a gorgeous setup is essential for that perfect Pinterest-ready feel.
Creating Visual Height and Texture
This is my absolute favorite part! You can’t just serve cake on a dinner plate and call it a day. You need height! Grab every cake stand, pedestal, and even upside-down sturdy bowls you have when setting up. Placing the main cake high up draws the eye immediately. We’re aiming for elegant baby shower treats that look like they cost a fortune, even when they didn’t! Think about textures too—smooth frosting next to crisp meringues and shiny chocolate, or maybe something like these stacked strawberry delights!
Cohesive Color Palette for a Pastel Dessert Display
Sticking firmly to shades of pink, blush, and white is the secret sauce for making things look polished. When you mix neon green macaron with bright red cake pops, it gets chaotic fast. By keeping everything in the soft, lovely pink family, you create a unified pastel dessert display. Trust me, if it’s pink, it belongs on the table!
Essential Components for Your Pink Dessert Table for Baby Shower
Okay, now we need the star of the show! You cannot have a successful baby shower sweets table without a show-stopping main bake. While we’ll add lots of little pink extras later, this vanilla cake, dyed gorgeously pink, will be the centerpiece that anchors everything. It bakes up beautifully soft and holds its shape perfectly for stacking layers. Think of this recipe as your foundational piece for creating something truly memorable!
Ingredients for the Pink Vanilla Cake Base
Make sure you have all your wet and dry goods measured out before you start creaming the butter. Little tip: room temperature butter is non-negotiable here for getting that fluffy texture we want!
- 2 cups all-purpose flour
- 1.5 cups granulated sugar
- 0.75 cup unsalted butter, softened
- 4 large eggs
- 1 cup whole milk
- 2 teaspoons vanilla extract
- 1 tablespoon baking powder
- 0.5 teaspoon salt
- 1 Pink gel food coloring (for batter)
Ingredients for the Pink Buttercream and Garnish
We are using a sturdy American buttercream here so it can handle being displayed for a few hours, and the fruit adds that necessary pop of fresh, real flavor against the sweet frosting. I also always have extras on hand, like these cream sandwiches, just in case!
- 3 cups powdered sugar
- 0.5 cup heavy cream
- 1 Pink gel food coloring (for frosting)
- 1 White chocolate chips (for melting)
- 1 Fresh raspberries and strawberries (for garnish)
- 1 Edible rose petals (for garnish)
Step-by-Step Instructions for the Pink Dessert Table for Baby Shower Cake
This is where the magic really happens! Don’t rush any of these steps, especially related to creaming the butter—that sets the foundation for a tender cake, which is exactly what we need for this centerpiece bake. Following this sequence will ensure you get that perfect base for your Pink Dessert Table for Baby Shower setup.
Mixing the Pink Cake Batter
First thing, preheat that oven to 350\u00b0F (175\u00b0C) and get your pans ready. You won’t want to stop once you start mixing! Take your softened butter—remember, it needs to be soft but not greasy—and cream it with the sugar until it’s fluffy and pale. Then, slowly add those four eggs, one by one, making sure each one is beaten in completely before the next goes in. Now for the fun part: mix in the vanilla extract and add just a few drops of your pink gel coloring until you hit that perfect soft shade. In a separate bowl, quickly whisk your flour, baking powder, and salt together. Then, just start alternating! Add a third of the dry mix, then half the milk, then another third of the dry mix, the rest of the milk, and finish with the last of the dry ingredients. Mix only until you don’t see flour streaks anymore. Overmixing is the enemy!
Baking and Cooling the Cake Layers
Divide your beautiful pink batter evenly among your prepared pans. We’re looking at baking for 20 to 25 minutes. You know it’s done when a toothpick inserted right in the center comes out clean—no wet batter clinging to it! But here is the HUGE key for any big party spread: cooling time. You absolutely must let these cool in the pans for about ten minutes before turning them out onto a rack. Then, let them cool completely, and I mean completely! That custom time of 60 minutes is vital because trying to frost a warm cake turns the whole thing into a pink puddle. Patience pays off!
Assembling and Frosting the Pink Themed Desserts
Once everything is totally cool, it’s time for the frosting! Grab that powdered sugar, heavy cream, and your frosting coloring. Beat it all together until it’s smooth and spreadable. I like making mine slightly stiffer so it holds its shape well when I pipe or spread it over the layers. Cover your cake entirely—this is the shell that protects it and looks so gorgeous! After the main cake is frosted, use the remaining frosting to pipe little dollops onto your base cake boards or any other small treats, like the sugar cookies you might be making. This helps anchor those smaller pink themed desserts to the table design.
Expert Tips for Achieving a Stunning Pink Dessert Table for Baby Shower
Okay, you have your gorgeous pink cake base, but now we have to make that entire table sing! This is what separates a nice bake from a truly unforgettable Pink Dessert Table for Baby Shower. Forget just setting treats on a flat surface; we’re focusing on creating dimension and variety. You need lots of little surprises throughout the table to keep people looking! It’s all about putting your best baby shower dessert ideas forward.
Incorporating Non-Cake Pink Themed Desserts
To really nail that elegant look, you need variety alongside your main cake. Think about texture and scale! I always try to include things that balance the richness of the cake. Maybe some delicate pink French macarons—those are always a winner—or fluffy white meringues tinted the softest blush pink? Even simple things like pink lemonade shooters or a bowl of sugar-dusted strawberries add necessary visual contrast. Don’t forget chocolate-covered pretzels dipped in pink candy melts—they add a salty crunch, which is always welcome next to something sweet like my almond scones! A lot of inspiration for color pairing can be found over at places like Better Homes & Gardens, just for color scheme ideas!
Styling the Pastel Dessert Display with Props
If you want that truly elegant look, the staging is everything. Start by sourcing different heights. Borrow metal cake stands, use wooden risers, or even stack some nice books covered in elegant fabric underneath a simple platter to get that lift. Color-wise, stick to soft linens—blush pink, cream, or even a subtle gold runner really makes the desserts pop. And seriously, natural light is your best friend for photos, but if you have to use lamps or string lights, make sure they cast a warm, flattering glow on everything. A few small, fresh pink roses tucked around the platters finishes the look perfectly for your pastel dessert display.
Equipment Needed for Your Pink Dessert Table for Baby Shower
You don’t need a professional kitchen to pull this off, but you do need the right basic tools. I always check my kitchen inventory the night before to make sure I have these things ready to go. Having everything organized is half the battle when you’re trying to coordinate a whole baby shower sweets table!
Here is the checklist for the cake portion of your beautiful spread. If you’re short on something, don’t panic; check out party supply sites like Oriental Trading for cheap yet cute platters if you can’t borrow from friends!
- Large mixing bowl (for the main creaming process)
- Baking pans (whatever size you decide on—rounds work great!)
- Separate bowl (essential for mixing your dry ingredients without overdeveloping gluten)
- Whisk (for combining your dry components quickly)
Of course, once you start adding those complementary treats, like chocolate-dipped strawberries or small pink candies, you’ll need things like dipping trays and maybe some silicone mats, but these four items handle the core cake recipe!
Making Ahead and Storage for Elegant Baby Shower Treats
Planning a big event like a baby shower means timing is everything! You do not want to be stressed out the morning of, trying to bake and frost while everyone is arriving, you know? That’s why I always break the cake-making process down into manageable chunks. Getting your base baked early is a lifesaver for assembling those beautiful, elegant baby shower treats later on!
Storing Unfrosted Cake Layers
If you bake the layers a day or two ahead, they actually taste even better! Once they are completely cool—remember that crucial cooling time—wrap each layer tightly in plastic wrap, like a precious little present. You can store them at room temperature if your kitchen isn’t too warm, but if you want them to be absolutely perfect for layering the next day, tuck them into the fridge. If you’re planning way ahead, they freeze beautifully for up to a month! I have a whole guide on keeping breads and cakes moist when freezing, which works perfectly here.
Displaying the Finished Pink Dessert Table for Baby Shower
The final assembly obviously needs to happen closer to party time, mainly because of our gorgeous fresh fruit garnishes! If the cake is already frosted, you can store the finished centerpiece in the fridge overnight, but you absolutely must pull it out about two hours before the shower begins. This lets the buttercream soften up just a tiny bit so it tastes perfect. Always add the fresh raspberries and strawberries right before you place everything out. That way, your gorgeous Pink Dessert Table for Baby Shower looks picture-perfect and as fresh as possible for all the guests!
Common Questions About Creating a Pink Dessert Table for Baby Shower
When you get down to the details, sometimes little worries pop up. I’m here to tell you those are usually super easy fixes! We want this process to be fun, not the main source of stress for the shower planning. Don’t let tiny decisions derail your beautiful vision for the Pink Dessert Table for Baby Shower you’re dreaming up!
How can I make the pink color brighter without affecting the taste?
This is a really common worry! Most standard liquid food coloring is mostly water, so if you add too much, you thin out the batter or frosting, and that’s not good. My secret? You absolutely must use gel food coloring. It’s super concentrated, so you need just a toothpick tip of the gel, and boom—you get intense color without adding any extra liquid. It keeps your buttercream firm and your cake batter texture exactly right. It keeps your pink themed desserts vibrant!
What if I need more volume for my baby shower sweets table?
If your guest list grew and you need the table to look even more abundant, scaling up the cake is an option, but it gets tricky with baking times. A simpler route for your baby shower sweets table is adding filler treats! You can easily double or triple a tiny meringue recipe and tint them pink; they take up visual space without costing a fortune. Pink-tinted popcorn tossed in white chocolate is another cheap, cheerful filler that adds height when piled in a clear vase.
Can I use a different flavor base for these pink themed desserts?
Of course, you can skip the vanilla if you want! As long as you’re using ingredients that don’t drastically change the color, you’re good to go. For example, swapping the vanilla extract for a few drops of strawberry or raspberry extract will give you a whole new flavor dimension while keeping that perfect pale pink base for those elegant baby shower treats. Keep it bright, keep it fruity, and it works beautifully!
If you need more ideas on keeping those bases perfect, check out my tips on stopping sinkage in cakes—similar principles apply to keeping your flavorings distributed evenly!
Nutritional Estimates for the Pink Dessert Table for Baby Shower Cake
Now, I know when we’re planning something this fun and elegant, we aren’t exactly checking every calorie—it’s a celebration, after all! But I always like to give a vague idea of what’s going into whatever we bake for our big events. This cake uses a good amount of butter and sugar to give it that rich, classic crumb for your Pink Dessert Table for Baby Shower.
Since this recipe is designed to be the centerpiece, and the final product size can change based on how many layers you stack, these numbers are just a rough estimate per generous slice if you cut the whole batch into 12 pieces. Remember, these are just guides, not gospel!
- Estimated Calories: 480-550 per large slice
- Estimated Fat: 28g – 35g
- Estimated Protein: 6g
- Estimated Carbohydrates: 60g – 70g
A quick note here: If you use lighter cream in the frosting or skip the heavy chocolate drizzle we talked about earlier, those numbers drop a bit! But honestly, for pink themed desserts this pretty, I always say just enjoy it. Use good quality butter, and don’t stress too much on the details—the love poured into the presentation matters way more than the carb count, trust me on this one!
Share Your Pink Dessert Table for Baby Shower Creations
Now that you’ve got your base recipe and all my silly styling tips, the truly exciting part starts: showing off what you made! I absolutely live to see your beautiful work come to life. When you put this much love into making an elegant spread, you have to share it!
Did you manage to create that gorgeous height? What other pink themed desserts did you sneak onto the table alongside the cake? I want to see your finished Pink Dessert Table for Baby Shower!
If you followed this recipe, please stop by and leave a star rating right here on the page—it honestly helps other party planners find the best baby shower dessert ideas. If you tagged us online with photos of your stunning setup, I promise I’ll try to share it on my feed! Seeing your creativity running wild with these decorations, perhaps inspired by styles from Martha Stewart, makes all the recipe testing worth it.
If you have any lingering questions about your setup or need to send a photo directly, don’t hesitate to reach out via the contact page. Happy showering and happy styling!
Pink Dessert Table for Baby Shower
Equipment
- Large mixing bowl
- Baking pans
- Separate bowl
- Whisk
Ingredients
For the Cake
- 2 cups all-purpose flour
- 1.5 cups granulated sugar
- 0.75 cup unsalted butter, softened
- 4 large eggs
- 1 cup whole milk
- 2 teaspoons vanilla extract
- 1 tablespoon baking powder
- 0.5 teaspoon salt
- 1 Pink gel food coloring For batter
For the Frosting and Garnish
- 3 cups powdered sugar
- 0.5 cup heavy cream
- 1 Pink gel food coloring For frosting
- 1 White chocolate chips For melting
- 1 Fresh raspberries and strawberries For garnish
- 1 Edible rose petals For garnish
Instructions
- Preheat your oven to 350°F (175°C) and prepare multiple baking pans by greasing and lining them with parchment paper.
- In a large mixing bowl, cream together the softened butter and granulated sugar until light and fluffy, about 3-4 minutes.
- Add eggs one at a time, beating well after each addition, then mix in the vanilla extract and a few drops of pink gel food coloring until you achieve your desired shade.
- In a separate bowl, whisk together flour, baking powder, and salt.
- Alternately add the dry ingredients and milk to the butter mixture, beginning and ending with dry ingredients, mixing until just combined.
- Divide batter among prepared pans and bake for 20-25 minutes or until a toothpick inserted in the center comes out clean.
- Allow cakes to cool completely before preparing the frosting by beating powdered sugar, heavy cream, and a touch of pink coloring until smooth and spreadable.
- Frost your cooled cakes and arrange them on your dessert table alongside bowls of fresh berries, chocolate-dipped strawberries, and decorative elements.
- Melt white chocolate and drizzle over some treats, then garnish everything with edible rose petals for an elegant finishing touch.
- Arrange all desserts on varying heights using cake stands and pedestals, creating visual interest and a cohesive pink color palette throughout your display.