Oh, I am just so thrilled you’re here! If you ask me, there is nothing that shouts ‘Hello, Spring!’ louder than a perfectly bright, cheerful dessert. I’ve spent years trying to nail those light, airy bakes that look fantastic on a brunch table, and trust me, I’ve learned a thing or two about presentation!
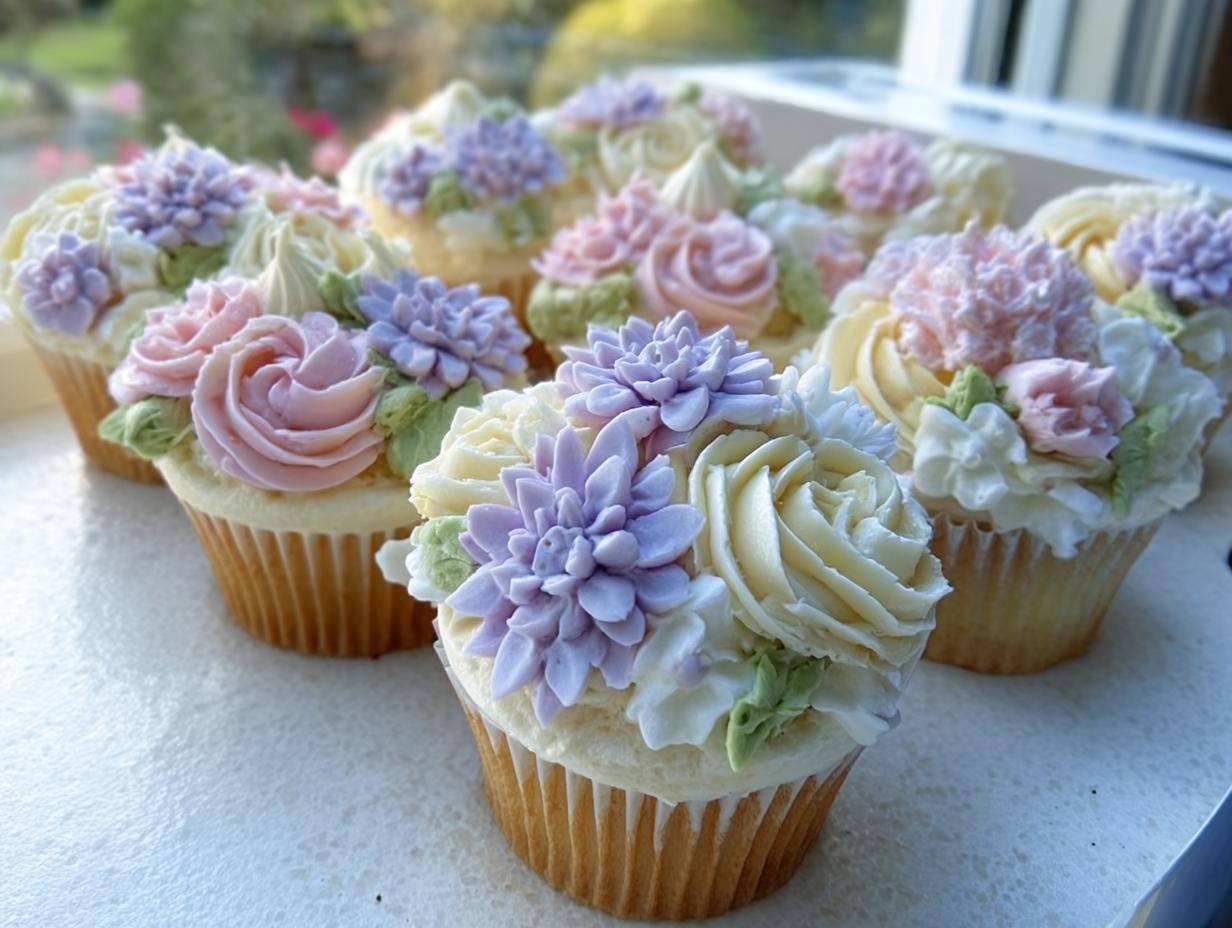
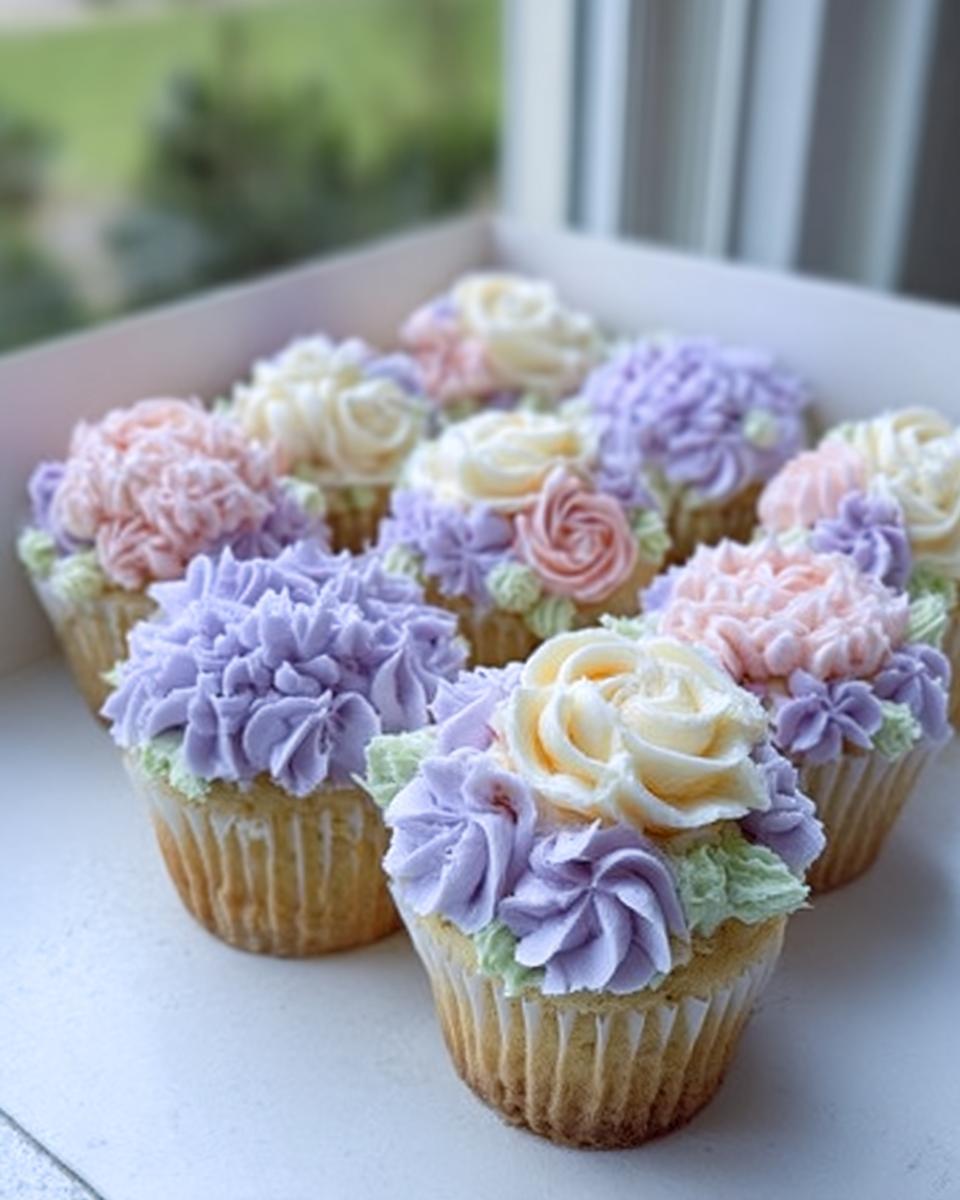
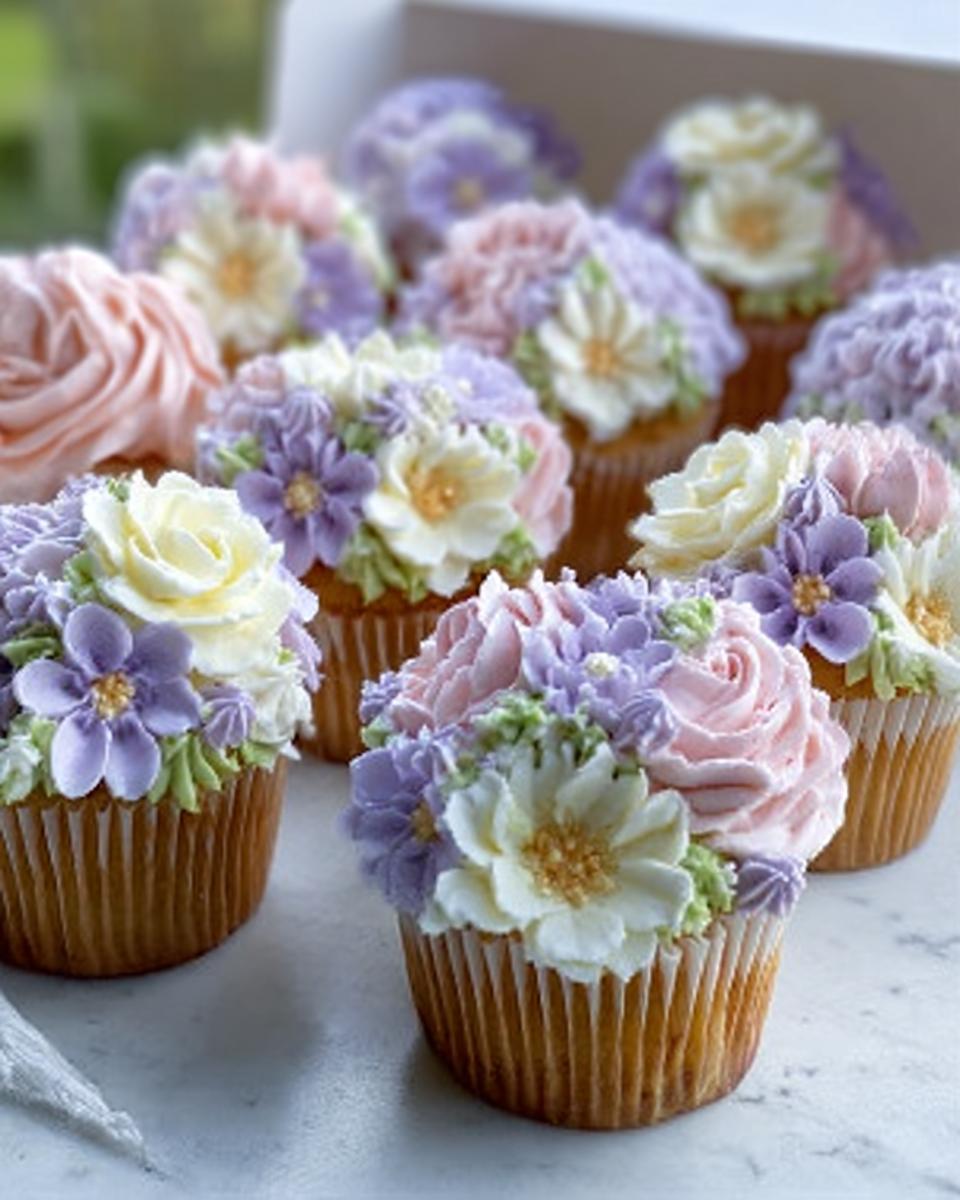
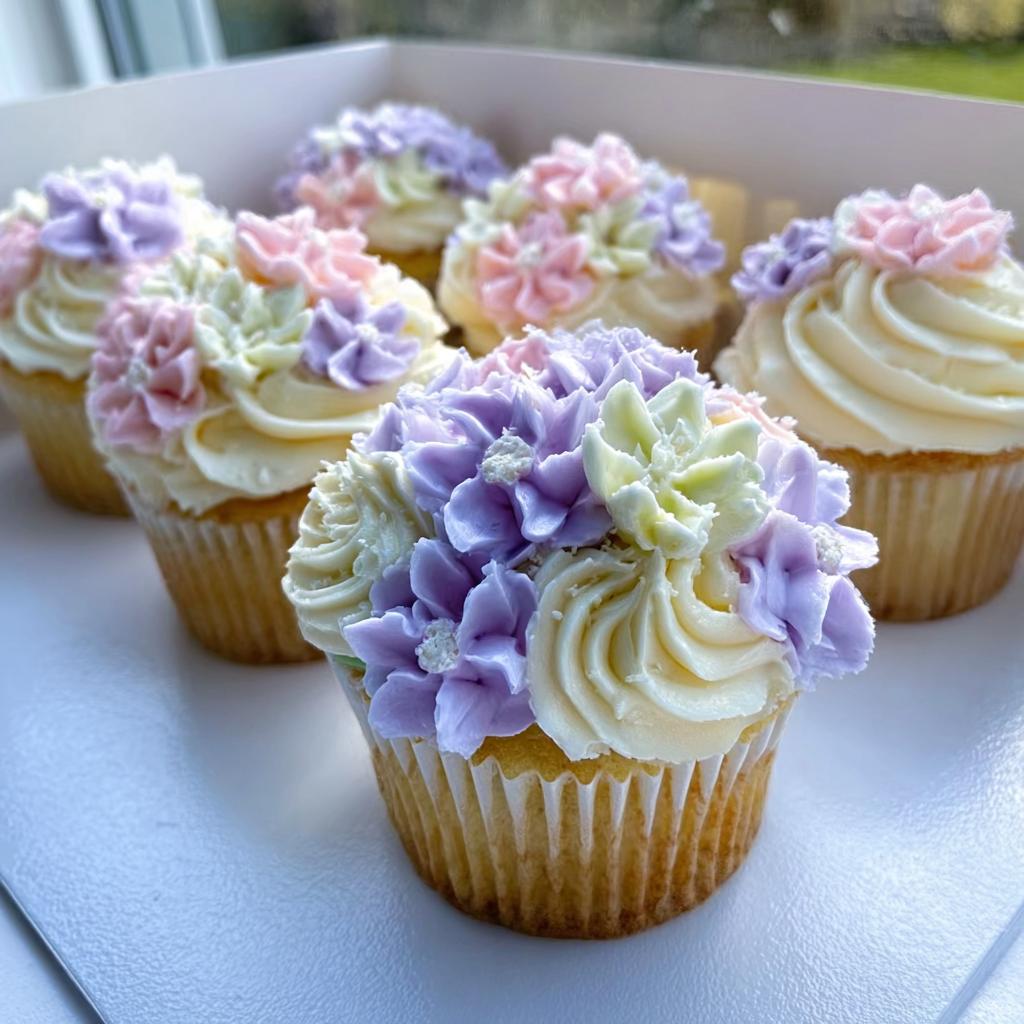
These Pastel Wildflower Cupcakes for Spring are honestly my favorite project when the weather finally turns warm. They’re not fussy or overly complicated, but the payoff is huge. That soft, pretty pastel tone, paired with those gorgeous little buttercream blooms, just makes everyone smile. I promise, you don’t need professional training to make these look like they came straight from a fancy bakery. We’re keeping the cake base super simple while letting the decoration do all the heavy lifting!
Why You Will Love These Pastel Wildflower Cupcakes for Spring
Honestly, I bake these for my neighborhood garden parties every single year now. They disappear faster than I can refill the stand! If you’re looking for that perfect centerpiece treat, look no further. Here’s why these pastel cupcakes deserve a spot in your spring baking rotation:
- They taste just like a light vanilla dream, providing the perfect neutral canvas for those colorful floral toppings. Seriously, the base is easy peasy!
- The visual impact is huge! They instantly transform your table into a springtime garden party setting. Everyone asks about these spring cupcakes.
- The recipe is wonderfully fast! We are working with a 20-minute prep time, which means you can whip up a dozen of these treats without spending all day in the kitchen.
- No advanced piping skills required if you use pre-made flowers, though I do have a fantastic frosting recipe you might want to check out if you get adventurous later, like my sprinkle cookie frosting which you could probably adapt!
- They hold up beautifully! Because the cake base isn’t too delicate, you can assemble these in the morning and they still look perfect by afternoon tea. You can find other great inspiration over at Delish, too, like these easy cupcake recipes for when you need a quick fix.
Essential Equipment for Perfect Pastel Wildflower Cupcakes for Spring
You don’t need a professional bakery setup to pull off these gorgeous little treats, I promise! But having the right tools makes the process so much smoother, especially when you’re aiming for that perfect light crumb in your 12 cupcakes. If you have the basics, you’re golden.
First up, you absolutely need your mixing bowls, of course. But my biggest piece of advice here for getting the best texture in these Pastel Wildflower Cupcakes for Spring? An electric mixer is your friend!
You’ll see in the instructions that we need to cream the butter and sugar until it’s light and fluffy. Doing that by hand takes forever, and honestly, you usually don’t get enough air incorporated. That air is what keeps these little guys from turning dense. So, dust off that hand mixer or stand mixer!
And naturally, you’ll need a standard cupcake pan, ready with liners, to make sure your dozen bakes up evenly. That’s really it for the essentials—no fancy attachments required!
Ingredients for Your Pastel Wildflower Cupcakes for Spring Batter
Okay, listen up! This is the area where people sometimes get tripped up, so read carefully. The genius behind these Pastel Wildflower Cupcakes for Spring is that the cake itself is a beautiful, simple vanilla base. It supports those colorful flowers perfectly without overpowering them. We’re focusing only on the cake part here!
Remember that my note says you need a separate recipe for the flowers? That’s important! If you want some inspiration for gorgeous toppings, you might want to check out my pistachio cupcakes post—I used a similar technique for the frosting there that you can easily color beautifully.
For the very best results, make sure your butter is actually softened, not melted! A lot of texture trouble comes from rushing this step. You can find tons of general baking advice over at Betty Crocker, too, if you ever need a backup on basics like cupcake recipes.
For the Cupcake Batter
We need enough ingredients here to make a lovely, rich dozen:
- 1.5 cups flour
- 1 cup sugar
- 2 eggs
- 0.5 cup butter, softened — seriously, make sure it’s soft enough to indent easily!
- 0.5 cup milk
- 1 tsp vanilla extract
- 1 tsp baking powder
For the Decoration
This is where the magic happens visually, but alas, it requires some planning ahead! You’ll need to prepare this component separately:
- Pastel buttercream flowers – for decorating. You need enough piped blooms to look like a tiny field on top of each of your 12 cupcakes!
Step-by-Step Instructions for Amazing Pastel Wildflower Cupcakes for Spring
Alright, let’s get baking! These instructions are broken down so you can check items off as you go. We want a fantastic foundation so those beautiful pastel cupcakes really look professional when they come out of the oven. You’ve got this!
Preparing the Batter and Oven
First things first, we need to get ready for action because we don’t want anything cooling down prematurely! Preheat your oven right now to 180°C (350°F). While that’s warming up, line your cupcake pan with liners; this saves so much cleanup later, trust me.
Now for the batter core. Grab that softened butter—it needs to be soft!—and your sugar. Use your electric mixer to cream these two together until they look genuinely light and fluffy. We’re talking pale yellow and slightly airy here; this step is crucial for a fluffy cupcake!
Next, slowly work in your two eggs, one at a time, making sure each one is fully incorporated before you add the next. Once those are mixed in, drizzle in that vanilla extract. Just keep mixing gently until everything looks combined and creamy.
Mixing and Filling the Pastel Wildflower Cupcakes for Spring
In a separate bowl, just whisk your flour and baking powder together lightly. That’s your dry team!
This part is where you can’t rush; you need balance! We are going to mix the dry ingredients into the wet ingredients alternately with the milk. What does that mean? Well, start by adding about a third of the flour mixture, mix until *just* combined. Then add half the milk, mix. Repeat with another third of the flour, the rest of the milk, and finish with the final bit of the flour mixture. Always begin and end with the dry ingredients!
Stop mixing the second you don’t see any more streaks of flour. Over-mixing right now leads to tough Pastel Wildflower Cupcakes for Spring, and nobody wants a tough spring treat! Once it’s mixed, fill those liners about two-thirds full. Seriously, don’t overfill them, or you’ll end up with those funny mushroom tops that break off when you try to frost them! For more tips on getting your mixing ratios just right, you can look at some tips I shared for my scone recipe—the creaming rules are similar!

Baking, Cooling, and Decorating
Pop that pan into your preheated oven and set your timer for 18 minutes. While you can check earlier, 18 minutes is usually spot on for a standard cupcake size.
How do you know they’re done? The toothpick test! Stick one right into the center of a cupcake; you want it to come out clean or with just a few moist crumbs clinging to it—not wet batter! That’s the hallmark of a perfectly baked cupcake. For more general baking guidance, BBC Good Food has tons of resources on cupcake recipes if you have any doubts about the bake time.
Once they pass the test, get them out immediately onto a wire rack. This is super important: they must cool completely, I mean totally cold to the touch, before you even *think* about adding your beautiful pastel buttercream flowers. If the cakes are even slightly warm, your gorgeous blooms will just melt into a greasy puddle. Patience pays off here, trust me!
Tips for Success Making Your Spring Cupcakes
I’ve learned a few things over the years when I’m making batches of these lighter, airier spring cupcakes, especially when I want that perfect, even top ready for piping. It all comes down to temperature control, honestly!
Here are my top three non-negotiables to ensure your 12-cupcake batch is flawless:
- Room Temperature Eggs are a Must: Don’t just take your eggs straight from the fridge! If your butter is room temp but your eggs are icy cold, the batter will seize up and look curdled right in the bowl. Just pop your eggs in a bowl of warm (not hot!) water for five minutes before you start. This helps them emulsify beautifully with the creamed butter and sugar, leading to a smoother, more stable batter.
- Don’t Over-Cream the Butter Alone: When you’re beating the butter and sugar, you’re introducing air, which is great! But stop beating once it looks light and fluffy. If you keep going for too long before adding the eggs, the structure can start to break down, and those tiny air bubbles can collapse before they even hit the oven. A minute or two past pale yellow is usually plenty.
- The Cooling Rack is Your Best Friend: I know you want to get those beautiful flowers on top ASAP, but that surface has to be stone cold. If you leave them sitting in the hot metal pan for even five minutes too long, the residual heat will start to cook the bottoms and sides unevenly. Transfer them to that wire rack immediately so air can circulate all around them. Cold cakes = happy, sturdy frosting base!
Follow those little tips on temperature and timing, and your batch of pastel cupcakes will rise beautifully and be ready for their floral makeover without any drama!
Ingredient Notes and Substitutions for Pastel Cupcakes
Since we are keeping the cake recipe itself uncomplicated—a simple, tender vanilla base—our focus really shifts to ingredient quality and, of course, those gorgeous flowers! When you look at the ingredient list, you’ll notice that most things are pretty standard, but even small choices make a difference in these delicate pastel cupcakes.
My number one tip for any vanilla-based recipe is never, ever skimp on the vanilla extract. You are relying on that flavor to shine through, especially since we aren’t loading this batter down with brown sugar or heavy spices like carrot cake. Use a good quality pure vanilla extract; the imitation stuff just tastes thin and sharp, and we want smooth, comforting flavor here!
If you’re looking for substitutions for the milk, you can absolutely use buttermilk if that’s all you have on hand—it will add a lovely little tanginess that brightens the cake, though the texture might be *slightly* different. I talk a bit about that creamy dairy choice over in my post about heavy cream versus buttermilk for scones, and the same principles about acidity apply here!
But let’s talk about the 800-pound gorilla in the room: those buttercream flowers!
As I mentioned, this recipe only covers the base. You will need a separate, high-quality buttercream recipe capable of holding a very stiff shape for piping those delicate petals. If you are making your own, ensure your fats (butter, shortening, if you use it) are perfectly cooled before you start adding your powdered sugar, otherwise, you’ll end up with soft frosting that droops before you get it onto the cooled cupcake. It’s really all about having that dense, buttery structure to hold those beautiful spring colors!
Storage and Serving Suggestions for Pastel Wildflower Cupcakes for Spring
Once you’ve put all that hard work into making the perfect cake base and topping them with those gorgeous little blooms, you want to make sure they stay looking perfect until it’s time to eat! Storing decorated cupcakes requires a little bit of strategy, especially when you’ve got buttercream flowers on top of your Pastel Wildflower Cupcakes for Spring.
Here’s the deal: since these are topped with buttercream, they really prefer the cool air of the refrigerator, especially if you are making them more than a few hours ahead of time or if your kitchen is warm. If you put them in the fridge, just make sure you store them in an airtight container, though. If you leave them uncovered, they’ll suck up all the stale air and dry out quickly—and nobody wants a dry cupcake!
When you are ready to serve them after they’ve been chilling, pull that container out about 30 minutes before you plan on eating them. Buttercream actually tastes much better when it’s not rock hard, so letting them come up to room temperature just slightly makes the texture softer and the flavor bloom!
As for serving these beauties? Because they are so light and visually spring-focused, you want accompaniments that match that fresh feeling. They are heavenly with a cup of hot tea—I actually have a recipe for a wonderful iced chai tea latte that would be divine alongside these, even if you skip the ice!
For a non-caffeinated option, a nice, light lemonade or sparkling water infused with mint and cucumber seems to complement the delicate visual theme of the pastel cupcakes perfectly. They truly feel like an outdoor, sunny treat, so serve them up anytime between brunch and afternoon tea for maximum enjoyment!
Frequently Asked Questions About Wildflower Cupcakes
I get so many messages asking about little tweaks for these lighter wildflower cupcakes, and that’s completely normal! Baking is all about making a recipe your own. Here are a few things people commonly ask me when they are planning their own batch of spring cupcakes.
Can I make the cake batter ahead of time and store it?
You know, I really wouldn’t recommend it for this particular recipe. Because the batter has a good bit of leavening agent (baking powder) and relies on that freshly mixed structure for the light texture, letting the batter sit for too long can cause it to deflate before it even hits the oven. If you want to prep ahead, I suggest mixing all your dry ingredients and all your wet/creamable ingredients separately, then mix them together right before you plan to bake. If you need a true make-ahead recipe, I talk about storing some of my breakfast items, like my protein breakfast bowls, which have much more flexible storage needs!
How can I color the cake batter itself to be pastel?
That’s a fun idea if you want the entire cupcake crumb to look like a little spring meadow! You absolutely can, but you have to be careful not to overmix when you incorporate the food coloring. Remember how I stressed alternating the dry and wet? When you add the color, treat it as part of the liquid addition. Use gel food coloring instead of liquid drops, because those drops add unnecessary moisture. You only need the tiniest dot of gel color to transform the batter. Start small, add a little, mix until just incorporated, and check the shade before adding more!
Do these pastel cupcakes need to be refrigerated after decorating?
If you’re serving them the same day, room temperature is fine—especially if you used a very stiff American or Swiss meringue buttercream for your piped flowers. However, if you are storing leftovers or if your kitchen is hot (say, over 75°F!), then yes, pop them in a sealed container in the fridge. Remember what I said before: refrigeration is better for preserving the integrity of the butter in the frosting, but you definitely want to pull them out about 30 minutes before serving so that the cake and the frosting soften up nicely!
What if I don’t have an electric mixer? Can I still make these?
Oh, bless your heart! It’s definitely doable, but it’s going to require some serious arm strength, especially during the creaming stage! You must beat the butter and sugar until it’s pale and fluffy—this takes way longer by hand. Be patient, use a sturdy wooden spoon, and really work that mixture in a big bowl. If you can’t get it super light, your final cupcakes will be denser, but they will still taste great. Just make sure you’re very gentle when adding the flour so you don’t overdevelop the gluten!
Share Your Beautiful Pastel Wildflower Cupcakes for Spring
Well, my friends, that’s it! You’ve made beautiful, seasonal, utterly gorgeous Pastel Wildflower Cupcakes for Spring. Now comes my favorite part: seeing your creations!
Baking is all about sharing, and honestly, there is nothing that makes me happier than seeing your kitchen counters turn into fields of little edible flowers. If you follow the steps we went over—especially paying attention to that cooling time before you pipe the buttercream—you’re going to have 12 stunning little desserts ready for whatever spring celebration you have planned.
When you pull them out, I would absolutely love it if you’d share a photo! Tag me on social media or just leave a comment right down below on this post. It means the world to me, Grace Williams over here at Recipes by Betty, to know that my little recipe helped bring a bit of light and flavor to your day.
And hey, if you loved how simple this base was, why not give this recipe a quick 5-star rating? It really helps other bakers find the reliability in this recipe. You can also check out my full bio page right here to read a bit more about my journey into making visually perfect desserts!
Happy Spring baking, enjoy every pastel bite!
Pastel Wildflower Cupcakes for Spring
Equipment
- Mixing Bowls
- Electric mixer
- Cupcake pan
Ingredients
Cupcake Batter
- 1.5 cups flour
- 1 cup sugar
- 2 eggs
- 0.5 cup butter softened
- 0.5 cup milk
- 1 tsp vanilla extract
- 1 tsp baking powder
Decoration
- pastel buttercream flowers for decorating
Instructions
- Preheat your oven to 180°C (350°F). Line a cupcake pan with liners.
- Cream the softened butter and sugar together until light and fluffy.
- Add the eggs one at a time, mixing well after each addition. Stir in the vanilla extract.
- Combine the flour and baking powder. Mix the dry ingredients into the wet ingredients alternately with the milk, beginning and ending with the flour mixture.
- Fill the cupcake liners about two-thirds full with batter.
- Bake for 18 minutes, or until a toothpick inserted into the center comes out clean.
- Remove the cupcakes from the pan and let them cool completely on a wire rack.
- Decorate the cooled cupcakes with pastel buttercream flowers before serving.