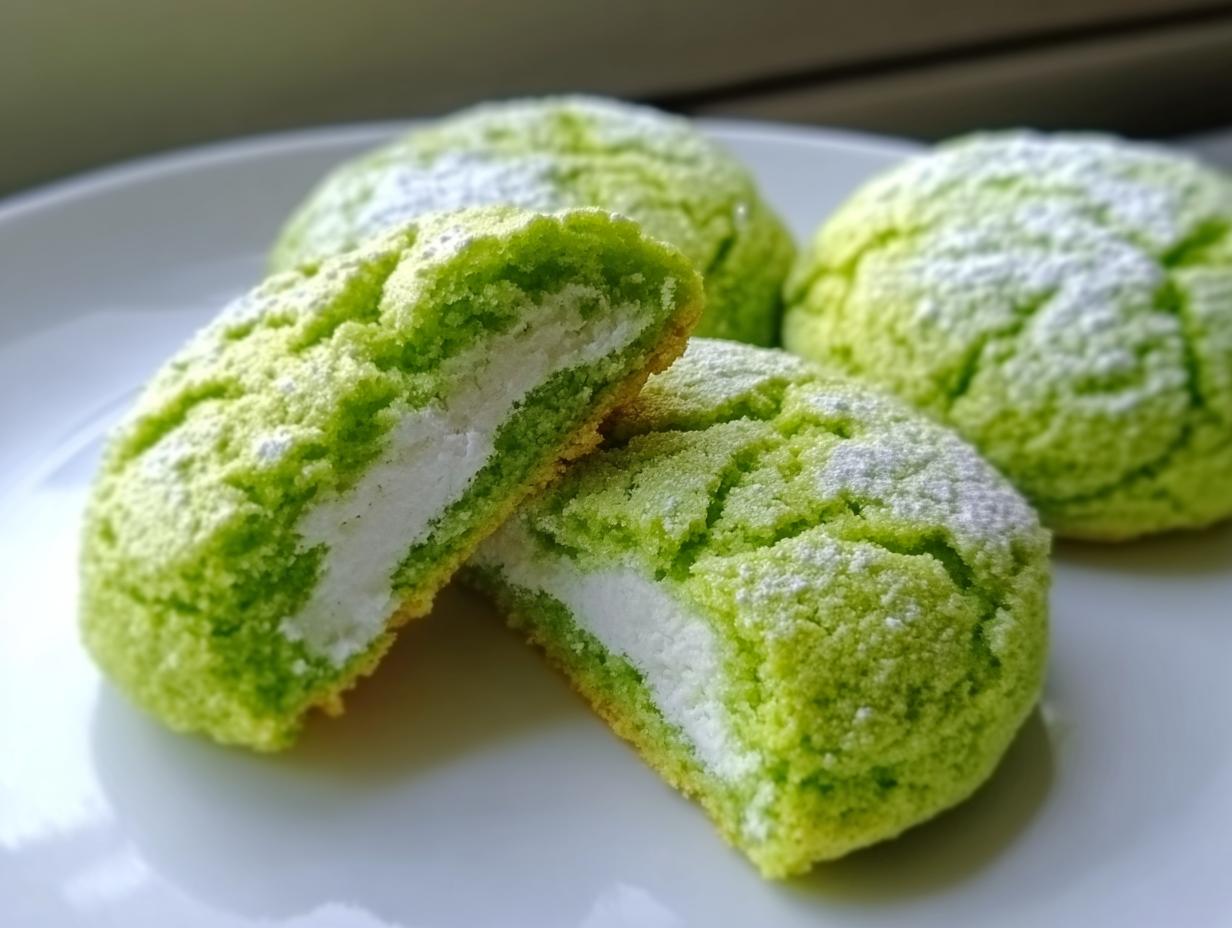
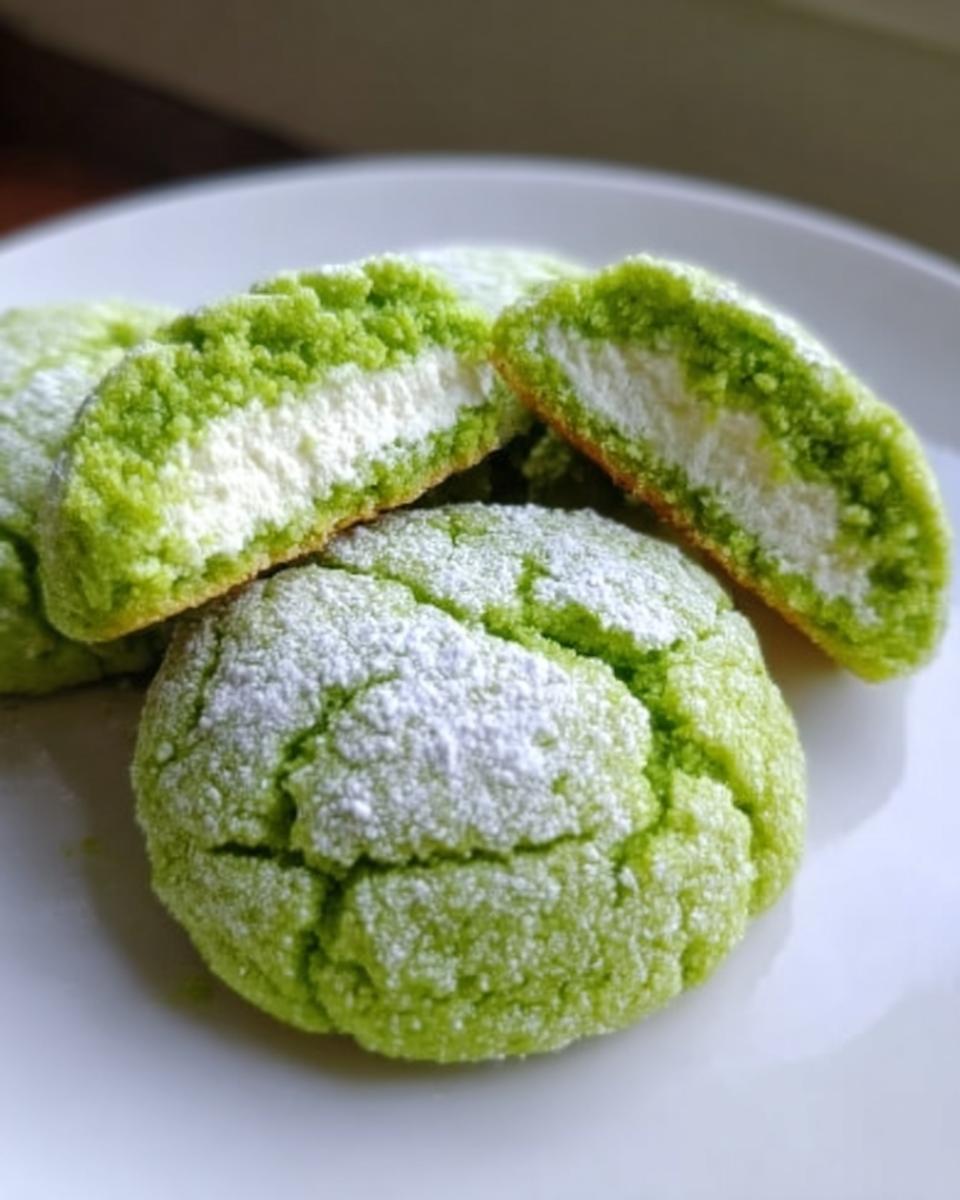
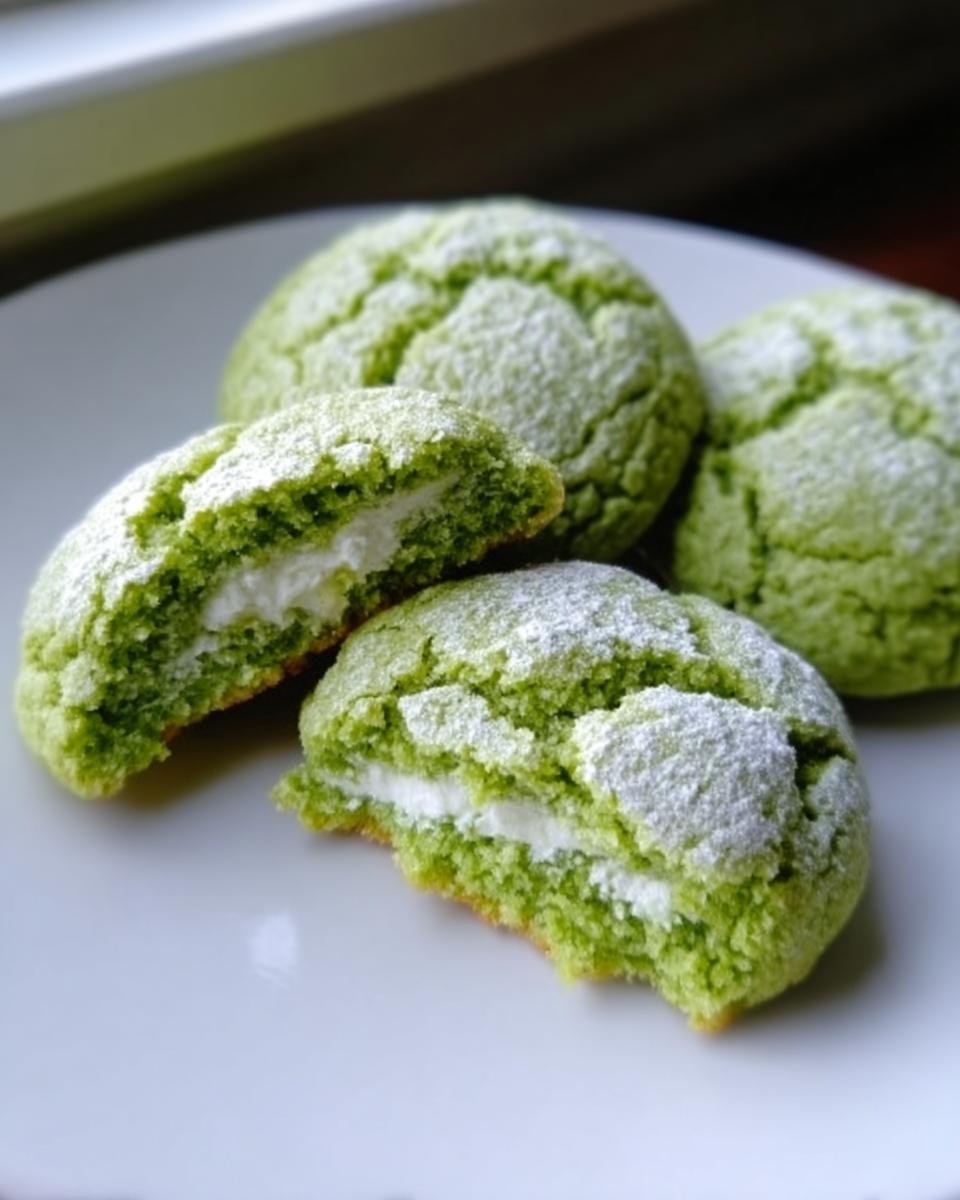
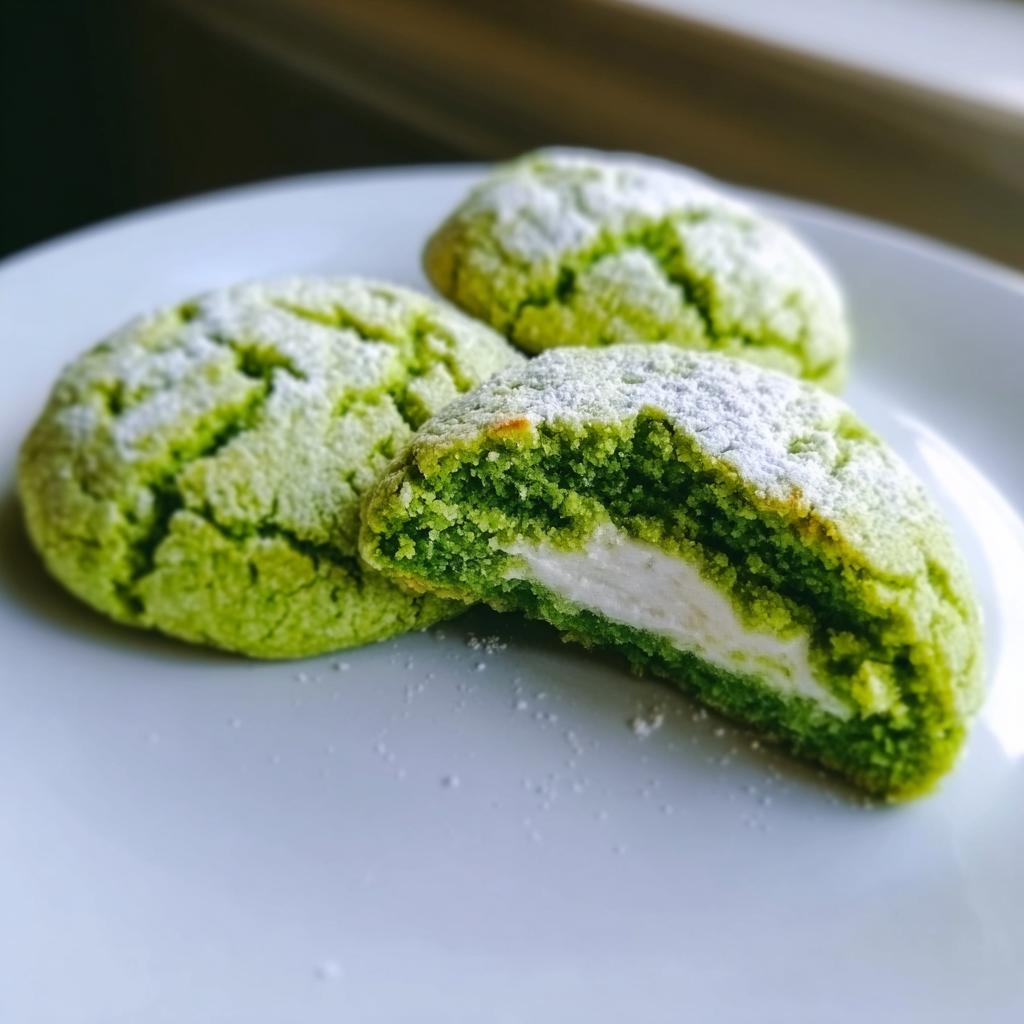
If you’re hunting for a cookie that screams celebration but melts in your mouth like velvet, stop right here. Seriously, these Green Velvet Cream Cheese Cookies are everything you could want in a holiday treat! They aren’t crisp; oh no, they are soft, tender, and just cake-like enough to feel decadent. The best part? Snapping one open to find that sweet, hidden cream cheese center—it’s like a little surprise in every St Patty Day Food bite.
These cookies remind me of baking days where color alone made everything feel more joyful before the first bite. Trust me, everyone is going to want this recipe once they see the vibrant green peeking out!
Why You Will Love These Green Velvet Cream Cheese Cookies
I swear, these aren’t just cookies; they’re little pockets of happiness, especially when you need some fun St Patty Day Food on the table. Here’s why I promise you this recipe needs to be your next baking project:
- They have an unbelievably soft, cake-like texture that practically dissolves in your mouth.
- That surprise center! The tangy, sweet cream cheese filling disappears beautifully against the velvet dough.
- They look incredible! The vibrant green makes them instant stars for any St Patrick’s Day Party.
- Honestly, they come together fast, even with the chilling time. Prep is a breeze!
- They are much easier to handle than typical drop cookies once they’re chilled and filled.
Essential Equipment for Perfect Green Velvet Cream Cheese Cookies
You don’t need a huge arsenal of fancy gadgets for these cookies, which is part of why I love them so much, honestly. We are aiming for soft, tender Green Snacks, and having a few solid tools makes all the difference in the mixing process.
Here’s what you definitely need handy before you start:
- A couple of trustworthy Mixing Bowls to keep your wet and dry ingredients separate initially.
- Your trusty Electric Mixer—handheld or stand mixer, doesn’t matter!
- A couple of sturdy Baking Sheets ready to go.
- Plenty of Parchment Paper to line those sheets; sticky doughs like this one need it!
Now, here’s a little tip about that mixer: when you are creaming the butter and sugar—that super important step to get that cakey texture—don’t rush it! Scrape down the sides of the bowl halfway through, even if you think you don’t need to. We want all that butter incorporated evenly to avoid dense spots later on. Trust me, a well-mixed base makes the final texture perfection!
Ingredients for the Green Velvet Cream Cheese Cookies
Okay, let’s talk about what makes these Green Velvet Cream Cheese Cookies work their magic! Recipe development is all about the right starting blocks, and for these, the texture hinges entirely on two things being perfectly softened: your butter and your cream cheese. If they’re too cold, you won’t get that beautiful, airy dough structure we need for a soft cookie.
When you’re grabbing your salt, remember that the type you use matters for flavor balance! If you want a deep dive into why, I wrote a whole thing about kosher salt versus sea salt, but for now, just use what you have handy!
Keep in mind, you can find fantastic primary cookie recipes over at Betty Crocker, like their collection of best cookie recipes, but our velvet twist is unique!
For the Cookies
This is the dough that gets that signature vibrant color. Don’t skimp on the green coloring if you want them to really pop for your St Patrick’s Day Treats!
- 240g all-purpose flour
- 30g cocoa powder (just a touch for that red velvet color base!)
- 5g baking soda
- 2g salt
- 150g sugar
- 120g unsalted butter, softened (and I mean truly soft!)
- 1 egg
- 10ml vanilla extract
- Green food coloring, to desired color (Be generous! We want GREEN!)
For the Cream Cheese Filling
This is the gooey, tangy heart of the cookie. Make sure your cream cheese is softened up so you don’t end up with lumps, which can actually cause your cookies to crack more during baking.
- 170g cream cheese, softened
- 60g icing sugar
- 5ml vanilla extract
Step-by-Step Instructions for Green Velvet Cream Cheese Cookies
Alright, buckle up! This is where the magic happens. If you follow these steps exactly, you’ll have those gorgeous, soft Green Velvet Cream Cheese Cookies that look store-bought but taste so much better because you made them yourself. Remember, while the recipe seems detailed, it’s really just three main stages: mixing the dough, chilling everything, and then assembling the surprise center.
I’ve broken it down so you can’t mess it up! When we get to the mixing part, remember that expert tip I shared about gentle handling? Overmixing develops gluten, and we want cookies that look like little cakes, not tough biscuits. For more baking insights, check out my tips on achieving perfect scones; the principle of not over-handling the dough is the same here!
If you need some inspiration once you’re done, Taste of Home has a great collection of top cookie recipes to browse!
Preparing the Cookie Dough Base
We need to build the structure first. Start by getting your components organized so you can mix efficiently.
- Whisk the flour, cocoa powder, baking soda, and salt together in one bowl. This dry mixture is going to give our cookies that slight depth against the green and cream cheese flavor. Set this aside for now.
- Now, in your big mixing bowl, beat that softened butter and the sugar together until the mixture is absolutely light and fluffy, looking almost pale. This creaming step is crucial for the cakey texture!
- Next, add in your egg, the vanilla extract, and every drop of that green food coloring. Mix it until everything is beautifully smooth and uniformly vibrant. Don’t stop until that gorgeous green is even throughout!
- Finally, slowly mix in your dry ingredients into the wet ones. I mean slowly—gradually add that flour mix until a soft dough just comes together. Stop mixing as soon as you can’t see any more dry streaks remaining. That’s it! Don’t keep going, or they’ll get tough!
Chilling and Preparing the Cream Cheese Filling
Patience pays off here, folks. I know you want to skip it, but that chilling time gives the gluten a rest and makes the dough firm enough to hold the filling without turning into soup.
- Wrap up your green dough tightly and pop it right into the refrigerator. You need to let it chill for a solid 30 minutes.
- While the dough is getting cold, let’s whip up the center. In a clean bowl, mix your softened cream cheese, the icing sugar, and the remaining vanilla extract until it’s lump-free and totally smooth.
- Take this filling bowl and chill it in the fridge alongside the dough. Keeping both components cold helps prevent the filling from melting out too soon when you place it in the warmer dough later!
Assembling and Baking Your Green Velvet Cream Cheese Cookies
This is the fun part where we turn dough and filling into a finished cookie. Remember, we are aiming for about 18 perfect treats here!
- Get that oven preheated to 175°C! While it’s heating up, line those baking sheets thoroughly with parchment paper. Trust me, parchment paper is your best friend for easy cleanup and non-stick assurance.
- Take your chilled dough and scoop out portions—you want them uniform so they bake evenly. Flatten each dough scoop just slightly with your palm.
- Take a tiny spoonful of that chilled cream cheese filling and carefully place it right in the center of the flattened dough. Now, this is key: gently bring the edges of the outer dough up and around the filling, sealing it completely. Roll it gently between your palms if you need to form a nice, round ball again. Make sure that seam is tight so you don’t have any filling leakage!
- Place these little wrapped dough balls onto your prepared sheets, leaving a couple of inches between them since they will spread a bit.
- Bake them for about 10 to 12 minutes. You’re looking for the edges to look set, but the centers should still look a little soft—they firm up as they cool.
- Let them sit right there on the hot baking sheet for about 5 minutes after they come out. This lets them set up before you mess with them. Then, carefully transfer them over to a wire rack to cool completely. Enjoy your stunning St Patrick’s Day Food Ideas!
Tips for Success with Green Velvet Cream Cheese Cookies
When you’re tackling a filled cookie like this, you need a few tricks up your sleeve to ensure you get those perfect, soft results and not a giant, messy puddle on the baking sheet. I learned these the hard way, so you don’t have to!
To keep these vibrant Green Snacks looking as good as they taste, here are my must-do fixes:
- Keep That Filling Cold: I mentioned it before, but it bears repeating—your cream cheese filling needs to be COLD when you wrap it in the room-temperature dough. If the dough is warmer than the filling, the filling races to melt out. If both are firm, they stand a fighting chance against the oven heat!
- Don’t Over-Color the Dough: While we want them bright for our St Patrick’s Day Treats, too much liquid coloring can actually throw off the moisture balance of the dough, making it sticky or even tough. Start with a few drops and gradually mix until you hit that rich, emerald shade you’re after.
- Seal Them Like a Little Bank Vault: When you bring the dough edges up over the filling, pinch that seam tightly shut. Really work it between your fingers to seal it. If you have a weak seal, the steam from the filling bursts out, leaving you with a cookie with a hole instead of a surprise center.
If you’re worried about your dough getting too soft while you’re rolling, just pop it back into the fridge for 10 minutes. It’s much easier to work with slightly chilled dough than dough that’s threatening to turn into soup. For more tips on keeping moisture right where you want it, check out what I wrote on preventing pumpkin bread from drying out—the science is similar for keeping these soft!
For general cookie inspiration that might help you plan your next bake, Pillsbury always has some fantastic cookie recipes on their site to browse!
Making Green Velvet Cream Cheese Cookies for a St Patrick’s Day Party
These Green Velvet Cream Cheese Cookies are tailor-made for your celebrations! Honestly, if you need standout St Patty Day Food that’s easy to serve to a crowd, these fit the bill perfectly. They are soft enough for the kids but rich enough for the grown-ups.
When planning your St Patrick’s Day Food Ideas, remember presentation is half the fun. To really maximize their visual impact, try rolling the outside of the dough balls—*before* filling them—in a light coat of green sanding sugar. Whoa! That gives you a gorgeous sparkle that screams festive without changing the flavor one bit.
They are wonderfully portable too, making them easy additions to any dessert table. Need a great savory pairing? You absolutely have to check out my recipe for perfect layer taco dip if you want a crowd-pleasing appetizer to go alongside these sweet treats!
Storing and Keeping Green Velvet Cream Cheese Cookies Fresh
One of the great things about these Green Velvet Cream Cheese Cookies is that they actually taste even better the day after you bake them! Seriously, the flavors meld together, and that cream cheese center gets even softer. But we need to store them correctly, especially since we often bake ahead for a big St Patrick’s Day Party, right?
Luckily, keeping these soft cookies perfect is super simple. You don’t need any fancy industrial containers or anything.
Room Temperature Storage vs. Refrigeration
Because they have that cream cheese filling, people always ask me if they need to go into the fridge. My answer is: it depends on how long you need to keep them!
For short-term storage—say, keeping them fresh for 2 to 3 days—an airtight container at room temperature is absolutely perfect. Just make sure they are completely cool before you try to seal them up. If you stack them, put a little piece of parchment paper between the layers so the soft tops don’t stick to the bottoms. That prevents any smearing of that beautiful green!
If you need them to last longer, maybe you baked them early for your St Patrick’s Day Party planning, refrigeration is your friend. Pop them into an airtight container and keep them chilled for up to a week. When you pull them out of the fridge, let them sit on the counter for about 20 minutes before serving. That lets the cookie soften back up to its proper velvet texture.
- Shelf Life (Room Temp): Up to 3 days in an airtight container.
- Shelf Life (Fridge): Up to 7 days in an airtight container.
Can You Freeze These Cookies?
Yes, you totally can! Freezing is the best way to keep these wonderful St Patrick’s Day Snacks For Kids ready way in advance. I suggest freezing them *unfilled* for the best results, but you can freeze them assembled too, you just need to be careful.
Freezing Assembled Cookies: Make sure they are completely cooled, and then lay them out on a tray without touching. Flash freeze them for an hour until they are solid little green rocks. Then, transfer your frozen Green Snacks into a heavy-duty freezer bag. They should be good for about two months this way.
When you want to eat them, just pull out what you need and let them thaw on the counter for a couple of hours. They come out tasting almost freshly baked!
A Quick Reheating Tip
If you chilled them and they’re just a little too firm for your liking, skip the microwave if you can. The microwave can sometimes make the cream cheese center go rubbery when reheating. Instead, just pop one onto a dry plate and microwave it for just 5 to 8 seconds—barely enough to warm it through. Honestly, letting them come to room temperature usually works best for maintaining that soft texture!
Frequently Asked Questions About Green Velvet Cream Cheese Cookies
I know when you look at a gorgeous cookie like this, your brain immediately starts bubbling with questions! Don’t worry, I had them too when I was perfecting this recipe. I’ve gathered the questions I get most often about keeping these Green Velvet Cream Cheese Cookies looking and tasting perfect, especially when you’re making them for big events!
Why did my cream cheese filling leak out while baking?
Oh, that’s the worst, isn’t it? Usually, the filling leaks because either the dough wasn’t sealed tightly enough around the center, or the filling itself wasn’t cold enough when you assembled the cookie. When you’re sealing them up, really pinch that dough closed, like frosting the edges of a pie! If the dough gets too warm while you’re working, put the batch you’re on back in the fridge for 5 minutes. If you need to know why things sometimes get mushy in the kitchen, I talk about textural failures over in my post about why spaghetti squash gets mushy—it applies to dough too!
Are these suitable as St Patrick’s Day Snacks For Kids?
Absolutely! These are fantastic St Patrick’s Day Snacks For Kids because they look exciting and they are super soft, which is much easier for little teeth than hard gingerbread or shortbread. The cocoa powder gives it a mild, chocolatey flavor that most kids adore, and as long as you use gel food coloring (which holds its color better than liquid), the green stays bright! They are a definite winner over plain vanilla cookies.
Will the green color fade during baking?
It can, a little bit, depending on the type of food coloring you use. If you are aiming for a really intense color for your St Patrick’s Day Treats, you need to use high-quality gel icing colors, not the watery stuff you find in basic grocery kits. Gel colors are concentrated and hold up much better to heat. Also, make sure you don’t overbake them! Once the edges look set, pull them out—the longer they bake, the duller the color gets.

Do I have to chill the dough for 30 minutes?
Yes! I know waiting is tough when you want cookies immediately, especially when you need St Patrick Party Food ready fast. That chilling time is essential for two reasons: it firms up the dough so it holds that lovely dollop of filling without melting outward, and it lets the flour hydrate, which improves the final soft texture. Think of it as mandatory setup time for a perfect cookie!
Where can I find great inspiration for other St Patrick’s Day Food Ideas?
If you’re looking for more ideas to round out your menu—maybe a savory dish to balance these rich cookies? BBC Good Food has a wonderful collection of cookie recipes, but if you need full party planning ideas, you might look outside the dessert realm for main dishes! These cookies are really a perfect, easy finisher for any spread.
Estimated Nutritional Information for Green Velvet Cream Cheese Cookies
Now, let’s talk about the numbers, because I know some of you are curious! Between the butter, the sugar, and that glorious cream cheese center, these Green Velvet Cream Cheese Cookies are definitely a treat and not exactly a diet food. But hey, they’re for the party, right?
I ran the numbers based on dividing the total batch ingredients across the 18 cookies we yield. Please remember, this is just an estimate, folks! The exact brand of flour or thickness of your cream cheese can shift these slightly. I always treat these nutrition facts as a general guideline rather than gospel truth.
The richness really comes from the combination of butter in the dough and the full-fat cream cheese in the center that makes these such fantastic St Patrick’s Day Treats!
- Servings: 18 cookies
- Calories (Estimated): 220 – 250 per cookie
- Fat (Estimated): 12g – 14g per cookie
- Carbohydrates (Estimated): 26g – 29g per cookie
- Protein (Estimated): 3g – 4g per cookie
As you can see, they pack a bit of a sweet punch due to that delicious filling! But honestly, one of these perfect, bright green cookies is worth every single calorie when you’re enjoying the holiday!
Share Your Green Velvet Cream Cheese Cookies Creations
Well, we made it! You now have the secret to the softest, most shockingly green Green Velvet Cream Cheese Cookies ever dreamed up. I truly hope you enjoyed the process as much as I do when I’m whipping these up for gatherings. There’s just something about that vivid color against the white cream cheese center that always gets compliments!
Now, this is the part where I need your help! If you whip up a batch of these for your next event—whether you’re serving them as St Patrick’s Day Snacks For Kids or showing them off at a big bash—I absolutely need to see them!
Rate This Recipe
If these cookies lived up to the hype and you’re already dreaming of making them again next year, please take two seconds to leave a rating at the top of the page (or bottom, depending on where you’re reading this!). A five-star rating helps other bakers find this recipe, and honestly, it makes my day to know you loved my creation. It’s the best thank you I could ask for!
Share Photos on Social Media
Seriously, snap a picture! I love seeing your beautiful bakes. Tag me on Instagram or share your photo on Facebook using the hashtag #GreenVelvetCookies. Seeing these bright little treats popping up on your feed always makes me smile, confirming that these are indeed some of the best St Patrick Party Food recipes out there.
Need to Reach Out?
If you ran into a snag, or maybe you discovered a genius variation I haven’t thought of yet (maybe a hint of mint extract? Tell me!), please don’t hesitate to reach out! You can always get in touch with me directly through the contact page. I read every message and love hearing from you all.
Thank you so much for stopping by Recipes by Betty today. Happy baking, and may your cookies always be green and velvet!
Green Velvet Cream Cheese Cookies
Equipment
- Mixing Bowls
- Electric mixer
- Baking sheets
- Parchment paper
Ingredients
For the Cookies
- 240 g all-purpose flour
- 30 g cocoa powder
- 5 g baking soda
- 2 g salt
- 150 g sugar
- 120 g unsalted butter, softened
- 1 egg
- 10 ml vanilla extract
- to desired color Green food coloring
For the Cream Cheese Filling
- 170 g cream cheese, softened
- 60 g icing sugar
- 5 ml vanilla extract
Instructions
- Whisk the flour, cocoa powder, baking soda, and salt in one bowl. Set this dry mixture aside.
- Beat the butter and sugar in a separate bowl until the mixture is light and creamy.
- Add the egg, vanilla extract, and green food coloring to the butter mixture. Mix until smooth.
- Gradually mix the dry ingredients into the wet ingredients until a soft dough forms.
- Refrigerate the dough for 30 minutes to help it firm up.
- While the dough chills, mix the cream cheese, icing sugar, and vanilla extract until smooth. Chill this filling.
- Preheat your oven to 175°C. Line your baking sheets with parchment paper.
- Scoop the cookie dough, flatten it slightly, place a small spoonful of the cream cheese filling in the center, and gently seal it with more dough.
- Bake the cookies for 10 to 12 minutes, or until the edges are set.
- Let the cookies cool on the tray for 5 minutes before moving them to a wire rack to finish cooling.