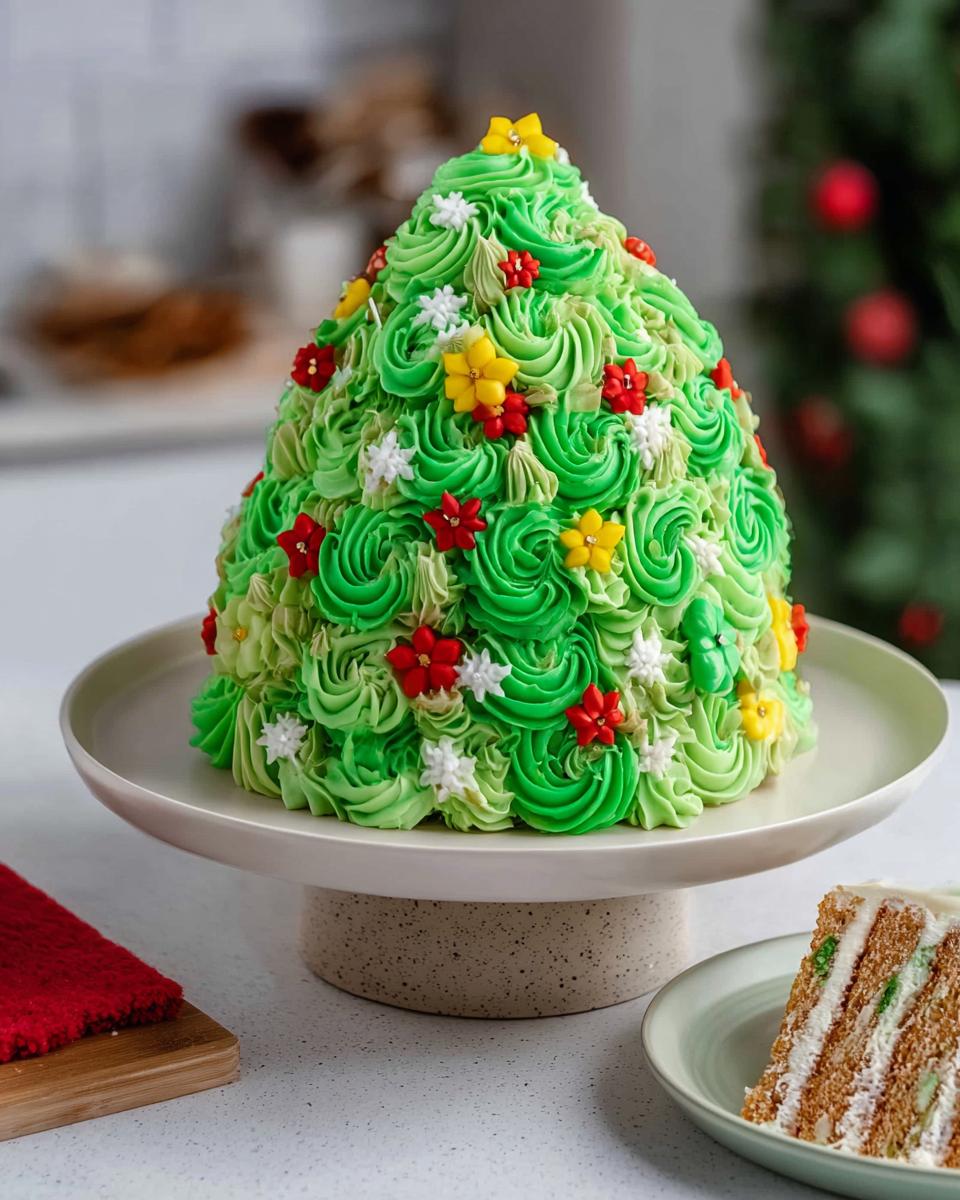
There’s something magical about holiday baking, isn’t there? The moment cinnamon and nutmeg hit the air, it instantly feels like Christmas. But my Festive Santa & Tree Cake? Oh, it takes that magic to a whole new level! I dreamed this one up a few years back when I wanted a dessert that would wow both the kids and adults at our family potluck. Picture this: marbled spice cake layers shaped into a whimsical Christmas tree, topped with Santa’s hat in swirling red buttercream. The first time I brought it out, my niece gasped, “It’s like eating Christmas!” And honestly? That’s exactly the reaction I was going for. Now it’s the centerpiece of our holiday table every year.
Why You’ll Love This Festive Santa & Tree Cake
Oh my goodness, where do I even start? This cake is pure holiday magic in dessert form! Here’s why it’s become my must-make every December:
- It’s a total showstopper – The moment you bring this beauty out, everyone grabs their phones for pictures. That perfect combo of Santa’s hat and the Christmas tree shape? Instant holiday cheer!
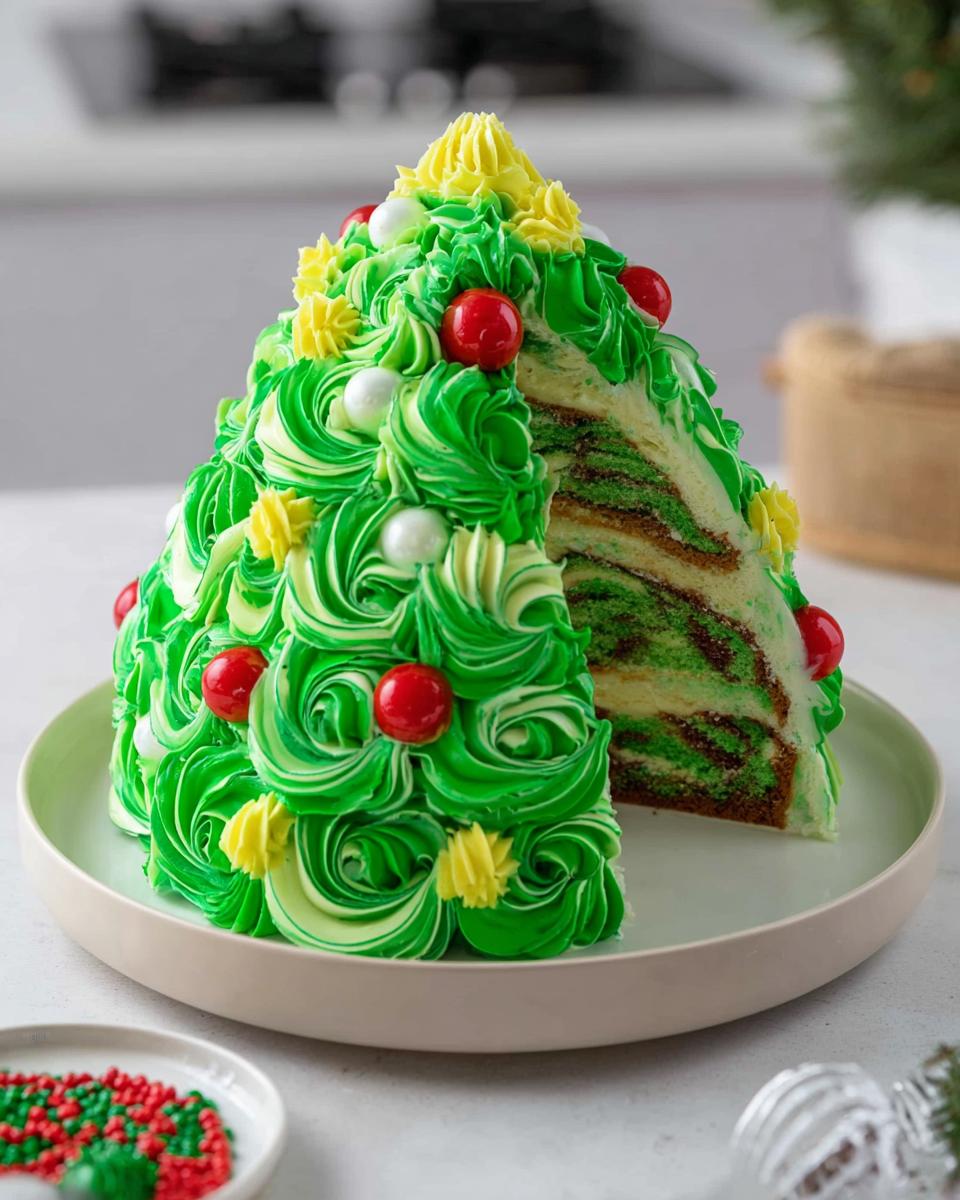
- The marbled spice cake layers – I use two shades of green batter swirled together, so when you slice it open? Gorgeous marbling that tastes like Christmas morning with all those warm spices.

- Decorating is half the fun – Pipe on as many rosettes or sprinkles as you want. Last year my nephew added mini marshmallow “snow” and it was adorable!
- Perfect for gatherings – Serves a crowd, and let me tell you, nothing gets people chatting like a festive centerpiece cake.
- Kids go wild for it – The bright colors and playful design make it the most exciting dessert on the table (though adults sneak seconds too!).
Trust me, once you make this once, it’ll become your new holiday tradition too. The compliments alone are worth it!
Ingredients for the Festive Santa & Tree Cake
Now let’s gather our merry little ingredients! I always make sure everything’s prepped and organized before I start – it makes the baking process so much smoother. Here’s everything you’ll need to create this holiday masterpiece:
Spice Cake Layers
- 3 cups (375g) all-purpose flour – spooned and leveled, none of that packed measuring!
- 1 1/2 cups (300g) granulated sugar – because every good cake starts with sugar
- 1 1/2 cups (300g) packed light brown sugar – this gives the cake that lovely caramel depth
- 2 1/2 tsp (10g) baking powder – fresh is best for perfect rise
- 1 tsp (6g) fine salt – enhances all those yummy flavors
- The spice trio:
- 2 tsp (6g) cinnamon
- 1 tsp (3g) ginger
- 1/2 tsp (2g) nutmeg
- 1/2 cup (113g) unsalted butter, room temp – seriously, let it soften naturally
- 4 large eggs (224g), room temperature – cold eggs can make your batter angry
- 1 cup (255g) full-fat sour cream, room temp – the secret to super moist cake
- 1/2 cup (90g) unsweetened apple sauce – adds natural sweetness and moisture
- 1/2 cup (105g) vegetable or canola oil – keeps it tender for days
- 1 tsp (4g) vanilla extract or vanilla bean paste – the good stuff, please!
- Green gel food coloring – I use two shades for that pretty marbled effect
Buttercream Frosting
- 3 cups (678g) unsalted butter, room temperature – yes, that’s 6 sticks. No judgment here!
- 1 Tbsp (12g) vanilla extract or vanilla bean paste – can you tell I love vanilla?
- 1 tsp (3g) fine salt – balances the sweetness
- 10 cups (1250g) powdered sugar – you’ll sift this to avoid lumps
- 1/2 cup (120g) heavy whipping cream, room temp – makes the frosting silky smooth
- Gel food coloring in green, yellow, and red – these give us that festive pop. Trust me, gel colors are WAY better than liquid ones!
A quick tip: if you’re in need of some holiday sauce to accompany your desserts, my simple cranberry sauce recipe pairs beautifully with so many treats! Now let’s get to baking our masterpiece.
Equipment Needed for the Festive Santa & Tree Cake
Okay friends, let’s chat tools! You don’t need anything too fancy, but having these things on hand will make decorating this showstopper cake SO much easier. Trust me, I’ve tried shortcuts before (who hasn’t used a zip-top bag as a makeshift piping bag in a pinch?), and having the proper equipment seriously makes all the difference.
- Serrated knife – My go-to for leveling those cake layers without tearing them up
- Spinning cake stand – Total game-changer for smooth frosting and even decorating
- Electric hand mixer or stand mixer – Your arms will thank you when making all that buttercream!
- 8-inch greaseproof cake board – Gives you a sturdy base to work on
- Small offset spatula – Perfect for getting into all those nooks when frosting
- Thick bubble tea straw or wooden dowel – Keeps all those stacked layers from sliding around
- Piping bags (large and small) – I like having both sizes for different decorations
- Piping tips:
- Open star (Wilton 1M) – For those beautiful rosettes
- Large French (Wilton 6B) – Great for Santa’s hat details
- Small round (Wilton 10) – Perfect for little accents
- Small French tip – My secret for those perfect swirls
Quick baking confession: I struggled with cakes until I learned some key techniques. If you want to sharpen your skills, check out my secrets to perfect scones – many of those baking fundamentals apply here too! Now that we’re all prepped, let’s get to the fun part – baking!
Step-by-Step Instructions for the Festive Santa & Tree Cake
Alright, let’s dive into the fun part! I know this cake looks fancy, but I promise it’s totally doable if we take it step by step. I’ve made all the mistakes so you don’t have to – follow along and we’ll create something magical together!
Preparing the Spice Cake Layers
First things first – preheat that oven to 350°F/175°C. While it’s warming up, let’s get our pans ready. I line my 8″, 7″, two 6″, and two 4″ pans with parchment rounds and give them a good spritz with non-stick spray. Trust me, you’ll thank me later when those cakes pop right out!
Now for the dry ingredients – whisk together the flour, both sugars, baking powder, salt, and all those lovely spices in a big bowl. Here’s my trick: I like to sift them together first to avoid any lumps. Then we’ll slowly mix in the butter until it looks like coarse sand. Don’t rush this part – we want those butter pieces nice and small.
Next comes the wet ingredients – eggs first (two at a time), then the sour cream, apple sauce, oil, and vanilla. Mix just until everything comes together – overmixing is the enemy of tender cake! Now the fun part: divide your batter in half and tint one portion light green and the other dark green with gel food coloring. Alternate spoonfuls of each color into your prepared pans, then swirl gently with a butter knife for that gorgeous marbled effect.
Pop them in the oven for 28-33 minutes. You’ll know they’re done when a toothpick comes out with just a few moist crumbs. Let them cool in the pans for 10 minutes before transferring to wire racks – this prevents them from breaking apart.
Assembling and Decorating the Cake
While your cakes cool, let’s make that dreamy buttercream. Beat the butter until it’s light and fluffy (about 30 seconds), then mix in the vanilla and salt. Gradually add the powdered sugar and cream – start slow unless you want a powdered sugar cloud in your kitchen! The frosting should be smooth and spreadable. If it’s too thick, add more cream a tablespoon at a time.
Now for the fun part – assembly! Use a serrated knife to level your cooled cake layers. Stack them from largest to smallest on a cake board to create that perfect tree shape. A dab of frosting between each layer helps them stick together. Pro tip: insert a bubble tea straw or wooden dowel through the center to keep everything stable.
Apply a thin crumb coat of frosting over the whole cake – this catches any loose crumbs so your final layer looks clean. Chill for 30 minutes (or 10 in the freezer if you’re impatient like me). While it chills, divide and color your remaining frosting: light green, dark green, red, yellow, and leave some white.
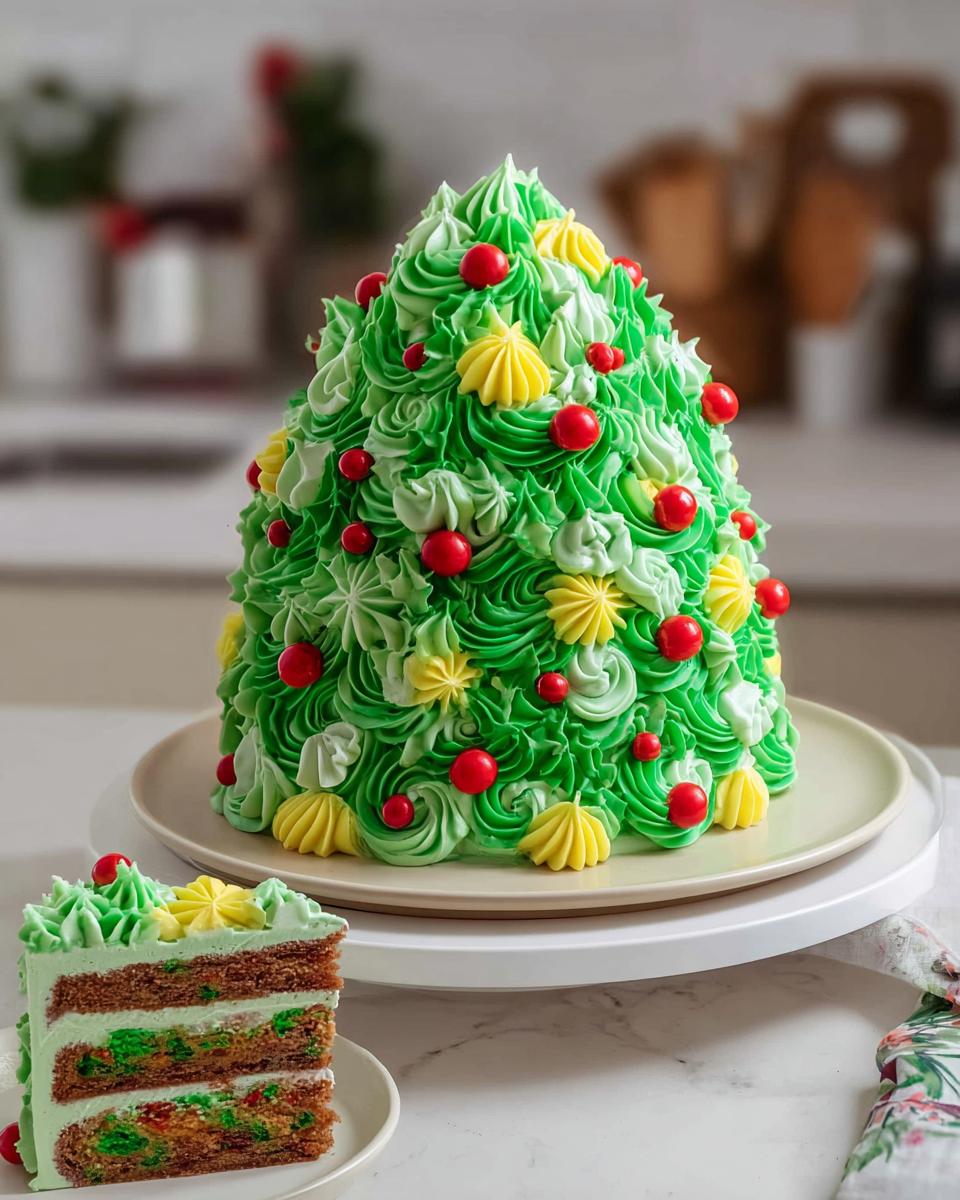
Pipe rosettes all over with your green frostings – I alternate colors for depth. Then get creative with Santa’s hat details using the red frosting and white accents! The yellow makes perfect little star decorations. Feeling extra festive? Try my pistachio cupcakes technique of adding edible glitter for sparkle.
For more holiday baking inspiration, check out this fabulous holiday butter cookies recipe that pairs beautifully with our cake. Now step back and admire your masterpiece – you’ve just created a Christmas centerpiece that’s as delicious as it is beautiful!
Tips for Perfecting Your Festive Santa & Tree Cake
After making this cake more times than I can count (and learning from all my messy mistakes!), here are my absolute must-know tips for creating your best holiday masterpiece yet:
- Butter and eggs MUST be room temp – I know it’s tempting to rush, but cold ingredients make lumpy frosting and dense cake. Leave them out for at least 2 hours – your batter will thank you!
- Gel food coloring is the only way to go – Those liquid grocery store drops? They’ll water down your frosting. Gel colors give you those vibrant holiday hues without changing the texture.
- Chill between frosting layers – When that crumb coat goes on, pop it in the freezer for 10 minutes. The frosting sets up perfectly, and you’ll avoid annoying crumbs in your final layer.
- Don’t overmix the batter – As soon as those flour streaks disappear, STOP mixing! Overworked batter leads to tough cake, and nobody wants that.
- Pipe your decorations on parchment first – Practicing Santa’s hat details? Pipe them on parchment, freeze for 5 minutes, then transfer to your cake. Saves so much stress!
Follow these tricks, and you’ll have the prettiest, tastiest holiday cake on the block. Promise!
Make-Ahead and Storage Tips
Oh honey, let me tell you my secrets for stress-free holiday baking! This cake is actually PERFECT for making ahead. I always bake my spice cake layers up to a month in advance – just wrap each cooled layer tightly in plastic wrap, then again in foil before freezing. Trust me, they thaw beautifully overnight in the fridge!
The frosted cake keeps like a dream too. Once decorated, it’ll stay fresh at room temp for about 2 days (just cover it loosely with plastic). Need longer? Pop it in the fridge for up to 5 days! Pro tip: Let chilled cake sit at room temp for 30 minutes before serving – those spices will bloom and the texture gets super moist again.
Leftovers? What leftovers? But if you somehow manage to have some, individual slices freeze beautifully wrapped in parchment paper. Just thaw at room temp when those holiday cravings hit!
Festive Santa & Tree Cake FAQs
Over the years, I’ve gotten so many questions about this holiday showstopper – here are the ones that pop up most often from fellow bakers trying this recipe for the first time!
Can I use boxed cake mix instead of making it from scratch?
You absolutely can! While I adore the flavor of homemade spice cake (those warm cinnamon notes just scream “holidays”), a spiced cake mix works in a pinch. Just prepare it according to package directions, divide the batter, and tint it green like the recipe shows. For extra oomph, stir in an extra teaspoon of cinnamon and a pinch of nutmeg – it makes all the difference!
How do I prevent my buttercream from melting while decorating?
Oh boy, been there! The key is keeping everything cool. If your kitchen is warm, work in small batches – I keep most of my frosting in the fridge and only take out what I’m using immediately. Also, if you find your hands warming the piping bag too much (happens to me every time!), try wrapping an ice pack in a towel and resting the bag on it between piping. Works like a charm!
Can I make this cake gluten-free?
Yes indeedy! Swap the all-purpose flour for your favorite gluten-free 1:1 baking blend. Just make sure it contains xanthan gum. I’ve had great results with Cup4Cup and King Arthur’s blends. And here’s a bonus tip from my kitchen disasters – how to prevent pumpkin bread from drying out works wonders for gluten-free cakes too – a tablespoon of apple cider vinegar helps keep everything moist!
What’s the best way to transport this cake?
Oh honey, after the great frosting smear disaster of 2019 (never again!), here’s my foolproof method: Chill the cake completely first. Then, place strips of parchment paper under the edges before putting it in a cake carrier or box – this lets you slide them out after transport without messing up your beautiful piping. If it’s a long drive? Tuck some ice packs around the box (not touching the cake!) to keep everything firm.
Nutritional Information
Just a quick note about nutrition – while I pour my heart into baking this festive cake, I’m not a nutritionist! The values are estimates and can change based on your specific ingredients and portions. That said, moderation is my motto for holiday treats – savor every delicious bite!
More Holiday Desserts to Try
One delicious cake is great, but why stop there? Looking for more festive treats? I can’t get enough of my Halloween ghost brownies and patriotic crinkle cookies – they’re the perfect way to make every holiday special! Friends, share your own version of this Santa & Tree cake – I’d absolutely love to see your recreations! Snap a pic and rate the recipe to help others discover its sparkle.
Festive Santa & Tree Cake
Equipment
- Serrated Knife
- Spinning cake stand
- Electric hand mixer or stand mixer
- 8-inch greaseproof cake board
- Small offset spatula
- Thick bubble tea straw or wooden dowel
- Large piping bags
- Small piping bags
- Open star piping tip (Wilton 1M)
- Large French piping tip (Wilton 6B)
- Small round piping tips (Wilton 10)
- Small French piping tip
Ingredients
Spice Cake Layers
- 3 cups all-purpose flour 375g
- 1 1/2 cups granulated sugar 300g
- 1 1/2 cups packed light brown sugar 300g
- 2 1/2 tsp baking powder 10g
- 1 tsp fine salt 6g
- 2 tsp ground cinnamon 6g
- 1 tsp ground ginger 3g
- 1/2 tsp ground nutmeg 2g
- 1/2 cup unsalted butter, room temperature 113g
- 4 large eggs, room temperature 224g
- 1 cup full-fat sour cream, room temperature 255g
- 1/2 cup unsweetened apple sauce 90g
- 1/2 cup vegetable or canola oil 105g
- 1 tsp vanilla extract or vanilla bean paste 4g
- Green gel food coloring
Buttercream Frosting
- 3 cups unsalted butter, room temperature 678g
- 1 Tbsp vanilla extract or vanilla bean paste 12g
- 1 tsp fine salt 3g
- 10 cups powdered sugar 1250g
- 1/2 cup heavy whipping cream, room temperature 120g
- Green, yellow, and red gel food coloring
Instructions
- Preheat the oven to 350°F/175°C. Line one 8″, one 7″, two 6″, and two 4″ pans with parchment rounds and grease with non-stick baking spray.
- Mix together 3 cups flour, 1 1/2 cups granulated sugar, 1 1/2 cups brown sugar, 2 1/2 tsp baking powder, 1 tsp salt, 2 tsp cinnamon, 1 tsp ginger, and 1/2 tsp nutmeg in a large bowl until fully combined.
- Mix 1/2 cup of unsalted butter slowly into the dry ingredients on a low speed. Continue to mix until no large chunks of butter remain.
- Mix in 4 large eggs on low until just incorporated, 2 at a time.
- Add 1 cup sour cream, 1/2 cup unsweetened apple sauce, 1/2 cup vegetable oil, and 1 tsp of vanilla extract. Mix on a low speed until just incorporated.
- Scrape down the sides of the bowl with a rubber spatula, then beat on a medium speed for about a minute to make sure everything is properly mixed together.
- Use the green gel food coloring to color half the batter light green and half of the batter a darker shade of green.
- Add spoonfuls of both colors of batter into the prepared pans, filling them each to the same height (about 1-inch high). Then use a butter knife or offset spatula to swirl the batter together to create a marbled look.
- Bake for 28-33 minutes or until a toothpick comes out with a few moist crumbs. Let the cake layers cool in the pans for 10 minutes, then run a small offset spatula around the perimeter of the pan to separate the cake from the pan.
- Flip the cake layers onto a wire rack to cool. Use a serrated knife to level the tops of the layers once they’re fully cooled, then stack the cake layers and trim them into the tapered shape of a Christmas tree.
- If you make these cake layers in advance and freeze them, let them thaw for about 20 minutes before making your cake. The cake layers should still be slightly cold to the touch, which will make it easier to assemble your cake.
- While the cake layers bake and cool, make the buttercream frosting.
- Beat 3 cups of butter (6 sticks) on a medium speed for 30 seconds with a paddle attachment until smooth.
- Mix in 1 Tbsp of vanilla extract and 1 tsp of salt.
- Gradually mix in 10 cups of powdered sugar and 1/2 cup of heavy cream on a low speed.
- If the frosting seems too thick, add in additional cream (1 TBSP at a time). If the frosting is too thin, add in more powdered sugar (quarter of a cup at a time). Wait to color the buttercream until the cake is stacked and crumb coated.
- Stack and frost the cake layers on a greaseproof cake board or flat plate using a dab of frosting to help stick the first cake layer to the board. Stack the layers from largest to smallest, to create a Christmas tree shape.
- Spread an even layer of buttercream on top of each cake layer. Once the layers are stacked, insert a wooden dowel or thick straw into the center of the cake layers to help keep them in place.
- Cover the cake in a thin coat of frosting. Smooth using an offset spatula or bench scraper, then chill the cake in the fridge (30 minutes) or freezer (10 minutes) until the frosting is firm to the touch.
- While the cake chills, color the remaining buttercream. Scoop 1/2 cup of white frosting into a small piping bag fit with a small round piping tip. Set aside.
- Color 1/2 cup of frosting red with gel food coloring. Place this in a small piping bag fit with a small French tip. Set aside.
- Color 1/2 cup of frosting yellow with gel food coloring. Place this in a small piping bag fit with a small round tip. Set aside.
- Color half of the remaining frosting light green, and color the other half dark green with green gel food coloring. Place each frosting in its own large piping bag fit with an open star tip. Set aside.
- Use the green frosting to pipe rosettes around the cake, then fill in with frosting dollops of red, yellow, and white frosting.