When you’re planning a really special occasion, sometimes you just need a dessert that whispers elegance instead of shouting it, you know? Forget those big, fussy cakes! For a truly sophisticated gathering, especially a sweet celebration like a baby shower, you need something delicate and refined. That’s where these Elegant Garden Baby Shower Cookies come in. Seriously, they are my new go-to.
I remember testing these out last spring; I was trying to nail that soft, muted wedding palette. When I finally added those light, tiny floral details, the whole cookie just elevated. The garden-style details really gave them that upscale, soft look I was after. Trust me, these are the perfect canvas for any beautiful theme.
If you love beautiful presentation but want a manageable bake, you absolutely *have* to try the technique I use over here for subtle wildflower cookies—it’s related, but these garden ones hit just the right note of formal charm!
Why You Will Love These Elegant Garden Baby Shower Cookies
Honestly, setting out a tray of these cookies just instantly makes the whole room feel more expensive, which is exactly what we want for these special events!
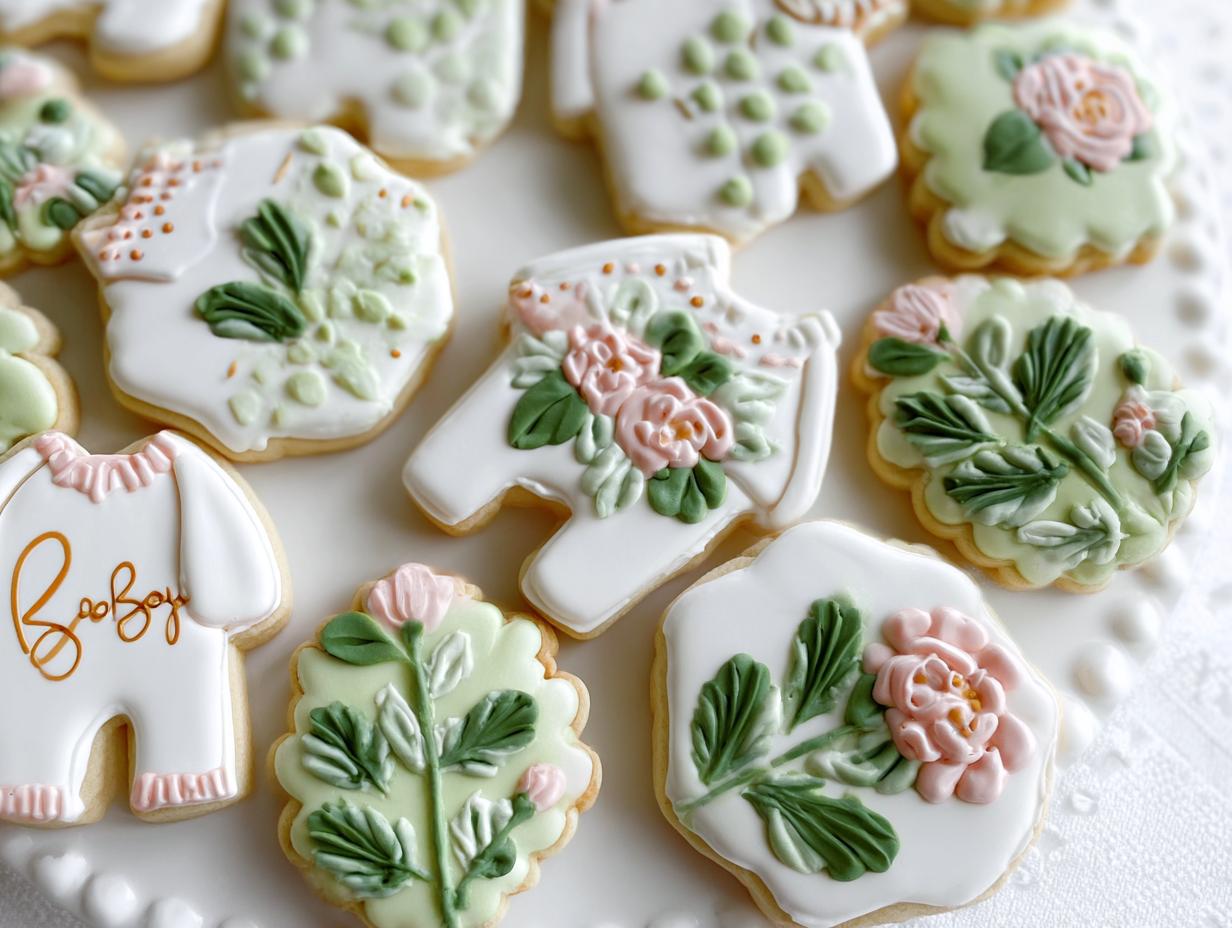
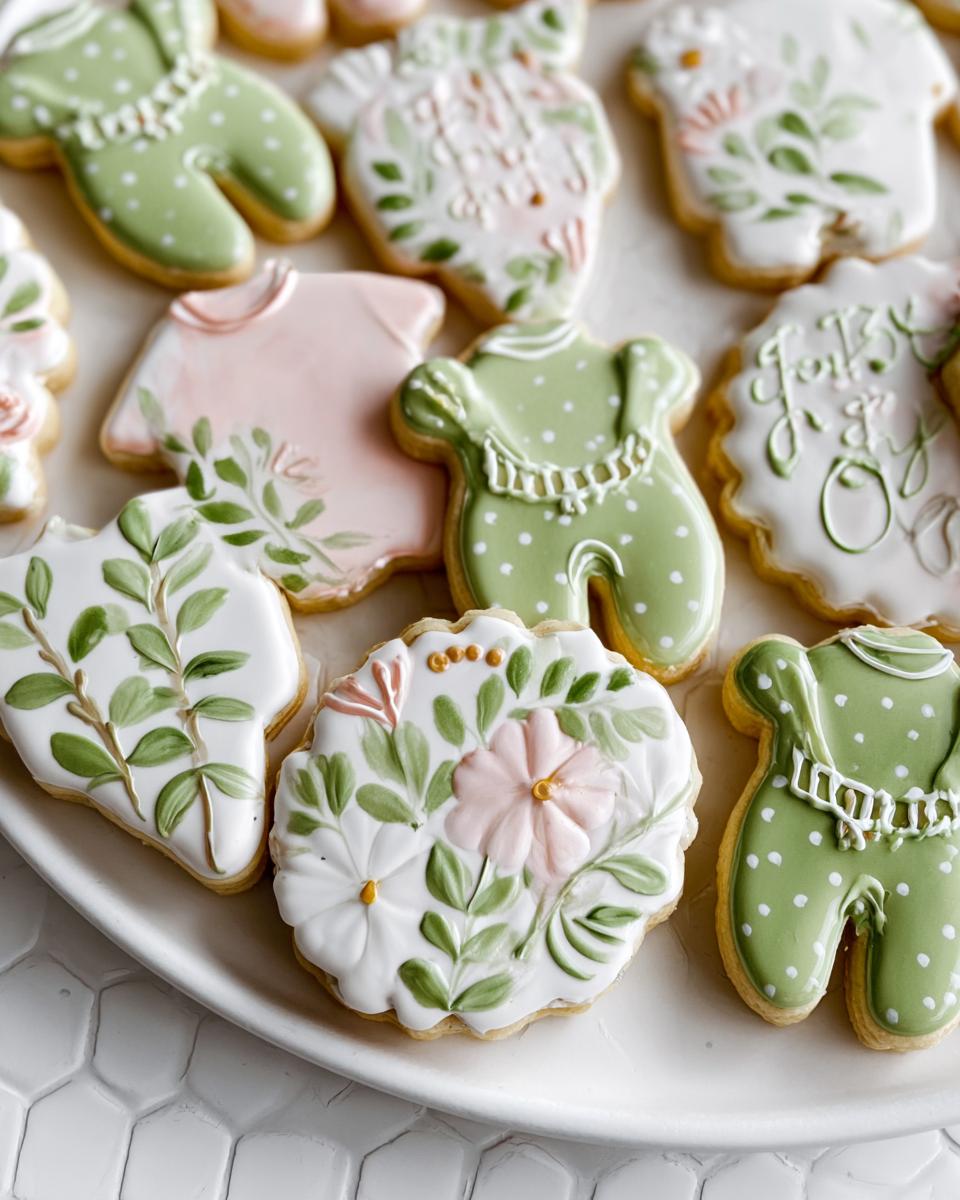
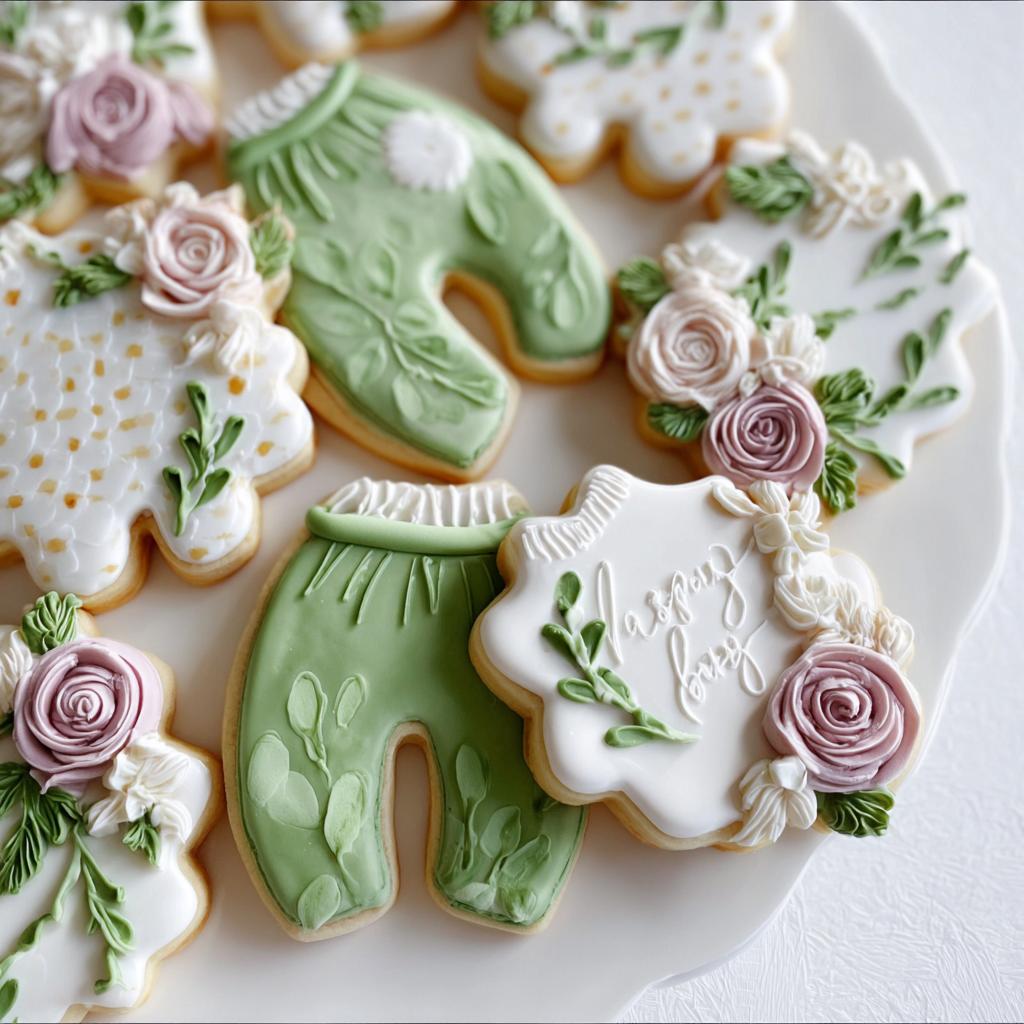
- Unmatched Elegance: The soft ivory base paired with dusty rose and eucalyptus greens makes them perfectly refined, fitting right in with any high-end garden party baby shower desserts theme.
- Fantastic Base for Decorating: Once you get that sugar cookie dough right and the icing base completely smooth and dry (this takes patience, I know!), piping those tiny floral details is almost meditative.
- They Travel Beautifully: Because they are sturdy, well-baked sugar cookies, they hold their shape far better than cakes or cupcakes, making them ideal for shipping to venues or giving out as favors.
- Perfectly Themed: These elegant garden baby shower cookies feel custom-made for the theme without requiring you to sculpt giant sugar roses or anything stressful. It’s all about the delicate line work!
Essential Equipment for Elegant Garden Baby Shower Cookies
Look, you can’t paint a masterpiece without the right brushes, right? And these cookies definitely require a bit of artistry! Don’t panic if you don’t have everything; I’ve linked some of my favorites from King Arthur Baking which I totally trust for my base ingredients.
For these elegant garden baby shower cookies, setup is half the battle. You need tools that allow for precision, especially when dealing with those fine floral royal icing cookies details. Here’s what you’ll need pulled out before you even think about mixing the dough!
- Rolling Pin: A heavy, sturdy one works best here. You need consistent thickness, especially when baking decorative shapes.
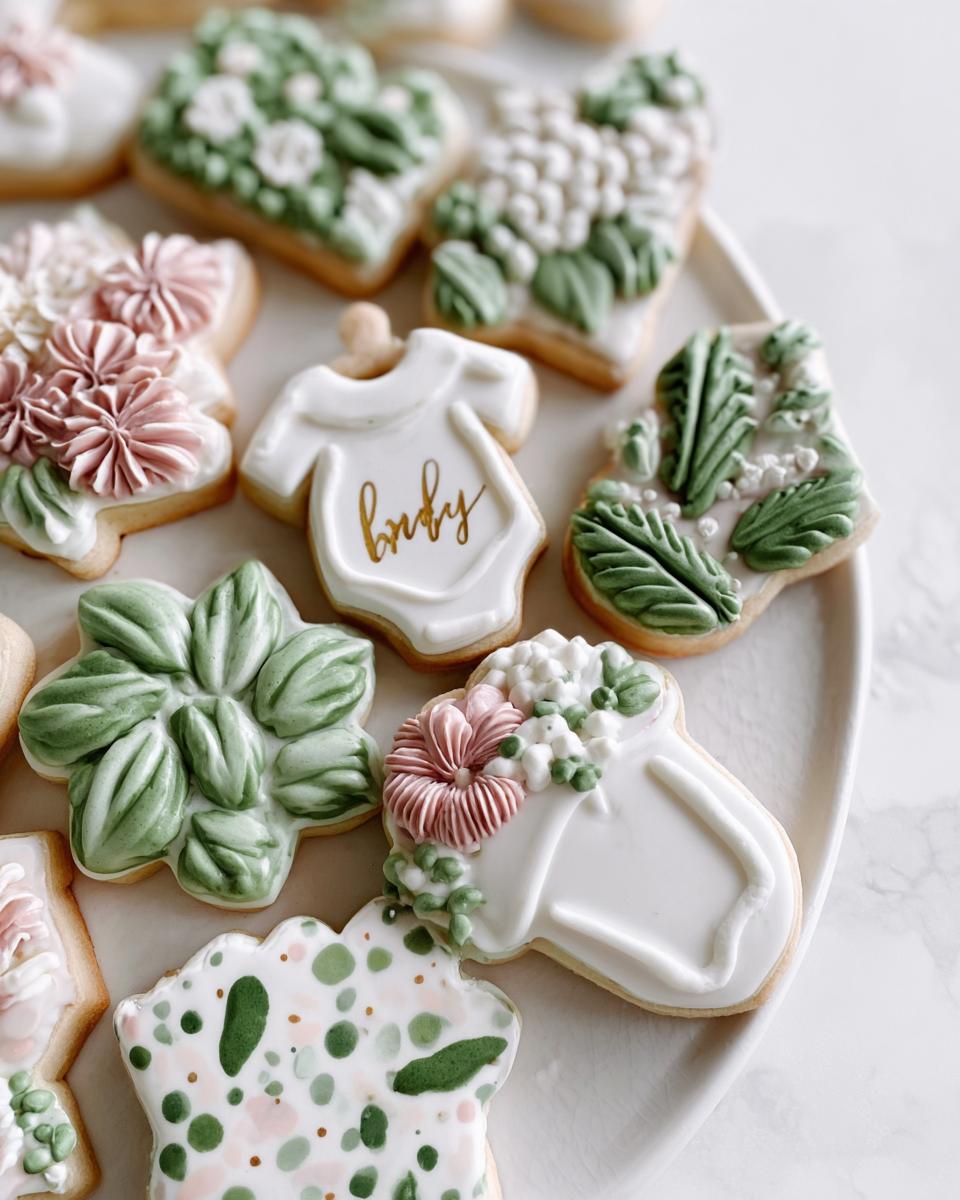
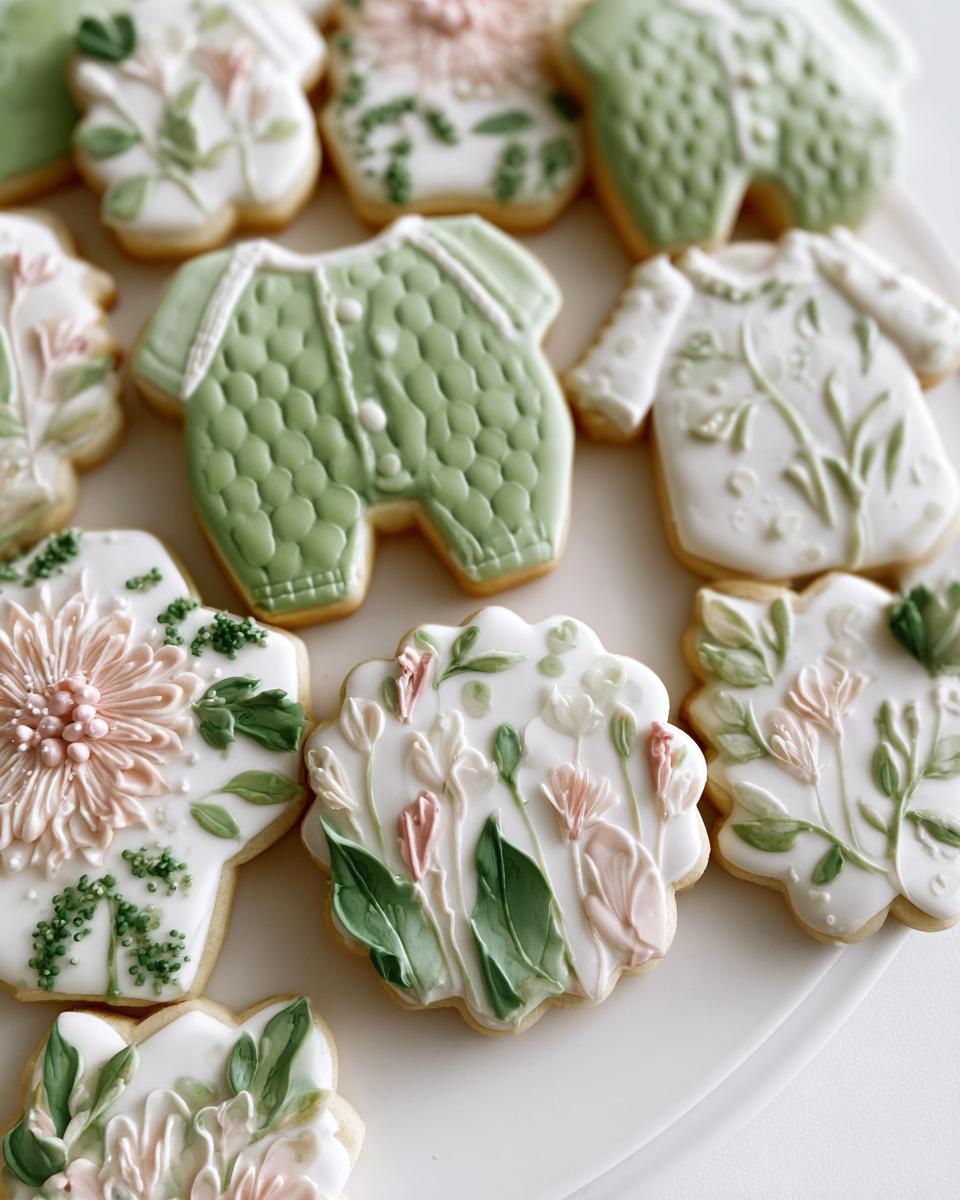
- Cookie Cutters: We aren’t just using circles today! Make sure you have a nice mix—plaque shapes are great for layered designs, and arch or scalloped circle cutters give that soft, vintage feel.
- Baking Sheets & Racks: You’ll need plenty of empty baking sheets to alternate with, and lots of cooling racks! These cookies need space to breathe once they come out of the oven.
- Fine-Tip Brushes: This is non-negotiable for getting those tiny vines and little petal edges perfect. Keep a dedicated little set just for food coloring and edible paint.
Ingredients for Perfect Elegant Garden Baby Shower Cookies
Okay, deep breath! The ingredients list seems long because we have three separate steps happening here: the cookie, the icing base, and the final fancy touches. But don’t worry, they are all easy-to-find staples. Getting the right consistency and ensuring your butter is actually soft (not melted!) makes all the difference in getting those pristine elegant garden baby shower cookies we are aiming for.
Pay close attention to the notes, especially regarding the powdered sugar—sifting is your friend here, trust me! If you skip it, you’ll just spend extra time smashing lumps later, and who has time for that?
For the Sugar Cookie Base
For the cookie itself, we want a sturdy but tender base that holds its shape when baked. It needs to be ready for the icing, so make sure your butter is softened up nicely before you start cream—it should give a little when you push it, but not be greasy!
- 2 3/4 cups all-purpose flour
- 1 tsp baking powder
- 1/2 tsp salt
- 1 cup unsalted butter, softened (Remember: softened, not melted!)
- 1 cup granulated sugar
- 1 large egg
- 2 tsp vanilla extract
For the Floral Royal Icing
This is where the magic happens! Meringue powder is key because it helps the icing dry rock hard without separating, which is what we need for these detailed designs. And yes, you absolutely need gel colors here, not liquid food dye, unless you want soupy icing!
- 4 cups powdered sugar, sifted (Yes, sift it! Don’t skip this!)
- 3 tbsp meringue powder
- 5 to 6 warm water (You are looking for a smooth, floodable consistency as you add this slowly)
- As needed gel colors (ivory, dusty rose, eucalyptus green, soft peach)
Decoration Elements
These final touches are what take you from a nice decorated cookie to proper garden party baby shower desserts. The gold is so subtle but so luxurious!
- Optional: Edible gold paint (This is mixed with a tiny bit of liquor or lemon extract later for painting those fine edges!)
Step-by-Step Guide to Making Elegant Garden Baby Shower Cookies
This is the marathon part of the recipe, but honestly, most of the time involved is just waiting! Don’t let the list of steps scare you off. We’re breaking this down into three main phases: getting that perfect cookie baked, making the icing smooth enough to glide, and then the fun part where we turn them into those lovely elegant garden baby shower cookies.
If you’ve ever baked tricky items like scones, you know that the chilling time is crucial for structure—and these cookies are no different! For more advice on making sure your dough behaves, check out my tips on secrets to perfect scones; that dough handling knowledge transfers right over!
Preparing and Baking the Cookie Dough
First things first, we have to keep that butter cold once it’s mixed in! Combine the dry ingredients first, just a quick whisk. Then, get your softened butter creamed up with the sugar until it’s fluffy. Add that egg and vanilla and mix just until it sings. Now, slowly incorporate the dry stuff! You want to mix this until it *just* comes together. If you overmix, they spread, and we want sharp edges for our garden details!
Wrap that dough up tightly in plastic wrap—I actually pat mine into a nice flat disc so it chills faster—and put it in the fridge for a solid hour. Don’t rush this! Once chilled, preheat that oven to 350\u00b0F (175\u00b0C). Flour your surface and use your rolling pin to get the dough rolled out evenly to about 1/4 inch thick. It needs that thickness to withstand the icing! For general baking inspiration, sometimes I look at what the folks over at Betty Crocker are trying out, but we stick to the fundamentals here.
Cut out your shapes—plaque, arch, whatever fits your theme. Pop them onto your prepared baking sheets. Bake time is usually 9 to 11 minutes, depending on how big your shapes are. Watch the edges; they should look set, not deeply browned. Cool them completely on a wire rack before we even think about icing them!
Creating the Floral Royal Icing Consistency
Now we tackle the icing. This is usually where people get stressed, but if you use meringue powder, you’re already ahead of the game! Whisk your sifted powdered sugar and meringue powder together really well. This prevents the dreaded sugar clump!
Next, add the warm water, tiny bit by tiny bit. You are aiming for what we call “flood consistency.” How do you know when it’s right? When you lift your whisk, the icing running off should settle back into the bowl, and you should be able to trace a ‘8’ in the bowl before the line disappears—that usually takes about 8 to 10 seconds. If it disappears instantly, it’s too thin! If it sits there like a mountain, add a few more drops of water. Remember, you can always thicken icing by adding more powdered sugar later, but it’s tough to thin it out nicely without messing up the ratio.
Once you have your lovely white base icing, divide it up. Color a big portion ivory for the base layer, and then small amounts for your dusty rose, eucalyptus green, and soft peach.
Decorating Your Elegant Garden Baby Shower Cookies
This is the moment we’ve waited for! Start by flooding your completely cooled cookies with the ivory icing in whatever shape base you chose. Flood them right to the edge. You can use a scribe tool or shake the cookie gently to level it out. Seriously, make sure this base layer is perfectly smooth because everything else sits on top of it.
And here’s the tough part that needs all the patience: Drying Time. You absolutely must let that flood coat dry until it is totally firm to the touch. I mean it—at least 8 hours, or overnight if your kitchen is humid. If you try to pipe details onto wet icing, it sinks right in, and you lose that gorgeous dimension! I sometimes use a small fan on the lowest setting, pointed away, to speed things up, but don’t blast it!
Once the base is bone dry, you can grab your medium-stiff icing (use the same colors you used for the base if you want depth, or just new small batches). This is where you pipe those delicate details! Think tiny vines snaking along the edges, little clusters of rosebuds in the dusty rose, and tiny leaves in your green. Keep your hand steady—those fine-tip brushes, or piping tips, are your best friends here for achieving true elegant garden baby shower cookies perfection. For an extra wow factor, follow the gold-painting steps next!
Tips for Perfect Floral Royal Icing Cookies
Decorating with royal icing can feel a bit witchcrafty at first, but once you master a couple of quirks, you’ll be unstoppable! These little tips have saved my sanity countless times when trying to achieve that soft, detailed look perfect for garden party baby shower desserts.
If you’re looking for great troubleshooting ideas when things go sideways or you need help with batch consistency, the archives over at Taste of Home have saved me more times than I care to admit!
- Humidity is Your Enemy: I can’t stress this enough. If it’s a rainy or super humid day, your drying time will double, and your icing might never get hard enough for piping details. If I absolutely *must* bake on a humid day, I run a dehumidifier in the room where the cookies are drying. It makes a world of difference!
- The Stiff Icing Consistency Check: For piping those fine vines and petals, your icing needs to be medium-stiff, not stiff. If you try to pipe with icing that’s too thick, you get sharp, jagged lines. If it’s too thin, the tiny flowers melt into the base layer. Test it by piping a small swirl onto a spare cookie; if it holds its shape without drooping after 30 seconds, it’s probably just right for detailing.
- Keep Icing Covered (Seriously!): Royal icing dries out if it sees open air for more than five minutes. I mean it! Every time I step away to answer the phone or grab a coffee, I cover the bowls with damp paper towels tucked under plastic wrap, or I just seal them up tight with plastic wrap right against the surface of the icing. Nobody wants crusty icing left in the bowl!
- Clean Your Piping Tips Often: When you’re working with so many tiny floral elements, drying icing can clog your fine tips almost instantly. Keep a little bowl of warm water nearby and occasionally dip the tip of your piping bag into it, letting the warm water dissolve any hardened bits before continuing. A clean tip means professional-looking lines for your elegant garden baby shower cookies.
Storage and Presentation for Elegant Garden Baby Shower Cookies
Okay, you’ve poured your heart and soul into these meticulously decorated cookies—the ivory base is smooth, the gold accents are shimmering, and you absolutely cannot risk ruining them by storing them wrong! The biggest hurdle here, my friends, is time. Remember that 8-hour minimum drying time we talked about for the royal icing? That’s non-negotiable before storage.
The royal icing needs to be completely cured and hard as a rock. If you try to stack or bag them too soon, you’ll get smudges, and that elegant finish will turn into a muddy mess. Trust me, I learned that the hard way when I rushed a batch for a client once—never again!
Once you are 100% sure they are dry, you need to protect them from air and humidity until the party starts. These cookies are happy sitting on the counter for quite a while if they are stored correctly!
How to Store Your Finished Cookies
The key here is airtight and room temperature. Do not put these in the fridge! The condensation that forms when you take them out will actually dissolve parts of your beautiful icing.
- Store your fully dried cookies in a large, sturdy, airtight container. I love using a large rectangle Tupperware—the bigger the better—so you can lay them in single layers.
- If you have a lot of cookies and need layers, place a sheet of parchment paper or wax paper *gently* between each layer. Don’t press down at all! You just want a light barrier so the decorations don’t stick to each other.
- As long as they stay cool and dry, these elegant garden baby shower cookies can last a really long time—easily two weeks! They taste best in the first week, obviously, but they stay structurally sound for party setup.
Packaging for an Upscale Presentation
If you are handing these out as baby shower favors, presentation really seals the deal and shows off all that hard work. We need to keep them protected while still letting those gorgeous floral details shine through.
The note mentioned packaging them individually, which I highly recommend for party favors. Get some nice, clear cellophane or cello bags. They look so much better than Ziplocs!
- Gently slide each cookie into its own bag.
- Seal the bag securely, making sure there isn’t a ton of extra air trapped inside, which can lead to movement.
- Tie the top with a fancy ribbon—I always gravitate toward silk ribbon in one of the theme colors, like dusty rose or soft sage green, to keep that upscale vibe going. You could even add a small custom tag that says, “Welcome Baby [Name]!”
When you’re transporting them to the venue, use a box lined with a non-slip mat or a layer of paper towels underneath the cookie container. Keep them flat, and warn whoever is driving that they are carrying priceless edible artwork!
Variations on Garden Party Baby Shower Desserts
Once you have mastered the basic dough and the royal icing consistency—which you totally will after making these elegant garden baby shower cookies—you can start playing around! Honestly, decorated sugar cookies are the best because they are totally customizable. You can change the flavor profile slightly or just switch up the aesthetic without needing a whole new recipe.
I always think one of the easiest ways to get a completely new look is by changing the color palette. We went with dusty rose and eucalyptus green because it’s so soft, but if you’re doing a spring shower or maybe an afternoon tea theme, you can swing in bright yellows and blues for a different vibe. For more ideas on how to adapt flavors, sometimes I look at my lemon cake pop recipe for inspiration on incorporating extracts!
Switching Up the Dough Flavor
Since the cookie base is so sturdy, it holds flavor extracts beautifully. The base recipe is classic vanilla, but if you want your garden party baby shower desserts to have a little extra zip, try these easy additions when you mix in the vanilla:
- Lemon Zest Magic: Add the zest of one whole lemon into the butter and sugar mixture when you are creaming them together. It wakes up the vanilla and really brightens up the cookie, which is lovely alongside the sweet icing.
- Almond Whisper: Substitute half of your vanilla extract (so use 1 tsp vanilla and 1 tsp almond extract). Almond pairs wonderfully with florals and gives a sophisticated, almost French macaron flavor to the pastry.
- Subtle Spice: For a cozier feel, add just a tiny pinch of ground cardamom to the dry ingredients. It’s warm but much more exotic than cinnamon, which really suits a garden theme.
Rethinking the Cutter Shapes
Our main recipe uses plaques and arches for a very specific, classic look, but shapes totally change the narrative! If you want a more whimsical feel for your floral royal icing cookies, ditch the plaques for a day and grab some specialty cutters.
I think switching up the primary shape instantly changes how you approach the decoration. For instance:
- Butterfly or Moth Shapes: These are divine for a garden theme! You can flood them in pale ivory, and then use very fine piping to dust the wings with edible gold or use the green and rose colors to paint delicate ‘veins’ on the wings.
- Tiny Teacups or Birdcages: These shapes lend themselves perfectly to piped basket-weave details or small painted flowers spilling over the edges. They make fantastic individual party favors that really scream “elegant garden!”
- Scalloped Circles: Even if our recipe uses them, if you use them as the *main* shape, you can flood them in a pale green and then pipe a wreath of tiny flowers around the entire perimeter, making a beautiful border wreath cookie.
Palette Swaps for Modern Elegance
The dusty rose and eucalyptus green combination is classic, but maybe your mom-to-be is leaning toward a more jewel-toned or modern look. You don’t need a whole new recipe—just new colors!
Instead of our standard soft palette, try these:
- Deep Mood Forest: Use shades of deep teal and burgundy for your flood icing, with ivory flood bases. Then, use gold paint extensively on the details to mimic intricate metalwork mixed with dark florals. It’s moody and stunning!
- Lavender and Gold: Substitute all the dusty rose for rich lavender. Then, use white for the base and make all your piping details in either white or light gray, finishing with heavy gold accents. It feels so chic and French countryside!
Frequently Asked Questions About Elegant Garden Baby Shower Cookies
It’s totally normal to have questions when you’re diving into intricate decoration like this! Royal icing can be temperamental, and these aren’t just any cookies; they are centerpieces for your party! I’ve gathered up the most common things people ask me when preparing beautiful elegant garden baby shower cookies.
If you are struggling with consistency, sometimes just seeing how other bakers handle their dough and icing can help. I always get inspired scrolling through tips on Food Network to see different approaches, but here are my tried-and-true answers for your garden party needs.
Can I make these floral royal icing cookies ahead of time?
Oh, yes you can! That’s one of the biggest perks of using royal icing instead of buttercream on sugar cookies. Once the cookies are completely decorated—and I mean *completely* dry, which means waiting that full 8 hours minimum after any final detail piping—they seal up beautifully. If stored correctly in an airtight container at room temperature, they stay fresh and picture-perfect for up to two weeks! This is why they are perfect for event planners!
What is the best way to transport these cookies?
Transporting them is a tightrope walk, isn’t it? You want them secure but not squished! The absolute best way is to transport them completely flat. Use sturdy boxes—like those catering boxes—and line the bottom with a thin layer of paper towels so they don’t slide around once you hit the brakes or turn a corner. If you packaged them individually in the cello bags like I suggested earlier, that adds an extra protective shell! Whatever you do, keep them out of the trunk if it’s very hot, and absolutely keep them away from anything damp or steamy.
How do I get the gold paint to look professional?
This is one of my favorite little tricks! You absolutely should not just dip your brush in that metallic dust and start painting—it will look clunky and dry. You need to create an edible ‘paint consistency’ first. Take a small amount of the edible gold dust and mix it with just one or two drops of a high-proof, clear liquid. I usually reach for lemon extract because I often have it nearby (and it evaporates fast!), but clear vodka works perfectly too! Mix it until it forms a shimmery, runny paint, and then use your fine-tip brush. This technique ensures a smooth, professional metallic sheen on your elegant garden baby shower cookies. For more on adapting techniques, you might find my comparison of pastry styles interesting over at Italian vs. French Macarons.
Nutritional Estimate for These Cookies
Now, I know decorating elegant garden baby shower cookies involves a bit of sugar—I mean, you have cookie dough *and* royal icing! That’s just how these gorgeous treats go. But I always like to give a general idea of what you’re getting when you enjoy one of these pretty little things.
Please remember this is just a rough sketch, calculator style! Since we are dealing with homemade batches, hand-measured water for the icing, and whatever brand of butter you happen to have on hand, these numbers are just estimates. For the most accurate breakdown, you’d need to input every single ingredient into a specific nutrition calculator program. You can read more about how we handle these estimates on my disclaimer page, too.
Based on the recipe making 24 cookies, here is the ballpark nutritional structure:
- Calories: 250
- Carbohydrates: 35g
- Protein: 3g
- Fat: 11g
- Saturated Fat: 7g
- Cholesterol: 35mg
- Sodium: 150mg
- Fiber: 0g
- Sugar: 18g
See? Not too terrible for a fancy special occasion treat! The sugar content is mainly driven by that delicious, hard icing, but that’s what gives these floral royal icing cookies their perfect, crisp finish. Enjoy them guilt-free as part of your beautiful garden party baby shower desserts spread!
Share Your Garden Party Baby Shower Desserts
I truly hope you enjoyed following along and that you feel ready to tackle these beautiful elegant garden baby shower cookies! When you put in the time to get those fine details just right, it takes these from basic cookies to true showstoppers. I can’t wait to see what incredible color palettes and shapes you decide to use for your own celebration!
If you try them out, please come back and leave a rating! Five stars if they made your party feel extra special, please! It really helps other folks trying to find the perfect, refined dessert inspiration.
Also, if you share your finished floral royal icing cookies on social media—and you absolutely should, because they are gorgeous—please tag me or drop a link in the comments below so I can gawk at your amazing work! It makes my whole day to see my recipes out there making beautiful events happen. If you ever have a question about adapting a recipe or need to get in touch about a baking query, you can always reach out via my contact page!
Happy Baking, and I hope the showering baby brings you so much joy!
By Hanna Foster, Adaptation Specialist at Recipes by Betty.
Elegant Garden Baby Shower Cookies
Equipment
- Rolling Pin
- Cookie cutters (plaque, arch, scalloped circle)
- Baking sheets
- Fine-tip brushes
Ingredients
For the Cookies
- 2 3/4 cups all-purpose flour
- 1 tsp baking powder
- 1/2 tsp salt
- 1 cup unsalted butter, softened
- 1 cup granulated sugar
- 1 large egg
- 2 tsp vanilla extract
For the Royal Icing
- 4 cups powdered sugar, sifted
- 3 tbsp meringue powder
- 5 to 6 warm water Use enough for desired consistency
- As needed gel colors (ivory, dusty rose, eucalyptus green, soft peach)
For Decoration
- Optional edible gold paint
Instructions
- Prepare the cookie dough. Combine dry ingredients. Cream the butter and sugar, then add the egg and vanilla. Gradually mix in the dry ingredients until just combined.
- Wrap the dough and chill it for 1 hour.
- Preheat your oven to 350°F (175°C). Roll the chilled dough to 1/4 inch thickness. Cut the dough into plaque, arch, or scalloped circle shapes.
- Bake the cookies for 9 to 11 minutes, adjusting the time based on the size of your cutouts. Cool the cookies completely on a wire rack.
- Make the royal icing by whisking the sifted powdered sugar and meringue powder. Add the warm water slowly until you reach a smooth, floodable consistency. Divide the icing and color portions ivory and blush.
- Flood the cooled cookies with the ivory or blush icing. Let the cookies dry for at least 8 hours to achieve a smooth surface.
- Once dry, use medium-stiff icing to pipe delicate details like garden vines, small rosebuds, and tiny leaves onto the cookies.
- For a luxury look, mix the edible gold paint with a drop of lemon extract. Use fine-tip brushes to add tiny gold-painted edges or dots to the finished designs.
- For presentation, stand the cookies upright in a linen-lined tray or package them individually in clear bags tied with silk ribbon to serve as baby-shower favors.