
Oh, spring is finally peeking around the corner! That means it’s time to dust off the bunny and chick cookie cutters and get serious about holiday baking. Nothing screams Easter like perfectly shaped, buttery sugar cookies covered in smooth, bright color. That’s why I’m obsessed with sharing my recipe for Easter Sugar Cookies with Pastel Icing.
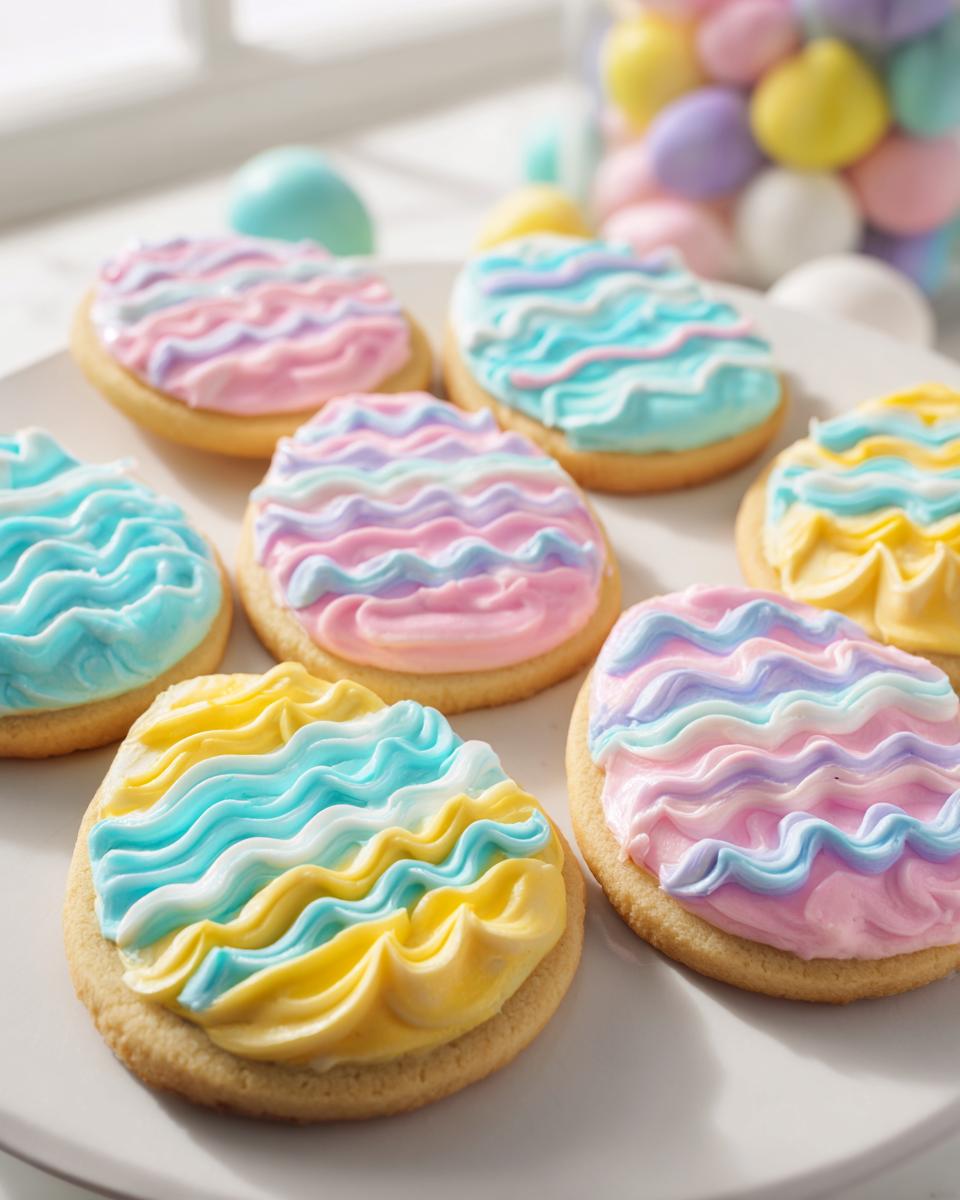
Pastel icing gave these cookies a bright, festive finish, making them look absolutely beautiful on any buffet table. This recipe yields classic sugar cookies that hold their shape beautifully while baking—no sad, spreading puddles here! I remember sitting at my grandmother’s tiny kitchen table, sorting out little bowls of icing colored the softest pinks and blues. It’s so much fun, and honestly, it’s about making sure our holiday traditions stay perfectly reliable year after year. For classic techniques, sometimes I love reviewing fundamentals, like the techniques found over at Joy of Baking.
We’re going to make sure your cookies are sturdy enough for decorating and that your icing looks professional but is super easy to manage. Trust me, you’re going to want to bookmark this one!
Why You Will Love These Easter Sugar Cookies with Pastel Icing
Whenever Easter rolls around, my kitchen gets filled with the scent of vanilla and the sight of bright colors. These aren’t just any cut-out cookies; they are the perfect canvas for holiday fun! If you need a recipe that survives little hands and busy holiday schedules, this one is it. You’ll be so proud of the beautiful easter decorated cookies you create.
They taste like home, they look incredible, and they’re just straightforward enough that you won’t feel stressed trying to get them done before the Easter egg hunt starts.
Recipe Highlights for Perfect Pastel Cookies Recipe
- The dough is sturdy! It chills beautifully and rolls out like a dream without sticking everywhere, which is essential for nice, clean cuts.
- This recipe guarantees that classic, slightly crisp edge with a soft, chewy center—the best kind of sugar cookie, honestly.
- The royal icing sets up just right. It dries firm enough to stack them in pretty boxes, but it’s delicious when you bite into it. This is the ideal pastel cookies recipe for flawless decorating.
- It’s totally kid-friendly once the cookies are cool! Mixing the pastel colors is a favorite activity here every spring.
- You get about 24 perfect cookies, which sounds like a lot, but trust me, they disappear fast once the family arrives!
Essential Equipment for Making Easter Sugar Cookies with Pastel Icing
Having the right tools ready before you start mixing makes the whole process so much smoother, especially when you’re trying to hit a deadline like the Easter morning brunch. You absolutely need a sturdy set of mixing bowls, because we are creaming fats and sugars, and you don’t want anything skipping across the counter.
An electric mixer is going to be your best friend here; trying to cream a whole cup of butter by hand just isn’t going to give us the lift we need for these cookies. Once the dough is chilled, you’ll want a reliable rolling pin to get that consistent 1/4 inch thickness that ensures all your cookies bake evenly.
Of course, you can’t make easter sugar cookies pastel icing masterpieces without a good collection of cookie cutters—have those bunnies and eggs ready to go! Remember to grab enough baking sheets; you want to bake these in batches so they don’t crowd the oven. It’s always a good idea to check out solid guides for baking basics, like the tips you can find over at King Arthur Baking just to make sure your technique is spot on.
Gathering Ingredients for Your Easter Sugar Cookies with Pastel Icing
Okay, ingredient check! Getting everything ready before you even think about turning on the mixer is half the battle in holiday baking. We have two main components here: the sturdy, delicious cookie itself, and that gorgeous, smooth icing we need for decorating those easter sugar cookies pastel icing masterpieces. Don’t try to substitute that butter, by the way—it needs to be perfectly softened!
Make sure you have your coloring gels ready to go! You can’t get those beautiful, soft springtime shades without them. It pays off to read through the whole list first so you aren’t scrambling when you’re elbow-deep in dough later on.
Ingredients for the Classic Sugar Cookie Base
For the actual cookies that hold up to cutting and decorating, you’ll want to gather these basics. Remember, the butter has to be softened, not melted, or the whole structure will fail us!
- 2 3/4 cups of all-purpose flour
- 1 teaspoon of baking powder
- 1/2 teaspoon of salt
- 1 cup of butter that is nicely softened
- 1 cup of sugar
- 1 whole egg
- 1 1/2 teaspoons of vanilla extract
Ingredients for the Bright Pastel Icing
This is where the magic happens for the decoration! Meringue powder is non-negotiable here, it helps stabilize the icing so it sets firm. And of course, your pastel gel colors are essential for achieving that perfect spring look.
- 2 cups of powdered sugar
- 1 1/2 tablespoons of meringue powder
- 3 to 4 water (Use just enough to reach the right consistency, but start slow!)
- A selection of pastel gel colors for tinting the icing
Step-by-Step Instructions for Perfect Easter Sugar Cookies with Pastel Icing
Alright, let’s get baking! Following these steps exactly is how we guarantee your cookies come out perfect and ready for their spring makeovers. We’ll start with the dough, let it rest—patience is key here, trust me—and then move onto the fun part: decorating those easter sugar cookies pastel icing dreams!
Preparing and Chilling the Cookie Dough
First things first, we need to incorporate the dry stuff. Take just a minute to mix your flour, baking powder, and salt together in a medium bowl until they look evenly blended. Pop that to the side, we aren’t quite ready for it yet.
- Grab your electric mixer and get that softened butter and sugar creamed together nicely in a big bowl! You want it light and fluffy—this step traps the air that keeps the cookies tender.
- Next, mix in that one egg and the vanilla extract until everything looks happy and combined. Don’t overdo it; just stir until you don’t see streaks.
- Now, slowly add those dry ingredients you set aside into your wet mixture. Mix slowly until it just comes together into a cohesive dough. If you mix too long here, the cookies will get tough, so stop as soon as it forms a ball!
- This is important: wrap that whole ball of dough tightly in plastic wrap. It needs to chill in the refrigerator for a full 1 hour. This chilling is what stops them from slouching in the oven later!
Rolling, Cutting, and Baking the Easter Decorated Cookies
Once that dough is nice and firm from chilling, we can get those fun shapes ready! Preheat your oven now to 175°C (350°F) so it’s ready when you are. Remember to line those baking sheets with parchment paper; it makes clean-up totally painless. If you need a good reference for baked sugar cookies, checking out recipes like those at Taste of Home is always worthwhile.

- Lightly dust your counter or a big cutting board with flour. Take out the dough and roll it evenly to about 1/4 inch thickness. Uniform thickness equals even baking!
- Use your favorite cutters to shape your cookies—think chicks, eggs, or simple circles you can decorate later.
- Place the cutouts onto your prepared baking sheets. They can be close, but don’t let them touch much.
- Bake them for 8 to 10 minutes. You are looking for just the slightest hint of golden brown around the very edges. They might look slightly underdone, but that’s perfect!
- Let them sit right there on the hot pan for just a couple of minutes to firm up, then gently transfer them to a wire rack so they can cool down completely before we even *think* about icing them.
Mixing the Royal Icing and Creating Pastel Colors
This royal icing is the best for those sharp, clean lines you want for professional-looking easter decorated cookies. It needs to be the right consistency, which is called ‘piping consistency’ for outlining.
- In a bowl, whisk your powdered sugar and the meringue powder together really well to break up any lumps.
- Slowly start adding the water, one tablespoon at a time. You’ll whisk constantly! Keep going until you have a smooth, thick icing that can hold its shape when you drag a whisk through it.
- Now for the fun part! Scoop your stiff icing into several small, separate bowls—one for each pastel color you want.
- Use your pastel gel colors to tint each small batch. Gel colors are better than liquid because they won’t mess up the necessary icing consistency for our perfect pastel cookies recipe.
Decorating Your Pastel Cookies Recipe
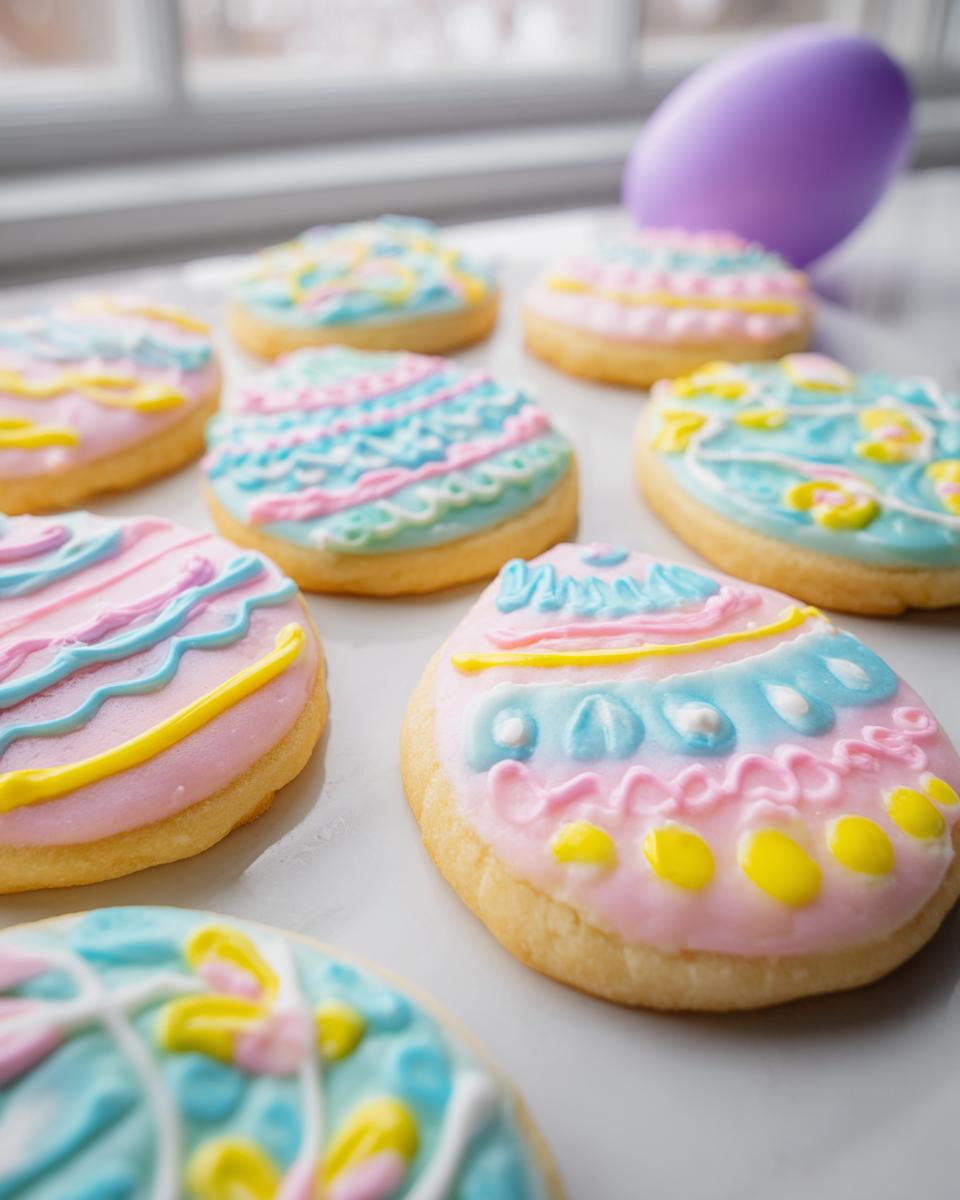
This is where attention to detail matters for the best outcome. We use a two-stage process for the smoothest finish on our pastel cookies recipe.
- Using a fine tip or a piping bag fitted with a small round tip, outline each cooled cookie with one of your chosen pastel colors. Don’t skip this step! This outline acts as a little dam.
- Let that outline dry until it’s just set—maybe 5 to 10 minutes. Then, you can use the same color (or a lighter shade!) to ‘flood’ the center. Remember the note: for flooding, you might need to thin the icing slightly with just a drop or two of water until it flows nicely off a spoon.
- Once the flood dries completely, which can take a few hours depending on how thick you went, you can come back with your darkest shades or white icing to pipe on details like dots, tiny stripes, or little crisscross patterns. Patience between setting the base layer and adding details is essential for beautiful easter sugar cookies pastel icing!
Tips for Success with Easter Sugar Cookies with Pastel Icing
Even with a great recipe, a few little baker tricks can take your cookies from ‘good’ to ‘absolutely perfect’ for the holiday. Since we are aiming for beautiful, stable cookies that can handle all that gorgeous pastel icing, pay close attention to these pointers. I learned these the hard way over many, many batches—I’m sharing them so you don’t have to!
First up: preventing spread! If you’re worried about your shapes melting during baking (which would ruin our beautiful cutouts for the easter sugar cookies pastel icing), make sure your butter isn’t too warm when you mix the dough. It should be soft enough to indent easily but still cool to the touch. If the dough feels greasy when you roll it out, quickly put it back in the fridge for 15 minutes. A cold cookie slab bakes flat, plain and simple.
Next, let’s talk about that icing consistency, because this is where most people get frustrated when trying to master the pastel cookies recipe. Remember that note I mentioned earlier about thinning the icing for flooding? That’s crucial. You mix it thick for the outline, but that flood icing must be runny enough to smooth itself over the middle of the cookie within about 10 seconds of tilting the cookie. If it’s too thick, it won’t settle flat; if it’s too thin, it will run right over your dam outline! Practice small dots on a piece of parchment paper until you get that perfect ribbon consistency.
My final tip for managing this decorating process is batch timing. Don’t decorate all 24 cookies at once! Work in small batches of four or six. Outline them all, let them sit for ten minutes, then flood them all. This gives the outline time to crust over before you flood, preventing the colors from bleeding into each other. This methodical approach is how we achieve those professional-looking easter decorated cookies!
If you want a reliable example of a sugar cookie base that holds up well, definitely check out the tips shared by folks over at Allrecipes—it’s always good to see how others handle rolling and cutting.
Ingredient Notes and Substitutions for Easter Sugar Cookies
When we’re talking about baking for the holidays, I always preach to stick as closely to the recipe as possible, especially for something structural like these sugar cookies. The specific ratios of ingredients are what stop them from spreading into sad pancakes when they hit the heat. But hey, sometimes you get to the pantry and realize you’re missing one tiny thing, or life throws you a vegan curveball! Don’t panic. Let’s talk about the non-negotiables and where you might be able to sneak in a substitution.
The biggest discussion point is always the butter. I wrote this recipe calling for **softened butter**, which is key. Softened means you can press a finger into it and leave a dent, but it shouldn’t feel greasy or warm. If your butter is too cold, it won’t cream properly with the sugar, and you lose all those essential air bubbles we talked about for the cookie structure. If your butter is melted? Forget about it! Melted butter leads to oily, flat, spreading disasters that are impossible to decorate with our beautiful pastel cookies recipe.
Now, let’s look at that meringue powder for the icing. It’s my go-to because it stabilizes the icing perfectly, giving us that glossy, hard-shell finish. If you absolutely can’t find it, you can mimic its effect by adding a tiny squeeze of lemon juice (about 1/2 teaspoon) or a 1/4 teaspoon of cream of tartar along with your powdered sugar. It won’t be quite as reliable as the meringue powder, but it usually helps activate the sugar to stiffen up. For more standard cookie base advice, I often look at guides like those from BBC Good Food.
For the sweetness, stick to the plain white sugar in the dough. Brown sugar is too moist and can change the texture we need for these cut-out cookies. If you’re looking to make a batch of easter sugar cookies pastel icing without eggs—that’s a tough one for cut-outs! Eggs bind everything beautifully. If you must attempt it, look for a commercial egg replacer designed for baking, but be aware you might need to chill the dough even longer.
My final note is on the vanilla. Use the best vanilla extract you have! This cookie has very few flavor components—just butter, sugar, and that vanilla—so make sure it’s high quality for the best taste profile in your finished easter decorated cookies.
Storage and Serving Suggestions for Easter Decorated Cookies
Once you’ve successfully decorated all those beautiful easter decorated cookies, the next big question is, “How do I keep them perfect until Easter Sunday?” Don’t worry; these cookies are sturdier than they look, thanks to that lovely royal icing shell we created. Luckily, storing these baked beauties is incredibly straightforward!
The most important thing for storage is air exposure. If you leave them out on a rack, the icing will get dull, and the cookie edges will go soft way too fast. You must store them in an airtight container. I prefer placing a layer of wax paper or parchment paper between stacked layers of cookies. This prevents the delicate pastel icing on one cookie from sticking to the one above it. Trust me, peeling icing off is nobody’s idea of fun!
Keep these cookies at room temperature. No need to put them in the fridge! Putting sugar cookies in the refrigerator can actually make them taste stale quicker because of the way the cold affects the butter in the base. If you’ve stored them correctly in an airtight spot, they’ll stay absolutely fresh and beautiful for at least a week—maybe even ten days if you managed to save any!
When it comes to serving these lovely easter sugar cookies pastel icing treats, presentation matters almost as much as taste! They look stunning simply arranged on a tiered white platter, maybe interspersed with some actual dyed eggs or chocolate bunnies for contrast. They make fantastic little edible party favors too. I often bag up three or four, tie them with soft yellow or light green ribbon, and hand them out when guests leave after our Easter meal.
Because the royal icing sets so hard, these cookies are fantastic when paired with other frosted treats, or even just served alongside coffee. If you happen to be making extra batches of frosting, you might want to check out the amazing ideas for different frosting types linked over at Recipes by Betty for your next baking adventure!
Frequently Asked Questions About Pastel Cookies Recipe
I get so many questions when people try this recipe for the first time, especially around the holidays when everyone is rushing! Royal icing can be tricky, and sugar cookies seem to have a mind of their own sometimes. Here are a few things that pop up most often when folks are making their pastel cookies recipe!
Why did my Easter sugar cookies spread while baking?
Ugh, spreading cookies are the worst, especially when you spent time cutting out perfect shapes for your easter sugar cookies pastel icing! This almost always comes down to two things: your butter was too warm when you mixed the dough, or you didn’t chill the dough long enough. Remember, that 1-hour chill time is mandatory! Cold dough hits the hot oven and sets its shape before the butter has a chance to melt out. If you notice they spread a tiny bit, you can actually trim them right after they come out of the oven while they are still warm—just use your cutter again to gently reshape them!
How long does the royal icing truly need to dry?
This is the biggest test of patience when making easter decorated cookies! If you are doing that outline-and-flood method we discussed, the flood layer needs to be completely dry before you pipe detail on top. Depending on how humid your kitchen is, this can take anywhere from 4 hours to overnight. You can test it by gently touching a dry area; if your finger leaves a mark, it’s not ready. If you try to pipe more detail, you risk smashing the soft layer underneath. For best results, leave them sitting out on the counter overnight if you can!
Can I use standard liquid food coloring instead of gel colors for the icing?
You absolutely can, but I really, really advise against it if you want that beautiful, thick texture for your pastel cookies recipe. Liquid food coloring adds unnecessary moisture to your icing mixture. If you add too much liquid, your icing will go too thin—it won’t hold that nice outline shape, and it will run everywhere! Gel colors are much more concentrated, so you only need a tiny toothpick dip to get vibrant pastel shades without altering the icing consistency. If you *must* use liquid, add it one drop at a time, and be prepared to add a little extra sifted powdered sugar to bring the thickness back up.
My icing is lumpy! What should I do?
Lumps usually mean you didn’t sift the powdered sugar well, or the meringue powder clumped up. Don’t throw it out! I usually give mine a quick whiz with my electric hand mixer right before I portion it out. If it’s still lumpy after mixing, run it through a fine-mesh sieve! You might have to press it through with a spatula, but it gets rid of those hard sugar bits so your easter sugar cookies pastel icing looks perfectly smooth and professional. A quick blend usually fixes 99% of icing issues.
For more baking troubleshooting and great ideas for holiday treats, you can always browse through the trend recipes collection linked over at Recipes by Betty.
Sharing Your Easter Sugar Cookies with Pastel Icing Creations
Well, that’s it! You’ve mixed, chilled, rolled, baked, and decorated your way to a table full of gorgeous Easter Sugar Cookies with Pastel Icing. I really hope you had as much fun making them as I do every spring!
I mean it when I say my absolute favorite part of sharing these recipes is seeing what you all come up with. If you nailed the flooding technique or found a unique way to arrange your pastel bunnies, please, please come back and let me know! Rating the recipe is such a huge help to me and other bakers out there trying to decide if they should make this recipe next. Five stars if you think they deserve it, of course!
And don’t forget to snap those pictures! When you post your beautiful easter decorated cookies online, tag me so I can swoon over your designs. I love seeing those tiny details you add to make them uniquely yours. Little variations on the pastel cookies recipe are always inspiring!
If you’re looking for other sweet inspiration for your holiday table, you know where to look—check out all the other dessert recipes waiting for you over at Recipes by Betty.
Happy Easter baking, everyone!
By Emily Mitchell, Efficiency & Testing Coordinator at Recipes by Betty.

Easter Sugar Cookies with Pastel Icing
Equipment
- Mixing Bowls
- Electric mixer
- Rolling Pin
- Cookie cutters
- Baking sheets
Ingredients
For the Cookies
- 2 3/4 cups flour
- 1 tsp baking powder
- 1/2 tsp salt
- 1 cup butter, softened
- 1 cup sugar
- 1 whole egg
- 1 1/2 tsp vanilla extract
For the Pastel Icing
- 2 cups powdered sugar
- 1 1/2 tbsp meringue powder
- 3 to 4 water Use enough to reach desired consistency
- pastel gel colors For dividing and coloring the icing
Instructions
- Mix the flour, baking powder, and salt together in a medium bowl. Set this dry mixture aside.
- Use an electric mixer to cream the softened butter and sugar in a large bowl until the mixture is light and fluffy.
- Add the egg and vanilla to the creamed mixture and mix until just combined.
- Gradually mix the dry ingredients into the wet ingredients until a dough forms. Do not overmix.
- Wrap the dough in plastic wrap and chill it in the refrigerator for 1 hour.
- Preheat your oven to 175°C (350°F). Line baking sheets with parchment paper.
- On a lightly floured surface, roll the chilled dough out to about 1/4 inch thickness. Cut out your desired shapes.
- Place the cutouts onto the prepared baking sheets. Bake for 8 to 10 minutes, or until the edges are lightly golden.
- Remove the cookies from the oven and let them cool on the baking sheets for a few minutes before transferring them to a wire rack to cool completely.
- Prepare the icing: Whisk together the powdered sugar and meringue powder. Slowly add the water, one tablespoon at a time, until you reach a smooth, thick consistency suitable for outlining.
- Divide the icing into separate small bowls and tint each portion with a different pastel gel color.
- Outline the cooled cookies with the desired color. Once the outline sets, flood the center with the same or a different color. Let the icing dry completely.
- Add decorative details like dots, lines, or Easter patterns using the remaining icing once the base layer is dry.