
You know those holiday desserts that make everyone stop mid-conversation just to say “Aww!”? That’s exactly what happened when I first brought out these Cute Strawberry Santa Desserts at our family Christmas party. I’ll never forget my niece’s eyes lighting up when she saw their little chocolate-chip eyes and fluffy coconut beards – she immediately named each one before anyone could take a bite!
What I love most about these adorable treats is how they turn simple ingredients into pure holiday magic. Fresh strawberries become Santa’s rosy cheeks, cream cheese frosting transforms into his snowy beard, and those tiny chocolate chips? They give him the most mischievous twinkle you’ve ever seen. The best part? No oven required – just some playful assembly that even kids can help with.
These strawberry Santas have become our must-make holiday tradition because they’re equal parts delicious and delightful. One bite of the juicy strawberry with that creamy frosting, and you’ll understand why they disappear faster than Santa’s cookies on Christmas Eve!
Why You’ll Love These Cute Strawberry Santa Desserts
Trust me, these little Santas will steal the show at your holiday gathering! Here’s why they’re my absolute favorite festive treat:
- No baking required – Just mix, assemble, and watch the magic happen (perfect for when your oven is already stuffed with cookies!)
- Kid-approved fun – My nieces and nephews love helping decorate the Santas’ faces – it’s like playing with edible dolls
- Impressively festive – Those little coconut beards and chocolate eyes make everyone reach for their phones to snap pictures
- Surprisingly easy – If you can slice strawberries and pipe frosting, you’re already halfway there
- Delicious combo – The sweet-tart strawberries with creamy frosting is a match made in holiday heaven
They’re the perfect partner to other no-bake treats like homemade fruit roll-ups or strawberry cheesecake parfaits on your dessert table. The best part? You’ll spend more time enjoying the party than slaving in the kitchen!
Ingredients for Cute Strawberry Santa Desserts
Gathering the right ingredients is half the fun with these adorable treats! I always make sure everything is prepped and ready before I start assembling – it makes the whole process so much smoother. Here’s what you’ll need to create 12 merry little strawberry Santas:
For the Frosting
This creamy frosting holds everything together (and tastes amazing too!):
- 1 package (8 ounces) cream cheese – softened to room temperature (trust me, this makes mixing so much easier)
- ½ teaspoon vanilla extract – the good stuff if you have it
- 2½ cups confectioners’ sugar – sifted if you want extra smooth frosting
For the Santas
Now for the fun part – building our jolly little guys:
- 12 large Driscoll’s strawberries – look for plump, evenly shaped ones (they make the cutest Santa bodies!)
- 12 chocolate cookies – I use Famous Chocolate Wafers, but any flat, round cookie works
- 24 Driscoll’s blueberries – these become Santa’s adorable little boots
- 24 mini semi-sweet chocolate chips – for those twinkly eyes (regular size will look too big)
- 12 mini white chocolate chips – the perfect tiny noses
- ½ cup finely shredded coconut – for the fluffiest Santa beards
- 1 cup semi-sweet chocolate chips – melted for “glue” to hold everything together
- Raspberries (optional) – great for adding extra holiday color as garnish
Pro tip: Set up all your ingredients in little bowls like a cooking show – it makes assembly feel like a fun craft project!
Equipment Needed for Cute Strawberry Santa Desserts
You probably already have most of these tools in your kitchen! Here’s what you’ll need to create these adorable strawberry Santas:
- Electric hand mixer – For whipping up that perfect creamy frosting (a whisk and strong arms work too in a pinch!)
- Piping bag with large round tip – Or just a zip-top bag with the corner snipped off – my lazy secret
- Microwave-safe bowl – For melting chocolate without making a mess
- Pairing knife – To carefully hollow out those strawberry Santa bellies
That’s it! No fancy equipment needed – just basic tools to help you assemble these festive little guys with ease.
How to Make Cute Strawberry Santa Desserts
Okay, let’s make some holiday magic! These strawberry Santas come together in three simple parts: making the frosting, prepping the strawberries, and assembling our jolly little guys. I promise it’s easier than wrapping presents – and way more fun!
Preparing the Frosting
First, let’s whip up that creamy “snow” for our Santas! Dump your confectioners’ sugar into a medium bowl – no need to be neat about it. Add the softened cream cheese and vanilla. Now grab your electric mixer (or a strong arm and whisk) and beat until it’s smooth and fluffy. The frosting should hold its shape when you lift the beaters – if it’s too runny, add a bit more sugar. Too thick? A teaspoon of milk will loosen it up. Pop it into a piping bag (or zip-top bag with the corner snipped) and chill for 10-15 minutes. This makes it easier to work with when we’re decorating!
Assembling the Strawberry Santas
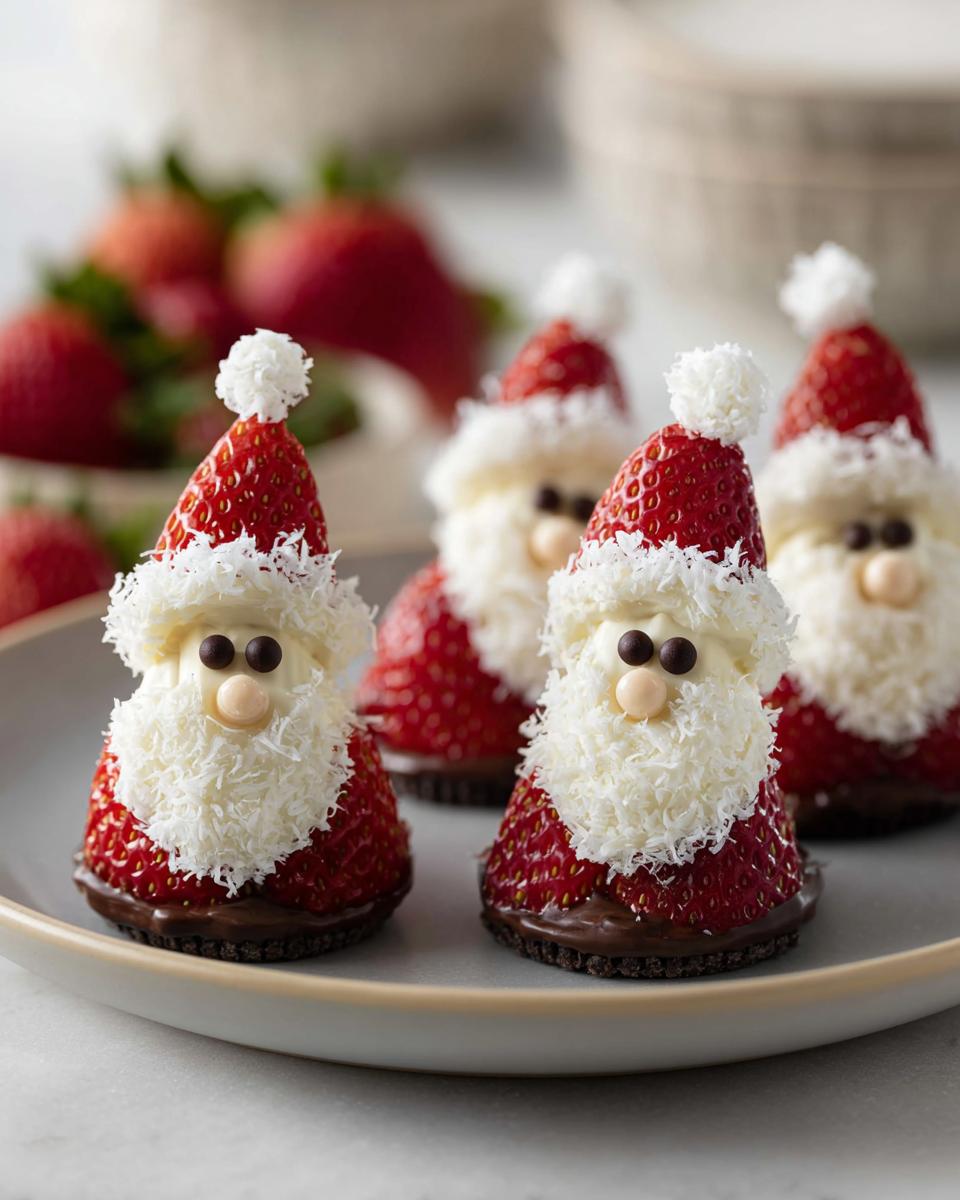
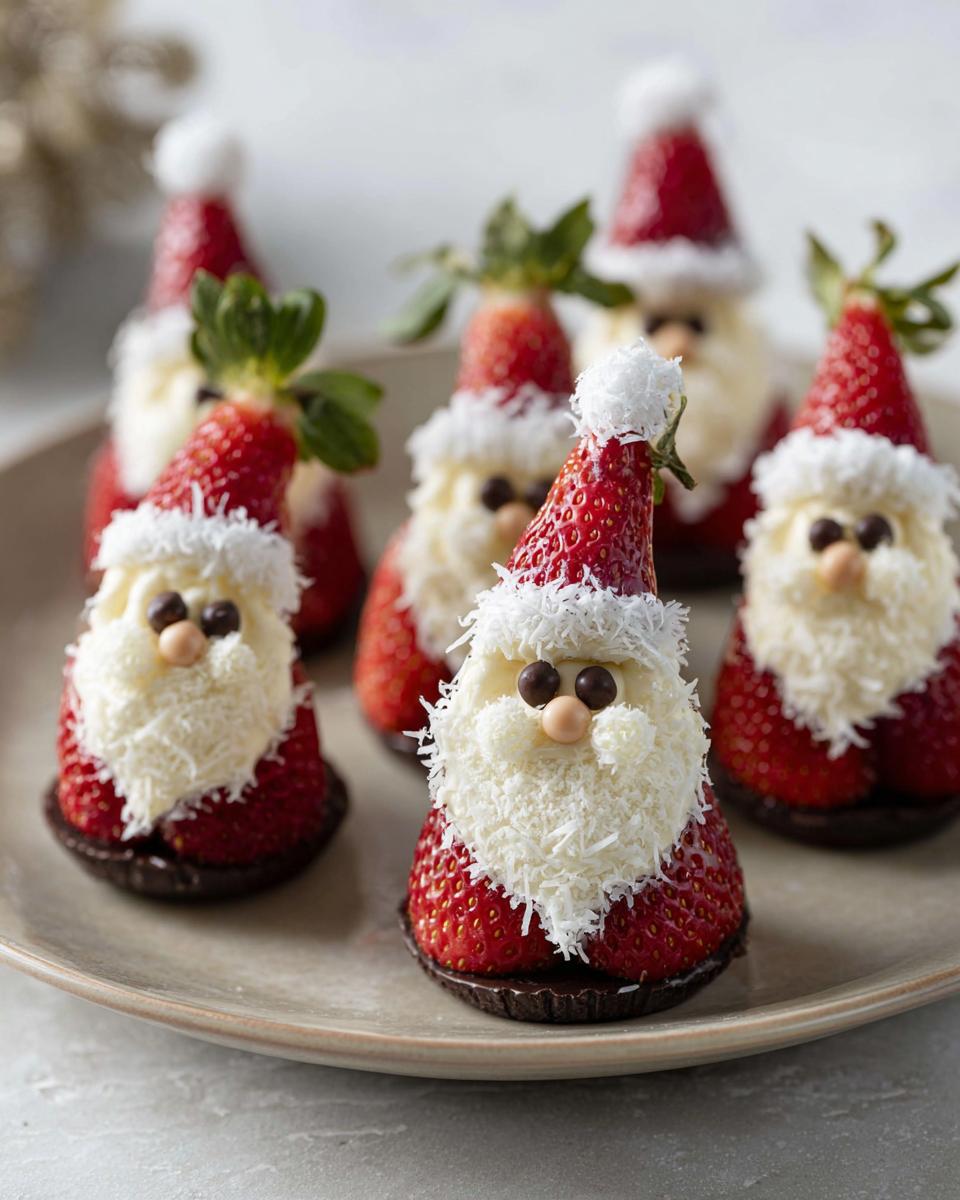
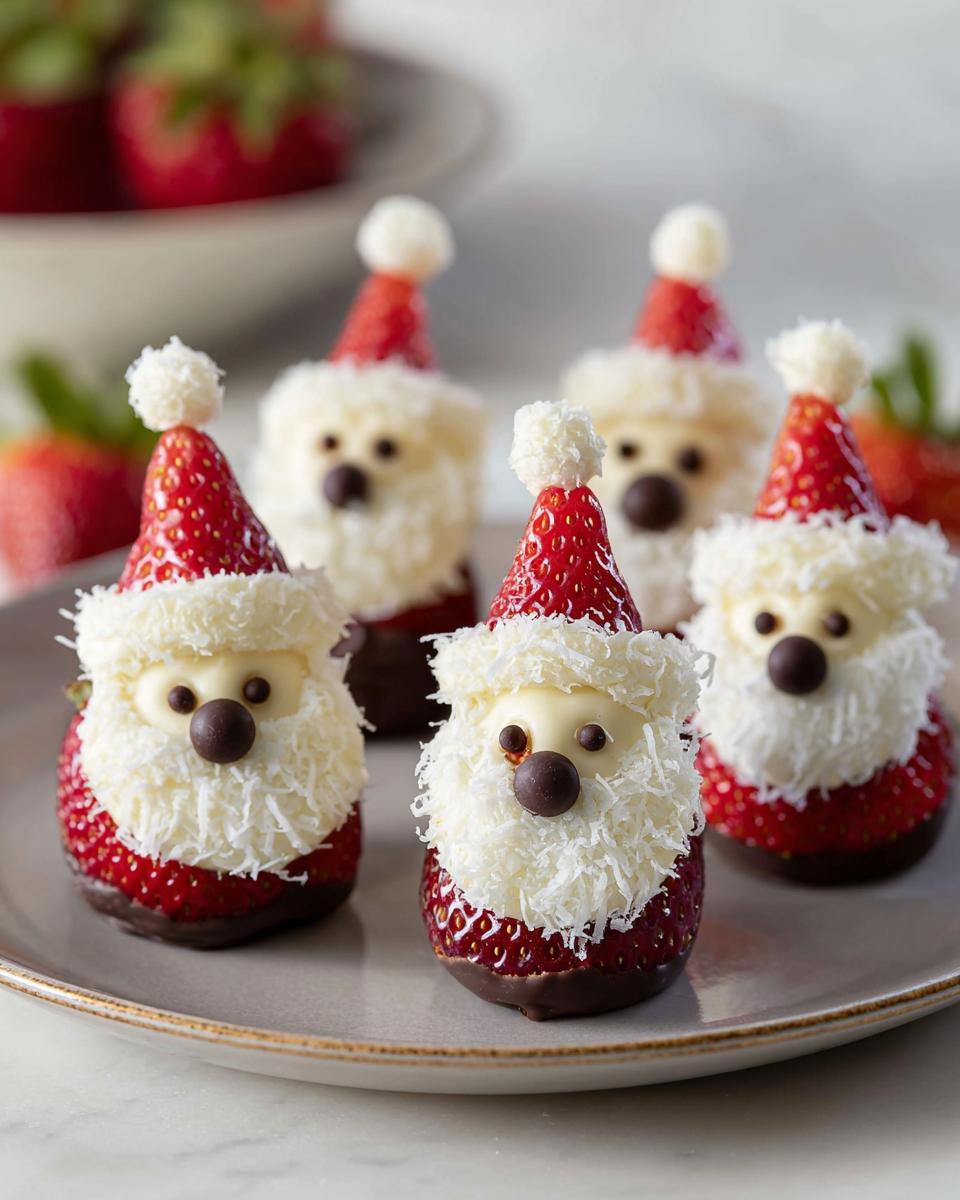
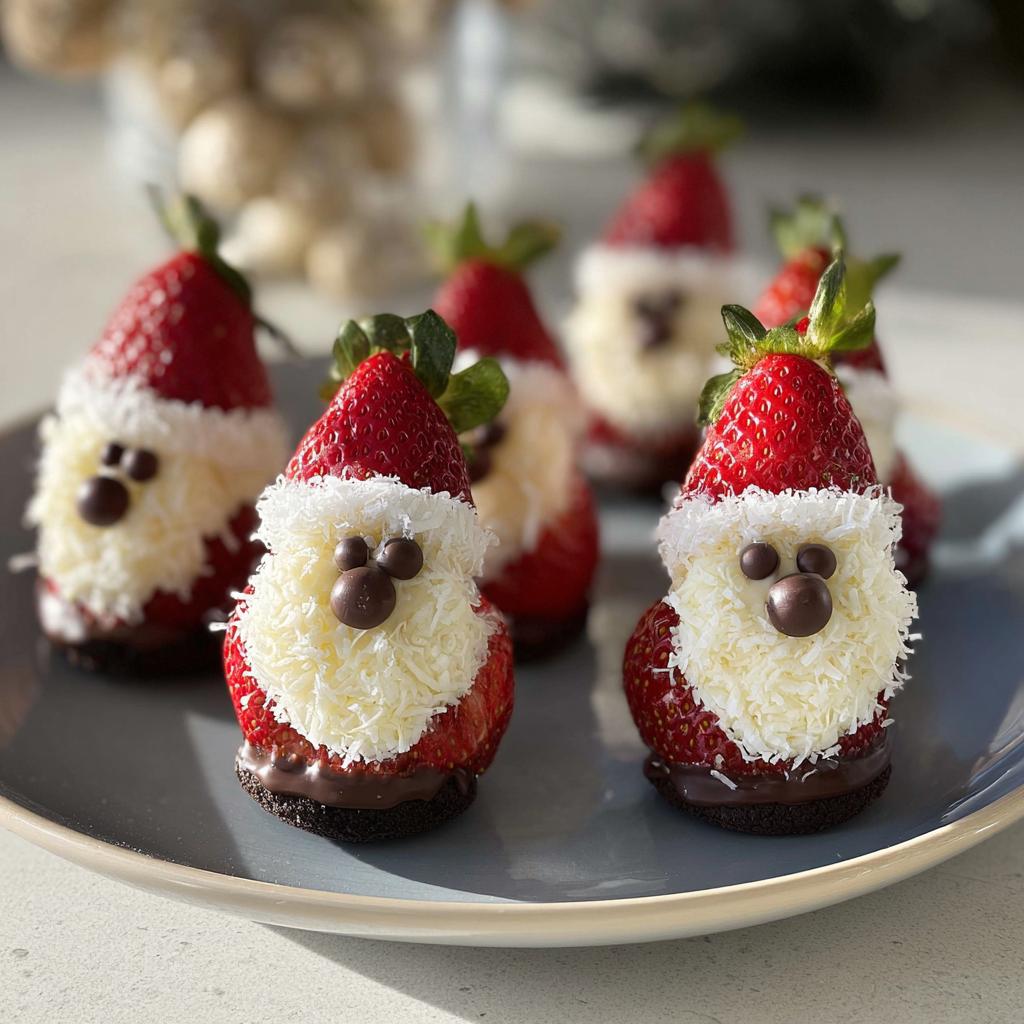
Here’s where the real fun begins! Slice the green tops off your strawberries, then carefully hollow out a little well in each one with your pairing knife – this is where Santa’s “belt” will go. Now slice off the pointy top third of each berry (save these for hats!) and set aside.
Melt your chocolate chips in the microwave in 10-second bursts, stirring between each until smooth. Dip the wide end of a strawberry in chocolate and press it onto a cookie – voilà, Santa’s body! Quickly add two blueberries dipped halfway in chocolate for boots before the chocolate sets.
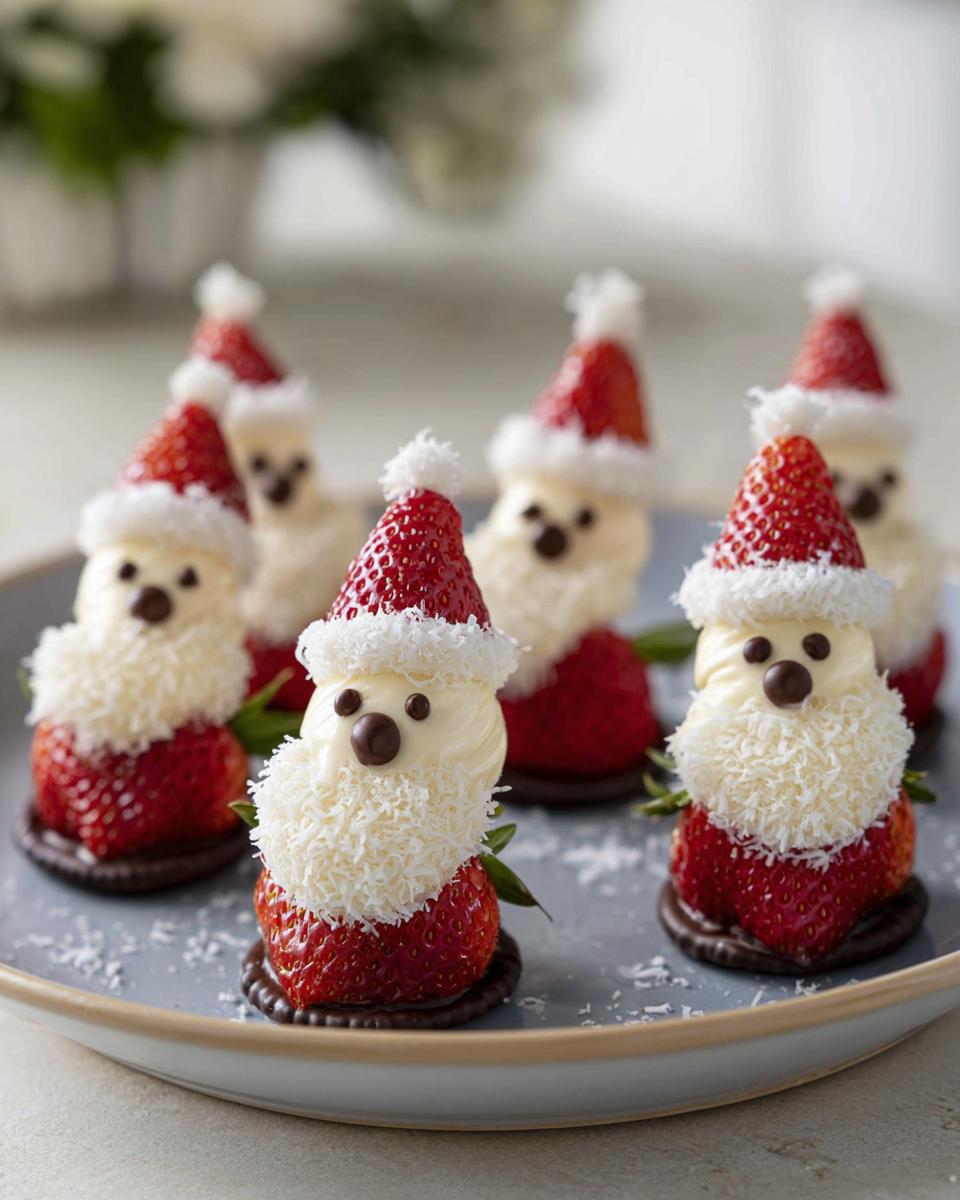
Now for the face: Pipe a generous dollop of frosting on top for Santa’s head, then a smaller one below for his beard. Gently press coconut into the beard – don’t be shy! Add a white chocolate chip nose and two mini chocolate chip eyes (I use tweezers for precision). For the hat, pipe frosting around the base of your reserved strawberry tip, press on some coconut “fur,” then place it jauntily on Santa’s head. A tiny frosting pom-pom on top finishes the look!
Chill your Santas for about 15 minutes to set everything. Serve them on a platter with some strawberry mousse cake or pumpkin dirt cups for a festive dessert spread. Watch how fast they disappear – these little guys are almost too cute to eat!
Tips for Perfect Cute Strawberry Santa Desserts
After making these adorable Santas more times than I can count, I’ve picked up some tricks to make them absolutely perfect every time! First, choose strawberries that are firm but ripe – if they’re too soft, they’ll slump like a melted snowman. Always chill your frosting for at least 15 minutes before piping; it holds its shape better for those fluffy beards. Work on a stable surface (I learned this after a Santa avalanche incident!) and use tweezers for placing those tiny chocolate chip eyes – it’s a game-changer! For extra stability, check out these pro decorating tips that work for desserts too. Most importantly? Have fun with it – even lopsided Santas taste delicious!
Serving and Storing Cute Strawberry Santa Desserts
Here’s the scoop on keeping your strawberry Santas looking their jolly best! These little guys love the cold – serve them straight from the fridge on a chilled platter to keep their frosting beards perky. If you’re making them ahead (smart move!), store assembled Santas in an airtight container with parchment between layers for up to 2 days. Just don’t freeze them – strawberries turn into mushy snowballs! Pro tip: Add the coconut beards right before serving so they stay fluffy and fresh-looking.
FAQ About Cute Strawberry Santa Desserts
I get so many questions about these adorable strawberry Santas – here are the answers to the ones I hear most often!
Can I use frozen strawberries instead of fresh?
Oh honey, I wouldn’t recommend it! Frozen strawberries turn way too mushy when thawed – your Santas would look more like melted snowmen. Fresh, firm berries are key for that perfect Santa shape. If strawberries aren’t in season, try making holiday-themed treats with other winter fruits instead!
How far in advance can I assemble them?
These little guys are best made the same day you’ll serve them – ideally within 4 hours. The strawberries can get weepy if they sit too long with the frosting. But you can prep everything ahead! Make the frosting 2 days early, wash and dry berries the night before, then assemble right before your party.
Are there nut-free alternatives?
Absolutely! Skip the coconut (use white sprinkles for beards instead) and choose nut-free cookies. For the chocolate, check labels carefully or use carob chips. Every child deserves to enjoy these cute Santas safely!
Can I make these vegan?
You bet! Use vegan cream cheese and powdered sugar for the frosting, dairy-free chocolate chips, and vegan cookies. I’ve even used sliced bananas instead of cookies for the base – not traditional, but still delicious!
Nutritional Information
Just a quick note – these Cute Strawberry Santa Desserts are all about holiday joy, not counting calories! Nutritional values vary based on your specific ingredients, but let’s be honest – when something’s this adorable, it’s worth every delicious bite!
Cute Strawberry Santa Desserts
Equipment
- Electric hand mixer
- Piping Bag
- Microwave-safe bowl
- Pairing knife
Ingredients
For the Frosting
- 1 package cream cheese (8 ounces)
- 1/2 tsp vanilla extract
- 2 1/2 cup confectioners’ sugar
For the Santas
- 12 large Driscoll’s strawberries
- 12 purchased chocolate cookies such as Famous Chocolate Wafers
- 24 Driscoll’s blueberries
- 24 mini semi-sweet chocolate chips
- 12 mini white chocolate chips
- 1/2 cup finely shredded coconut
- 1 cup semi-sweet chocolate chips
- raspberries optional for garnish
Instructions
- Place confectioners’ sugar into a medium bowl.
- Add cream cheese and vanilla.
- Mix with an electric hand mixer to create thick frosting. Add more confectioners’ sugar as needed to adjust thickness.
- Transfer frosting to a piping bag fitted with a large round tip. Alternatively, use a zip-lock bag and snip off one corner to create a disposable piping bag.
- Refrigerate frosting for 10-15 minutes or until firm.
- Slice green tops from strawberries.
- Hollow out the center of the berries carefully with a pairing knife.
- Slice off the top 1/3 from the tip of the berries and reserve tips to make Santa’s hats.
- Place cookies in a single layer on a serving platter or on individual dessert plates.
- Place chocolate chips into a microwave-safe bowl.
- Heat chocolate chips in microwave on low power for 5-10 seconds.
- Stir chocolate chips. Repeat heating and stirring in short increments until chocolate is melted and completely smooth.
- Dip the wide base of one strawberry into melted chocolate.
- Place the dipped end of the strawberry onto one cookie to make Santa’s body.
- Dip two blueberries halfway into melted chocolate.
- Place dipped blueberries onto the cookie to form Santa’s boots.
- Pipe a large dollop of frosting on top of the body to make Santa’s head.
- Pipe a small dollop of frosting onto the front of the head to make Santa’s beard.
- Press one pinch of coconut into the beard.
- Press one mini white chocolate chip into the face to make Santa’s nose.
- Press two mini semi-sweet chocolate chips into the face to make Santa’s eyes.
- Pipe frosting around the base of one strawberry tip to make trim for Santa’s hat.
- Press pinches of coconut into the hat trim.
- Place the hat onto Santa’s head.
- Pipe a tiny dollop of frosting on top of the hat.
- Sprinkle the hat with coconut.
- Use a toothpick to clean up decoration details as needed.
- Chill the strawberry Santa in the refrigerator.
- Repeat steps with remaining ingredients to make 12 strawberry Santas.
- Serve immediately or keep chilled in the refrigerator until ready to serve.