
If you’re anything like me, the smell of real citrus zest baking up in the oven instantly sends you right back to Grandma’s kitchen during the holidays. There’s just nothing that replaces the depth of flavor you get when you make ingredients from scratch! When it comes to adding that traditional brightness to fruitcakes or my favorite Orange Rolls Homemade, you need the very best. That’s why I absolutely adore making my Classic Mixed Peel (Orange + Lemon) right here at home. See, combining orange and lemon adds color contrast that makes baked goods look even better! I’m Clara Bennett, Lead Plate Designer here at Recipes by Betty, and getting that perfect sweet-tart balance is my specialty when handling traditional recipes.
Why This Classic Mixed Peel (Orange + Lemon) Recipe Works
Look, you can buy mixed peel, sure, but trust me, the flavor intensity you get from making it yourself is just night and day. When you follow this method, you aren’t just making a baking ingredient; you’re making something that gives real depth to your cakes. It’s all about respecting the process.
- You get that perfect, slightly chewy texture that store-bought stuff often lacks.
- The homemade flavor lets you control exactly how much sweet versus tart you want. If you want to peek at how this impacts other baked goods, check out my tips for perfect scones!
Achieving the Perfect Citrus Harmony
The secret sauce here is the 1:1 ratio of orange to lemon peels. If I just used oranges, it would be too sweet; all lemons and it’s too sharp. This mix gives you that beautiful bright pop of sunshine in every bite. It’s the balance that makes people ask what’s different in your fruitcake this year!
The Importance of Double Boiling for Classic Mixed Peel (Orange + Lemon)
Don’t skip that first boil! It might seem like extra work, but it’s really the key to removing all that harsh bitterness trapped in the pith. Boiling them twice ensures the peels are supple and ready to absorb that sweet syrup beautifully. It’s traditional for a reason, and it makes sure your final product is sweet, not sour. For context on how traditional peel is used further, check out this classic Christmas cake recipe development.
Equipment Needed for Classic Mixed Peel (Orange + Lemon)
You don’t need a million fancy gadgets for this, thank goodness! Since we are just dealing with peels, water, and sugar, the tools are straightforward. You’ll want a large pot—big enough to give those strips a good swim once they’re in the syrup. Seriously, don’t crowd them; that’s how things stick!
Beyond the pot, make sure you have plenty of parchment paper ready for the drying stage. That’s vital because if you try to dry them on a plate or foil, they’re going to glue themselves down. Trust me on that one!
Ingredients for Your Classic Mixed Peel (Orange + Lemon)
Getting the shopping list right is half the battle, especially when you’re dealing with specific parts of the fruit! We are keeping this really tight, focusing only on the best citrus and what we need to transform it into beautiful, brightly colored candied results. When you’re gathering spices later for other recipes, you might want to brush up on how different salts behave, like in my notes on Kosher Salt vs. Sea Salt.
Citrus Components
First up, you need two oranges and two lemons. And I mean just the peels! Try your very best to slice right through the colored zest and avoid scooping out too much of that bitter white pith underneath. The double boil helps us out, but less pith means a cleaner flavor overall when we get to the candying stage.
Syrup Base Ingredients
For the syrup, keep it simple: two cups of plain white sugar and two cups of water. That’s it! Mix these two together and get it on the heat first. You absolutely must wait until that sugar is completely dissolved and you have a clear syrup before dropping in those prepared citrus strips. If you add them too soon, you end up with grainy syrup, which is just a headache!
Step-by-Step Instructions for Classic Mixed Peel (Orange + Lemon)
Okay, getting this done takes a little time, so budget about three hours total when you factor in that long drying time, but the hands-on prep is really only about 10 minutes! This is where we take those tough peels and turn them into sweet little jewels ready for your baking projects. Remember, patience here means you get amazing orange peels uses that are perfectly edible and delicious.
Preparing the Citrus Peels
First thing’s first: you need to slice those orange and lemon peels into nice, thin strips. Aim for about an eighth of an inch thick if you can manage it—too wide, and they take forever to soften. Once you have your citrus strips ready, toss them into your large pot with fresh water and bring it to a rolling boil for about 10 minutes. After that time is up, dump that water right down the sink! Don’t even rinse them, just drain them hot.
Softening and Removing Bitterness
We’re doing that boil again! This is the step that separates the good peel from the frustratingly bitter peel. Refill your pot with fresh water, bring it back up to a boil, and let those peels cook another 10 minutes. Drain them again. This double process is crucial because it draws out the harsh oils hiding in the white pith, leaving you with a pure citrus flavor base ready for sweetening. It’s exactly the traditional technique you’d see when making something like a classic British Christmas Cake.
Candying the Classic Mixed Peel (Orange + Lemon)
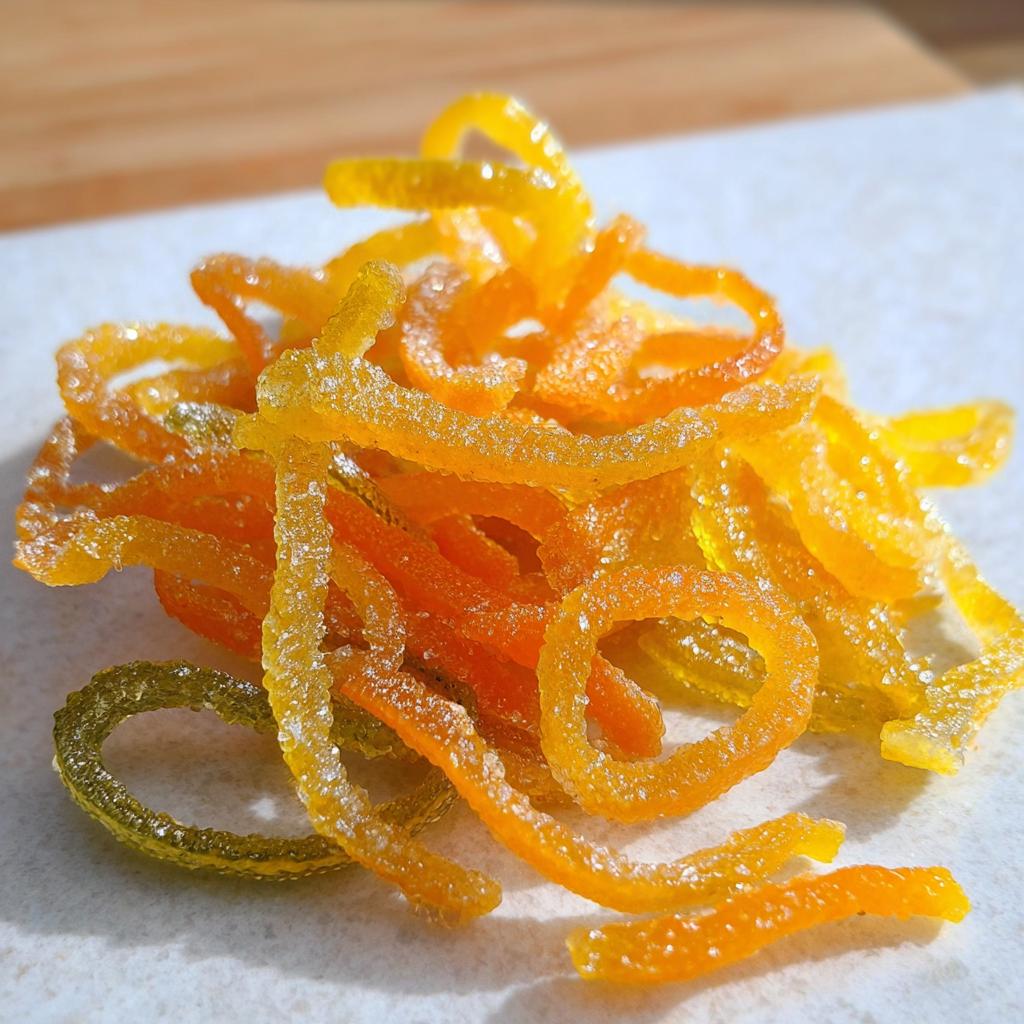
Now we make the magic syrup! Combine your two cups of sugar and two cups of water in that same clean pot. Get it simmering gently until every single grain of sugar has vanished and the liquid is perfectly clear. Once the syrup is ready, add those softened peels in. Turn the heat down to a low simmer—you want tiny, lazy bubbles. Let this go for a good 45 to 60 minutes. The peels will start to look translucent, like stained glass, which is how you know they’re getting nice and syrupy.
Drying the Finished Peel
This takes the longest, so plan accordingly! Carefully scoop the peels out of the residual syrup—don’t worry about dripping a little, but try to shake off any big clumps. You need to lay them out in a single layer on your prepared parchment paper. Make sure none of the pieces are touching, or they’ll fuse together while drying! Let these sit out for about two hours, or if you’re working in a humid area, maybe even overnight. This slow drying stage is what sets them up perfectly for holiday baking, much like how moisture control is key for fruit roll ups.

Tips for Success Making Classic Mixed Peel (Orange + Lemon)
I’ve messed this up so many times over the years, which is how I learned all the tricks to make sure you don’t have to! The biggest mistake people make is rushing the softening, and that leaves you with peels that are both tough and bitter. You want tender peel, not chewy rind!
When you’re slicing, precision really matters. If your strips are too thick, they won’t absorb that beautiful sugar syrup properly, and you’ll end up with candied chunks that are hard in the middle. If they’re microscopic, they dissolve right into nothingness during the boiling process. I aim for strips that feel sturdy when picked up but are still thin enough to easily bend without snapping.
And please pay attention to that sugar syrup! It needs to be completely clear before those peels go in. If you can still feel any grit on the bottom of your pot when you stir it, keep stirring over low heat. If the sugar hasn’t dissolved, the crystalline structure messes up how the syrup coats the fruit, and you’ll end up with a sugary crust instead of that beautiful, soft chew. For more tips on getting ingredients just right for holiday baking, check out my guide on perfect scones, because texture is everything!
Also, don’t try to rush the drying! If you think they look “mostly dry,” give them another 30 minutes. If they are even slightly sticky when you try to store them, they will clump together into one giant orange-lemon monster in the jar.
Storage and Shelf Life for Your Candied Peels
Once you’ve gone through all that hard work, you want to make sure your beautiful Classic Mixed Peel (Orange + Lemon) lasts! The absolute number one rule here is that the peels must be completely, totally dry before they go anywhere near a storage container. If there is any hint of stickiness left, they are going to mold or clump into a solid brick. I learned this the hard way!
Store your fully dried peel in a clean, airtight container. I usually just use a nice mason jar. You do not want to store these peels with any extra syrup clinging to them, so make sure that draining on the parchment paper really does the trick!

If you’ve dried them right, these beauties will last for months tucked away in your pantry. This is fantastic because it means you can make a huge batch now when citrus is cheap, and you’ll be set for all your holiday baking later. For more great ideas on what to do with dried citrus, check out my post on What To Do With Orange Peels!
How to Use Your Freshly Made Classic Mixed Peel (Orange + Lemon)
So, you’ve got your bowl of vibrant, sweet citrus! Now what? Honestly, this is the payoff for all that boiling! The main reason I go through this effort is for dense, traditional baked goods where you need intense citrus flavor that won’t shrink under high heat. My first go-to uses are always stollen or rich fruitcakes—the mixed color looks gorgeous when you slice into it.
If you’re looking for something a bit quicker than a whole cake, this peel is amazing tossed right into the dough for homemade Orange Rolls Homemade. It really wakes up the dough!
Incorporating into Holiday Breads
When I’m folding this into scone batter or a heavy holiday bread, I like to toss the peel with about a tablespoon of flour first. This tiny step keeps the peel from sinking right to the bottom of the pan during baking. It helps distribute that zingy orange and lemon flavor evenly throughout every single bite!
Simple Chocolate Dipping Variation
Now, if you don’t feel like baking right away, here’s my favorite trick that turns this ingredient into a standalone treat. Let the peels dry *extra* well, and then go ahead and melt some dark bittersweet chocolate. Dip half of each strip into the chocolate and let it set back on parchment paper. These Chocolate Covered Candied Orange Peels make incredible homemade gifts. People never guess you made the peel yourself!
Frequently Asked Questions About Classic Mixed Peel (Orange + Lemon)
I know you might have a few questions swirling around your head—making things from scratch always brings out the best questions! It took me a few batches to figure out this process myself, so here are the things folks ask me most often about getting the perfect Classic Mixed Peel (Orange + Lemon).
Can I use only oranges or only lemons for this recipe?
You certainly *can*, but you’ll lose the magic! The whole point of this specific recipe is the vibrant contrast and flavor balance that comes from mixing both oranges and lemons equally. If you only use oranges, the final product will be much sweeter and lack that sharp acidic lift. If you stick to just lemons, it might taste a little too aggressive for some recipes using oranges. I really recommend sticking to the two-and-two split for the best result!
What is the difference between this and using store-bought citrus?
Oh, honey, the difference is night and day! Store-bought peel is often loaded with preservatives and sometimes smells vaguely of chemicals—plus, the texture can be sad and rubbery. When you make this version, you control everything. We boil the bitterness out, we use fresh zest, and we candy it ourselves, meaning the flavor is unbelievably pure and bright. You can taste the sunshine! It makes a huge difference when you’re baking something special.
Can I make this recipe ahead of time for holiday baking?
Absolutely, and this is highly encouraged! Candying citrus is one of those projects where making it ahead is actually better. Once your mixed peel is fully dried and stored airtight, it lasts for months in the pantry. In fact, I find that when I use it in things like Christmas pudding two or three months later, the flavor seems even more mellow and integrated. You can totally finish this recipe in October and be completely set for December!
Nutritional Data Estimate for Classic Mixed Peel (Orange + Lemon)
Now look, I’m a baker, not a nutritionist, so take this part with a grain of salt—though you didn’t use much salt in this recipe, thank goodness! Since this recipe makes one full batch which will likely be spread across several holiday items, these numbers are calculated based on the *entire batch* yield because breaking it down into ‘servings’ feels a little silly when it’s an ingredient.
Because we are using a high volume of sugar to candy the peels, the carbohydrate and sugar counts are definitely going to be high, which is exactly what candied fruit is! If you’re planning on using this in some lovely Fresh Orange Recipes, just keep that in mind as you calculate the final treat’s nutrition.
Here is the rough estimate for the entire batch used in this Classic Mixed Peel (Orange + Lemon) recipe:
- Estimated Calories: 1800-2000 kcal (Total Batch)
- Estimated Fat: Less than 1 gram (Almost Zero)
- Estimated Protein: About 10 grams
- Estimated Total Carbohydrates: 450-500 grams
- Estimated Sugar Content: 420-450 grams
Remember, this is just an estimate, friends! The beauty of homemade candy is knowing exactly what went in, but the numbers reflect the simple fact that we are essentially preserving fruit in a sugar bath. When you fold this into a cake, you’re adding flavor and brightness, but also sugar weight!
Share Your Experience with This Citrus Recipe
Oh, I just love hearing when someone tries one of my family’s trusted recipes—especially something as foundational as the Classic Mixed Peel (Orange + Lemon)! When you take the time to boil and candy your own citrus, you deserve a little recognition, right?
I really want to know how this turned out for you. Did the lemon cut through the sweetness perfectly? Did the double boil really eliminate the bitterness like I promised? Please head down to the comments section right now and leave me a star rating telling me what you thought!
If you snapped a picture of your beautifully vibrant candied peels before you stirred them into your scones or used them for those amazing lemon cake pops, I’d be thrilled to see it! Tag us on social media—I love seeing your creations pop up on my feed. It genuinely makes my day to know this heirloom technique is living on in your kitchens.
Happy baking, everyone! I hope this bright, zesty flavor brings a little extra sunshine to your next batch of holiday treats. Until next time, keep those ovens warm!
Warmly,
Clara Bennett, Lead Plate Designer at Recipes by Betty
Classic Mixed Peel (Orange + Lemon)
Equipment
- large pot
- Parchment paper
Ingredients
- 2 Oranges Peels only
- 2 Lemons Peels only
- 2 cups Sugar
- 2 cups Water
Instructions
- Slice all citrus peels into thin strips.
- Boil the strips in water for 10 minutes, then drain the water.
- Repeat the boiling process one more time to soften the peels and remove bitterness.
- Combine the sugar and water in a pot and simmer until the sugar dissolves completely.
- Add the citrus peels to the sugar syrup and simmer for 45 to 60 minutes.
- Drain the peels and lay them out on parchment paper to dry completely.