
The moment I laid out this Christmas Tree Fruit Platter for the first time, I knew I’d stumbled onto something magical. It was during a frantic holiday photoshoot – I needed something quick, colorful and undeniably festive. Within minutes, ordinary grapes and berries transformed into the most charming edible Christmas tree! Now it’s my go-to centerpiece every December. Whether you’re hosting a holiday party or just want to make snack time special for the kids, this fruit platter brings instant cheer. Best part? It’s ridiculously simple to make. No fancy skills needed – just fresh fruit, a star-shaped pineapple topper, and a little holiday spirit!
Why You’ll Love This Christmas Tree Fruit Platter
Oh my gosh, you’re going to adore this little creation! I still get giddy watching people’s faces light up when I bring this to holiday parties. Here’s why it’s become my signature dish:
- Lightning-fast assembly: 15 minutes tops – perfect when you’re juggling a dozen other holiday tasks!
- A rainbow on a plate: Those jewel-toned grapes and berries just scream holiday cheer. I love how the colors pop against my grandmother’s Christmas china.
- Healthy but still festive: Finally, a centerpiece you don’t feel guilty about nibbling on all evening.
- Kid magnet: Seriously, my nieces and nephews actually beg for seconds of FRUIT when it’s arranged like this.
- Endlessly customizable: Swap fruits based on what’s in season, add chocolate drizzle if you’re feeling fancy – it’s your edible Christmas canvas!
Ingredients for Your Christmas Tree Fruit Platter
Let me tell you about the magic ingredients that make this Christmas tree come to life! The beauty of this platter is how flexible it is – use what you’ve got, but here’s my tried-and-true lineup:
For the Tree:
- 1/2 pound large green grapes (washed and dried) – these are your tree’s “needles”! Look for plump ones that’ll hold their shape. In a pinch? Kiwi slices work beautifully too.
- 1 pint mixed berries (washed and dried) – I’m partial to raspberries and blueberries for those gorgeous red and blue pops against the green. Strawberries sliced thin work wonders too!
Special Touches:
- 1 thick pineapple slice – for cutting our star topper. No pineapple? A star-shaped cookie cutter through melon works just as well.
- 10 pretzel sticks – these make the cutest little tree trunk. Feeling fancy? Swap with chocolate-dipped pretzels from my homemade treats collection.

Pro tip from my many trial runs: pat your fruit completely dry before assembling. Wet fruit slides around like it’s ice skating on that plate! And always, always pick the freshest produce you can find – it makes all the difference in both taste and how long your masterpiece stays picture-perfect.
Equipment Needed for Your Christmas Tree Fruit Platter
Don’t worry – you won’t need any fancy gadgets for this! Here’s what I always grab from my kitchen:
- A large rectangle plate – This gives you plenty of room to build your tree. I use my trusty white ceramic platter because it makes the colors pop!
- Star cookie cutter – For that perfect pineapple star topper. No cutter? Just trace a star shape with a knife – it doesn’t have to be perfect (mine never are!).
That’s seriously it! The beauty of this platter is how simple the tools are. Now let’s make some holiday magic!
How to Assemble Your Christmas Tree Fruit Platter
Okay, let’s make some holiday magic! I’ve assembled this platter more times than I can count – once even while half-asleep at 5 AM before a Christmas brunch. Trust me, it’s foolproof!
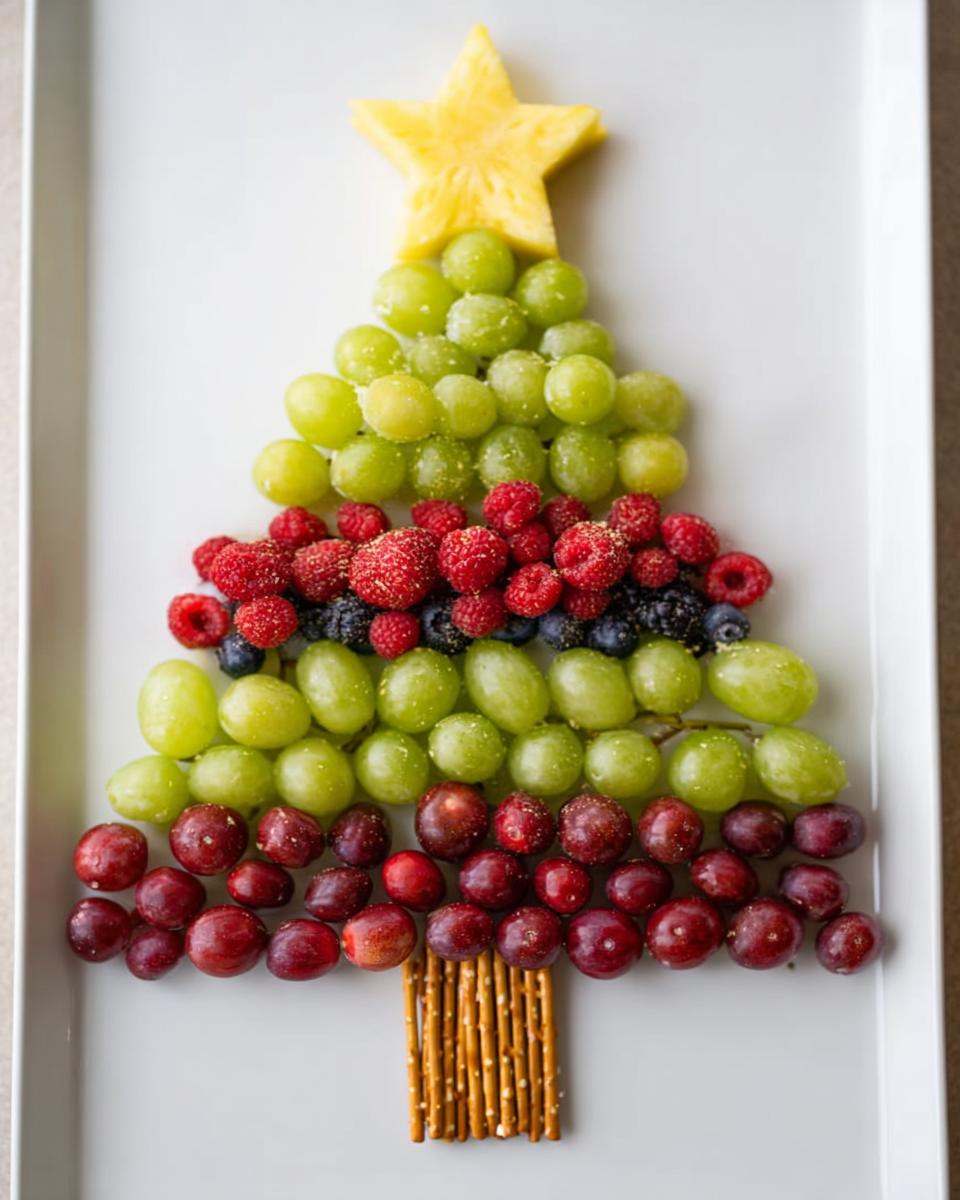
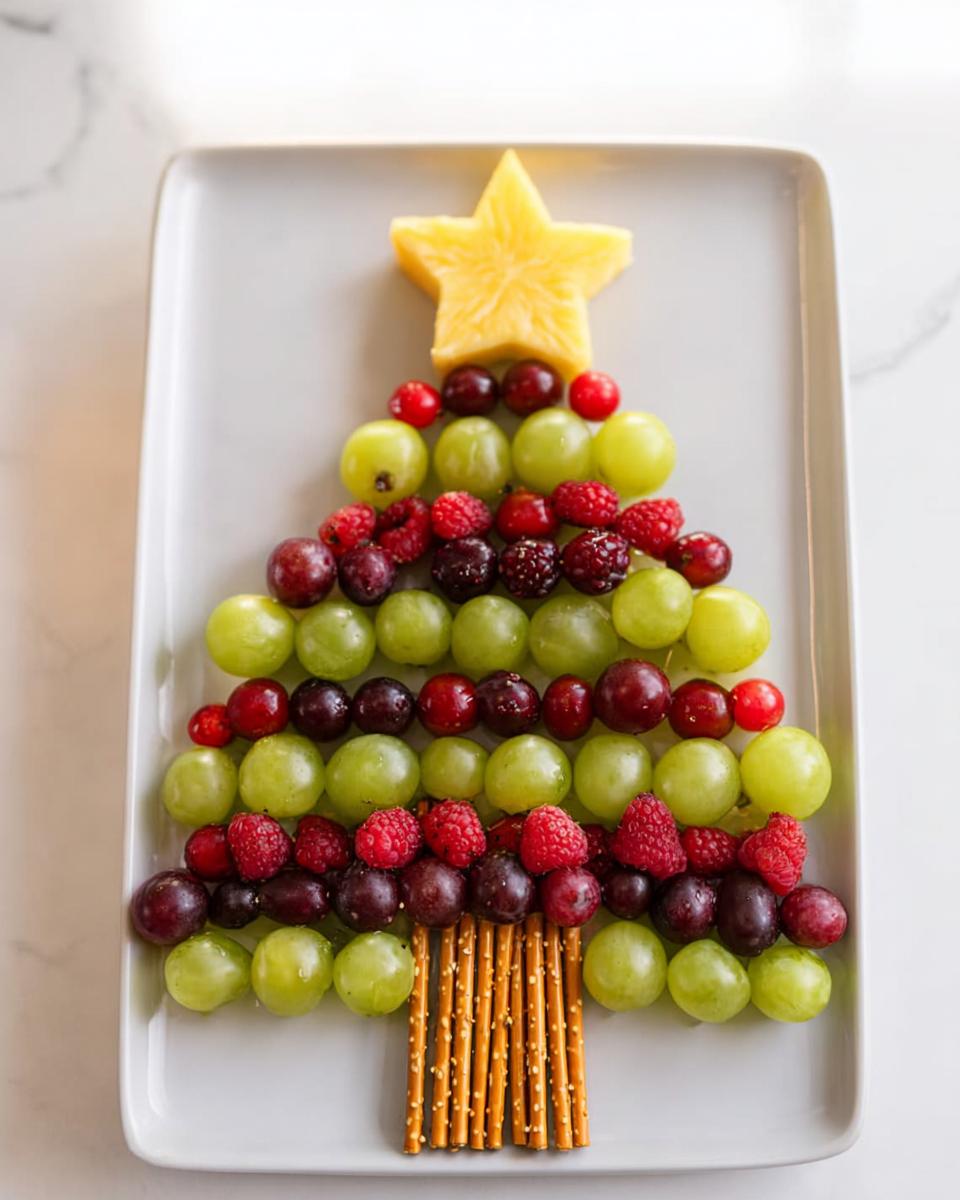
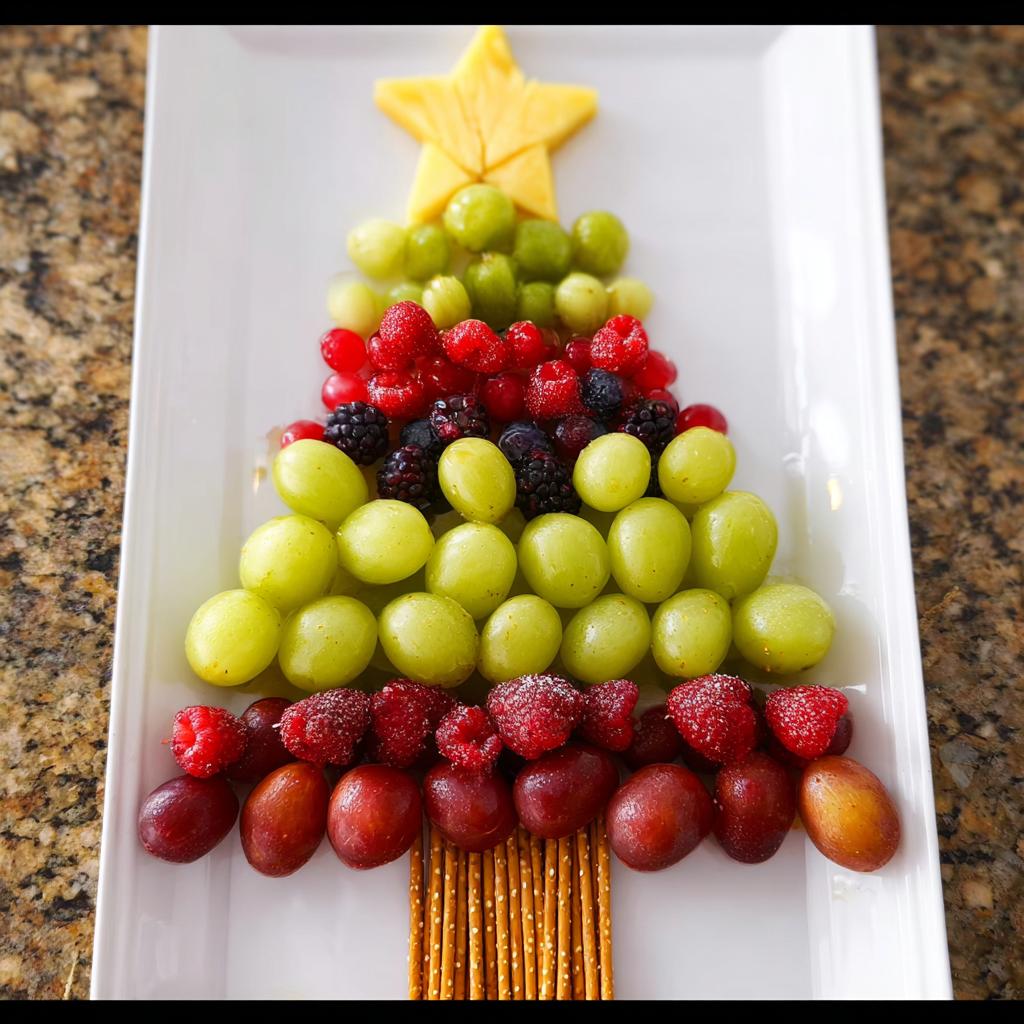
First, grab that pineapple slice and your star cookie cutter. Press firmly to cut out your tree topper – don’t worry if it’s not perfect! Mine always look a bit wonky, and that’s part of the charm. Place it at the top of your plate like the North Star guiding Santa’s sleigh.
Now the fun part! Start with one grape right below the star – this is your tree’s tip. Then add two grapes beneath it, slightly spaced apart. Keep building down, adding one extra grape per row. After 3-4 rows, switch to berries for a colorful “ornament” effect. I alternate between raspberries and blueberries – they look like little Christmas lights!
When you reach the base, arrange those pretzel sticks to form the trunk. Pro tip: angle them slightly outward to look like a real tree base. Voila! You’ve got yourself an edible Christmas tree that’ll have everyone reaching for their phones to snap pictures.

Oh, and if your grapes start sliding? No sweat! Just pop the plate in the fridge for 10 minutes to chill everything. Works like a charm every time.
Pro Tips for the Perfect Tree Shape
Here’s my secret sauce for picture-perfect trees every time:
- Chill your grapes first – they stack like dreamy little ornaments when cold!
- Use toothpicks discreetly for stubborn fruits – just remember to warn guests before serving.
- Rotate your plate as you work – it helps keep both sides even and photogenic.
Want to get really fancy? Check out my patriotic cookies for more decorating inspiration, or browse this gorgeous fruit salad for color combo ideas!
Creative Variations for Your Christmas Tree Fruit Platter
Oh, the fun you can have with this basic idea! Once I discovered how easily this platter comes together, I started playing with different fruits like a kid with edible LEGOs. Here are my favorite twists that always get oohs and aahs:
Try kiwi slices for that perfect pine tree green – just peel and slice them thin. My cousin swears by arranging them in overlapping rows, and honestly? It looks straight out of a holiday magazine. Or go nuts with pomegranate arils sprinkled between grape layers – they sparkle like real ornaments!
For winter wonderland vibes, cut apple slices into snowflake shapes (cookie cutter to the rescue again!). And if you’re feeling extra, layer mandarin segments with blueberries for a sunset effect. I once made a whole forest of mini trees using ideas from my charcuterie board – the kids went wild for their own personal edible trees!
The true magic? There are no wrong answers. My ugliest “happy accident” (a watermelon-starred version that totally flopped) still got devoured at last year’s cookie exchange. That’s the beauty of fruit – even when it doesn’t look perfect, it still tastes like holiday joy.
Serving and Storing Your Christmas Tree Fruit Platter
Oh honey, here’s my golden rule with this Christmas Tree Fruit Platter – serve it right after you make it! Those bright berries and crisp grapes are at their absolute prettiest when fresh. But hey, life happens! If you need to prep ahead:
- Day-of magic: Cut your pineapple star and wash all fruit the morning of, then assemble right before guests arrive.
- Fridge fix: If you must refrigerate, lay a barely-damp paper towel over the top to keep things fresh without getting soggy.
- Last-minute touch-ups: Notice berries shifting? Just quickly rearrange – no one will know!
Honestly? I’ve left mine out for parties up to 2 hours with no issues. Just keep it away from heaters and enjoy those oohs and aahs!
Nutritional Information
Now, I’m no nutritionist (just a fruit enthusiast with a serious sweet tooth!), but here’s what I love about this platter – it’s basically nature’s candy! Exact numbers will vary based on your fruit choices, but you’re getting all those wonderful vitamins and antioxidants. I always feel good seeing kids munching on this instead of sugary treats. Want to geek out on fruit nutrition? Check out this great resource from the American Heart Association. Bottom line? It’s delicious, it’s beautiful, and your body will thank you!
Frequently Asked Questions
Can I use melon instead of pineapple for the star?
Absolutely! I’ve used cantaloupe and honeydew stars when pineapple wasn’t available – they work like a charm. Just make sure to cut thicker slices (about 3/4 inch) so your star holds its shape. Pro tip: pat the melon dry before placing it to prevent sliding. The lighter color makes a pretty wintery star too!
How long will the fruit platter stay fresh?
In my experience, it’s best enjoyed within 2 hours of assembling – those berries start getting shy after that! If you must prep ahead, keep components separate in airtight containers and assemble last minute. Grapes stay perky longest, while raspberries are the divas of the bunch. Leftovers? Toss any remaining fruit into a bowl – still delicious, just less Instagram-worthy!
Which fruits work best for stability?
After many “fruit avalanches” (we don’t talk about the Great Kiwi Disaster of 2018), here’s my ranking from sturdiest to slipperiest: firm grapes > blueberries > strawberries (halved) > raspberries > kiwi slices. If using softer fruits, chill everything first and consider discreet toothpicks for reinforcement. My niece once built an entire tree with just apple slices – genius!
Can I make this ahead for a party?
Oh darling, I feel you – holiday hosting is chaotic enough! Here’s my cheat: wash and dry all fruit the night before, store in separate containers with paper towels. Cut the pineapple star morning-of. Then assemble your masterpiece right before guests arrive – takes less than 10 minutes when everything’s prepped. The oohs and aahs will make you look like a kitchen wizard!
Christmas Tree Fruit Platter
Equipment
- Large rectangle plate
- Star cookie cutter or knife
Ingredients
For the Tree
- 0.5 pound large green grapes washed and dried
- 1 pint berries washed and dried
- 1 slice pineapple
- 10 pretzel sticks
Instructions
- Cut a slice of pineapple about 1/2″ thick. Use a star cookie cutter or knife to cut out the star. Place it at the top of a large rectangle plate.
- Build your tree by adding 1 grape, then 2 beneath it. Continue adding one extra grape as you go down to form the tree shape. After 3-4 rows, add a row of berries (raspberries or small strawberries work well). Repeat this pattern.
- Once you reach the base of the tree, add the pretzel sticks at the bottom to form the tree trunk. Serve with toothpicks if desired.