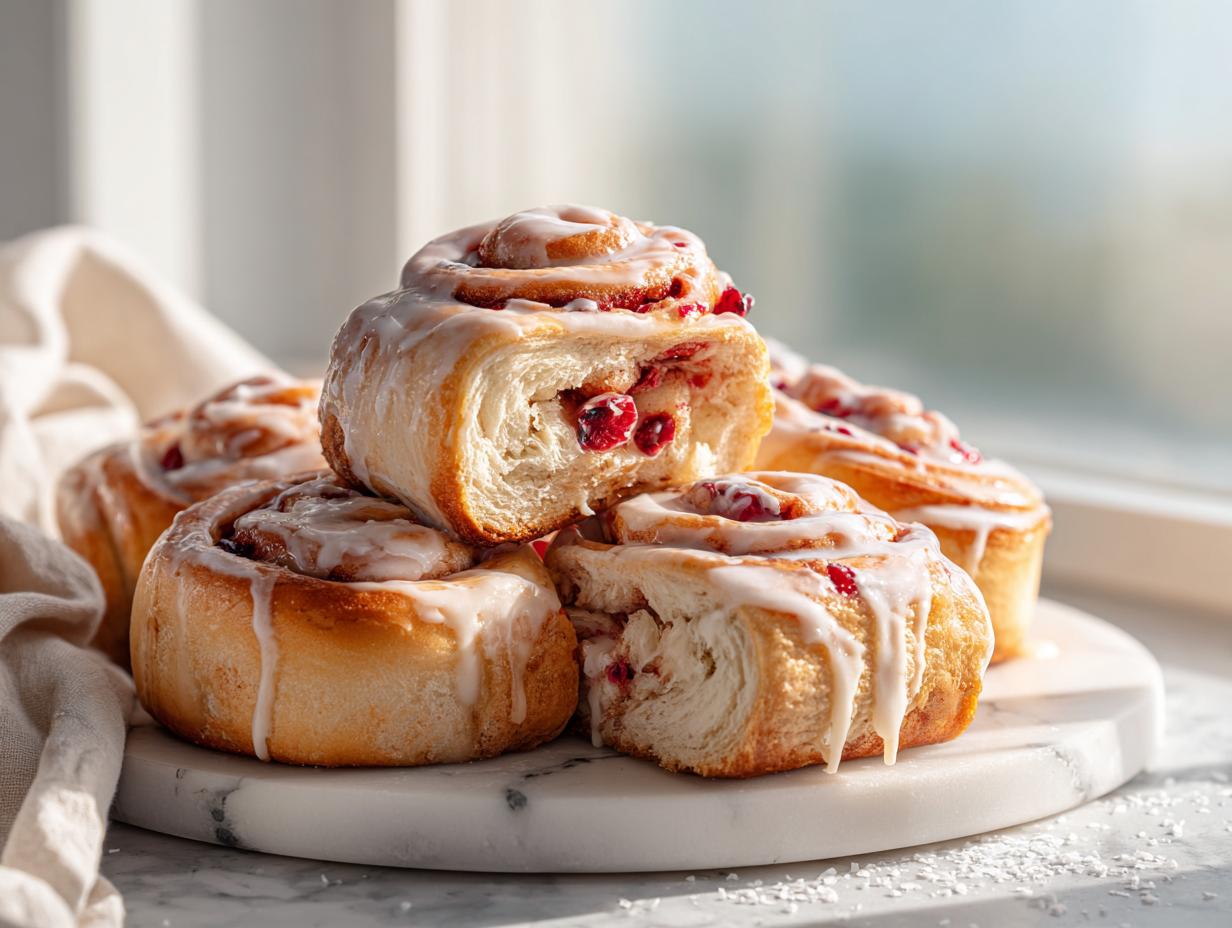
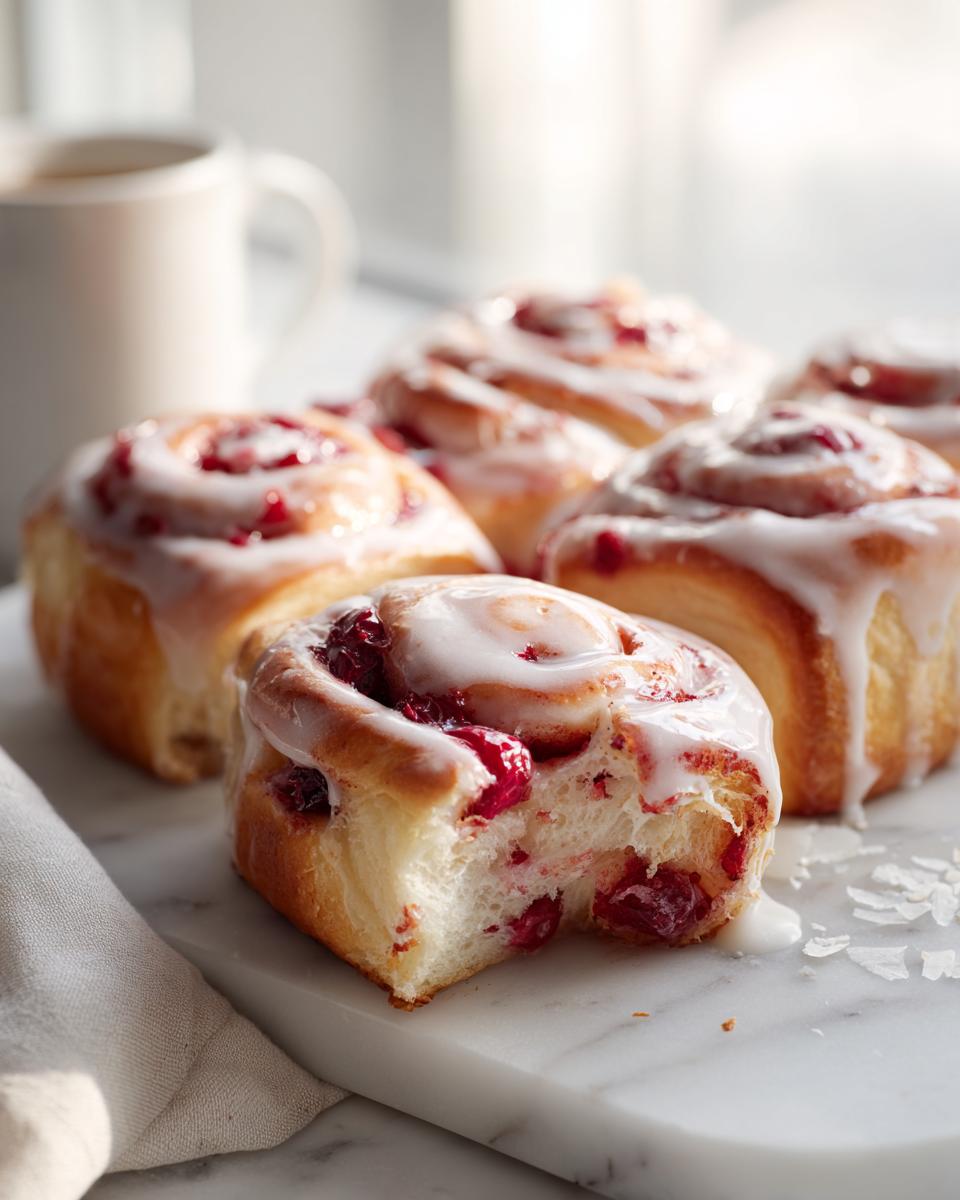
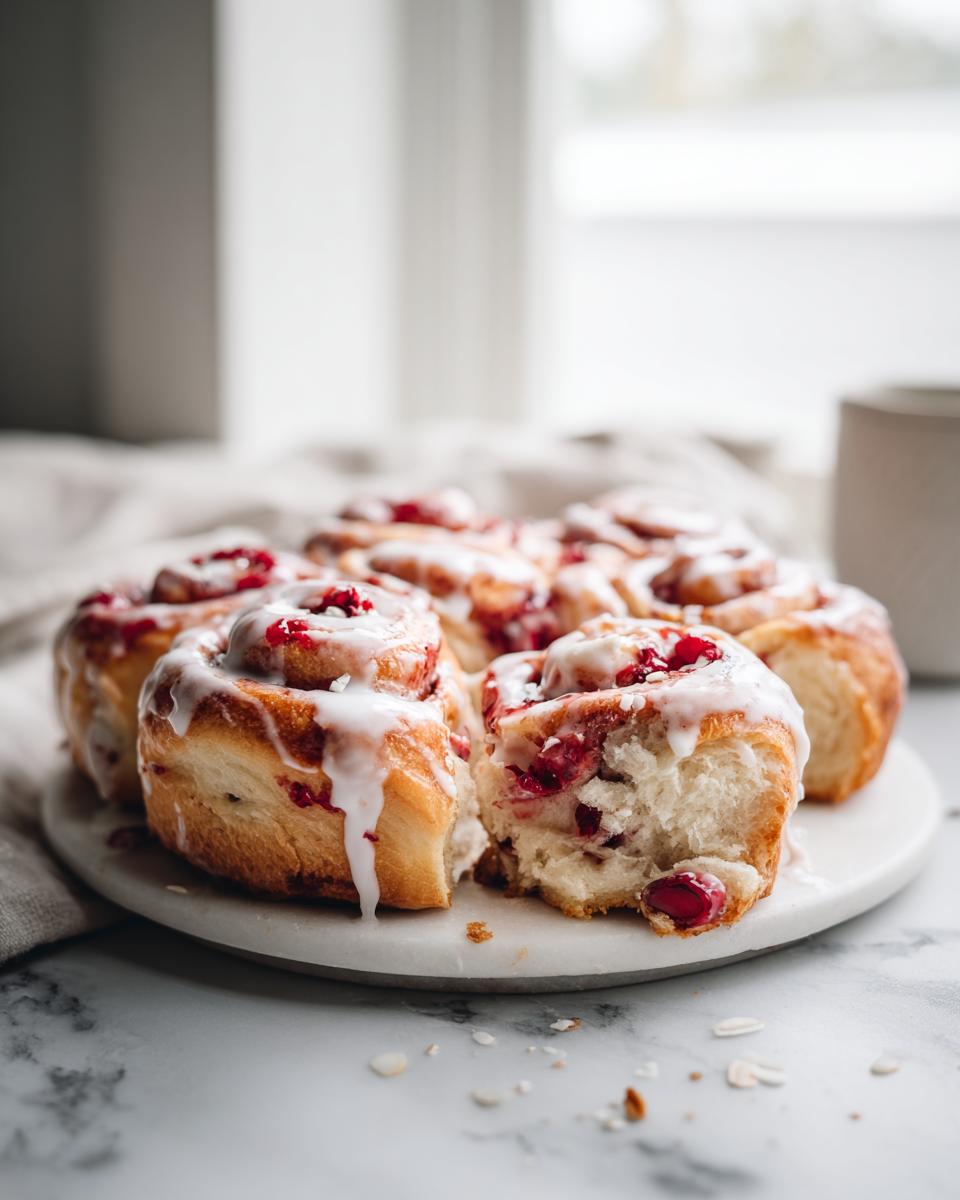
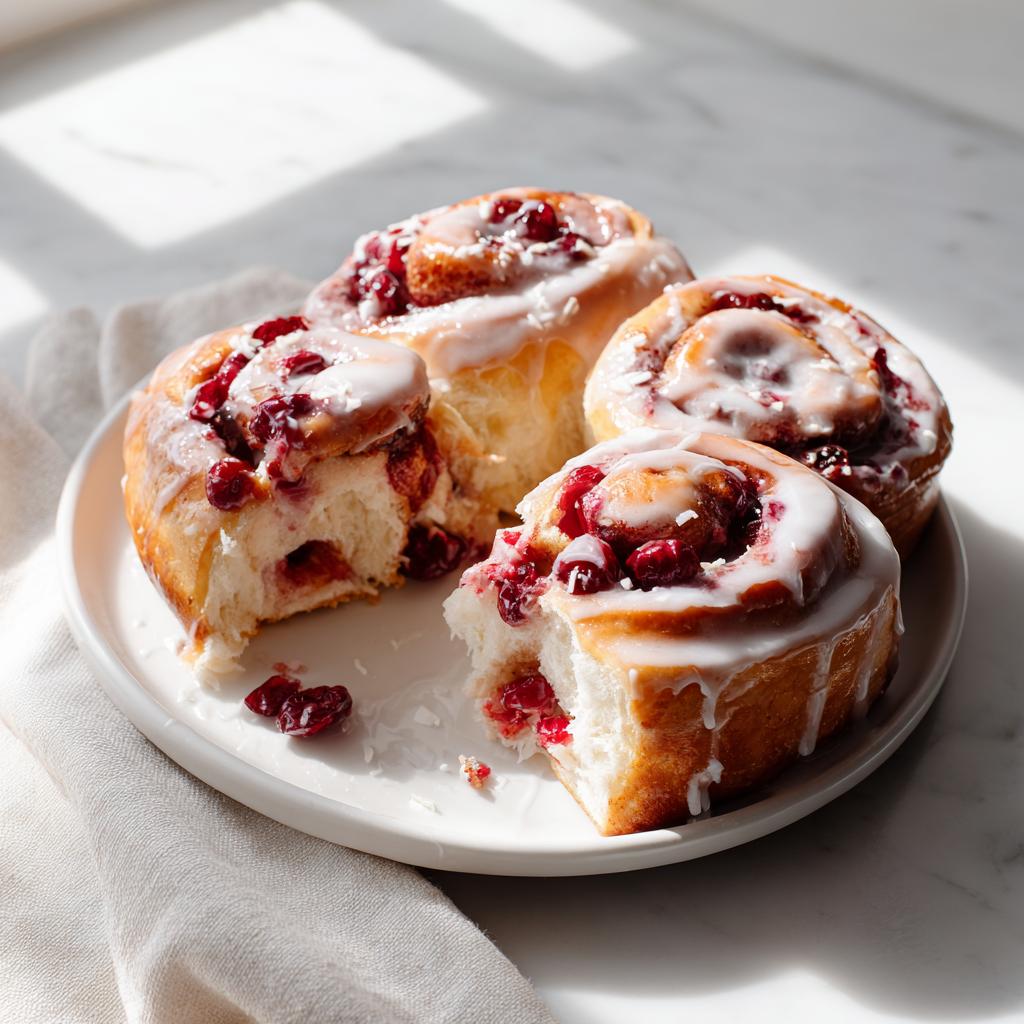
Oh my goodness, if you think sweet rolls have to be boring old cinnamon all the time, you are in for such a treat! There’s something almost magical about that warm, yeasty dough meeting a fantastic filling, right? Well, I stumbled upon absolute perfection when I started experimenting with what I call my Cherry Coconut Rolls. Seriously, these beautiful, spiral pastries combine the sharp, tart punch of dried cherries with that rich, tropical sweetness of shredded coconut.
I actually created these rolls after finding a forgotten bag of dried cherries in the back of my pantry—you know how it is, buy something excited at the market and forget about it! Inspired by my favorite coconut macaroons and a classic cherry pie, I wondered what would happen if I folded that fruity, chewy mixture into a standard sweet roll dough. Wow! The result completely blew me away. The tartness from the fruit cuts right through the sugar, making them dangerously addictive. My house is usually cleared out of these things within minutes of them coming out of the oven!
If you love rich, flavorful breakfast pastries that feel special but aren’t fussy, you’ve found your new go-to recipe. Happy baking—I’m Grace Williams, and I’m thrilled to share this recipe with you!
Why You Will Love These Cherry Coconut Rolls
These aren’t your average morning bake, trust me! They bring something genuinely exciting to the breakfast table. As someone who loves trying new things in the kitchen, I can tell you these rolls hit all the right spots without requiring you to be a professional baker. I bet yours turn out just as fluffy as mine!
- The Flavor Balance is Everything: That perfect dance between the sharp, tart dried cherries and the sweet, chewy coconut means you never get tired of the flavor. They are totally addictive!
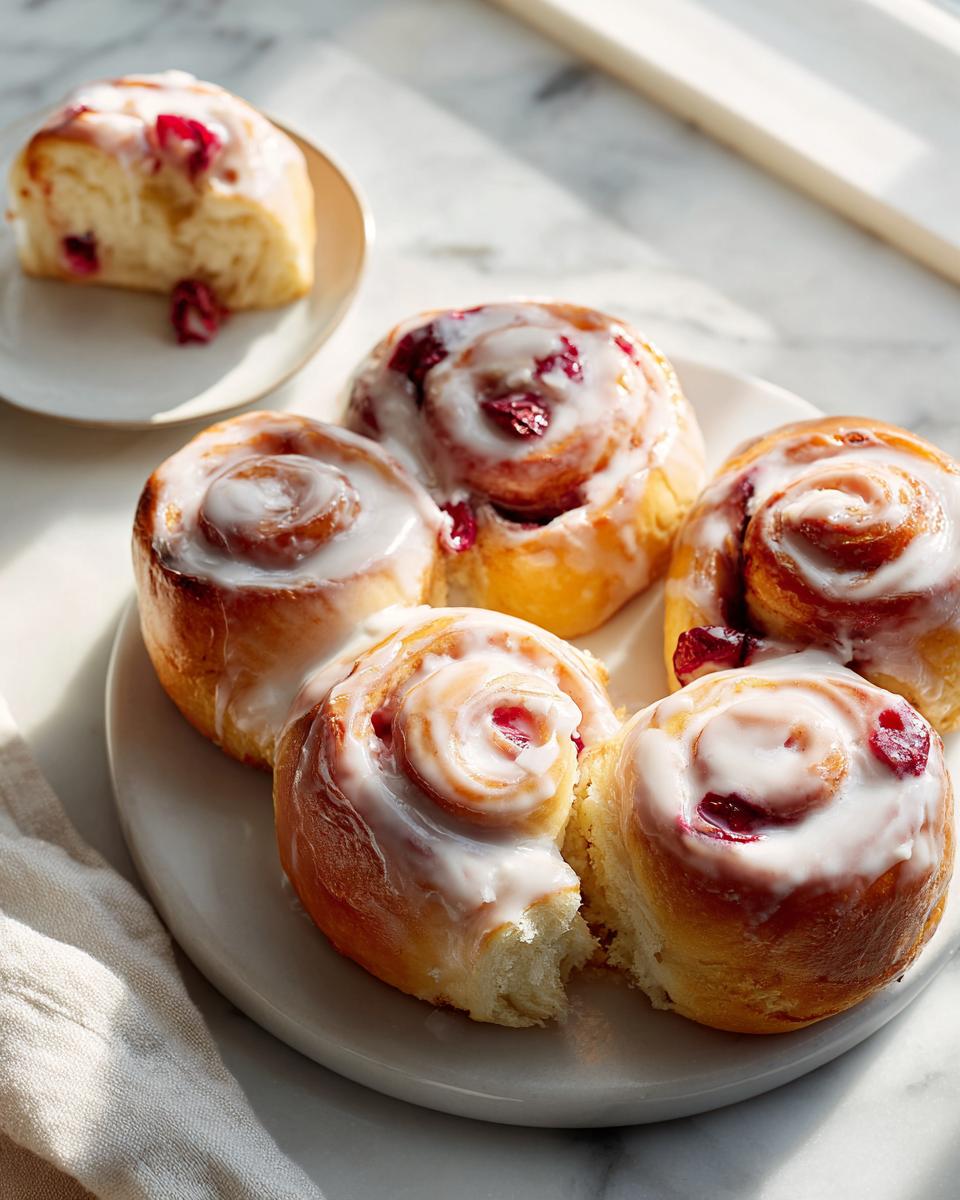
- Perfect for Weekend Brunch: They look impressive piled high in a basket, making them ideal for family gatherings or when you have guests over. We love having these breakfast rolls with cherries on a lazy Sunday morning with tons of coffee.
- Achievable Yeast Baking: The dough comes together easily in a stand mixer or by hand. We’re using instant yeast, so we skip the stressful proofing step that sometimes trips people up. You’ll feel so proud of yourself when you pull these out of the oven! Check out more of my simple breakfast recipes if you love starting your day right.
Essential Equipment for Perfect Cherry Coconut Rolls
Okay, so every great pastry relies on having the right tools, even if those tools aren’t super fancy. You don’t need a specialized machine to make these incredible Cherry Coconut Rolls! Most of what you need is probably already sitting in your kitchen cabinets right now. It’s always important to have good basics when dealing with yeast dough, though.
When I started testing this recipe, I learned quickly that the size of your baking dish really matters for an even bake. Since we are layering 12 rolls snugly into the pan, if your 9×13-inch dish is extra deep, they might need an extra minute or two to cook through the middle. For the softest sides possible, make sure your dish isn’t too tall, giving the rolls room to spread upwards slightly while baking. Don’t worry too much if you don’t have the exact size, but keep an eye on the center of the cluster while they bake!
Here are the main pieces you’ll want ready before you even start mixing that dough:
- A Large Mixing Bowl: You need plenty of room for kneading. If you’re using a stand mixer, make sure the bowl is big enough for the dough to double in size without spilling over once the rising starts!
- A sturdy 9×13-inch Baking Dish: This is the classic home for sweet rolls. Grease it really well, or use parchment paper lining for a super-easy payoff later when it’s time to lift them out (though I usually just go straight for the grease bucket with these).
- Rolling Pin: We need to roll that dough nice and thin, remember, a 12 by 16-inch rectangle is our target!
- Sharp Knife or Dental Floss: This might sound funny, but I swear by using unflavored dental floss to cut the rolls after they’ve puffed up. It slices right through without squishing the layers like a dull knife might.
Ingredients for the Soft Dough of Your Cherry Coconut Rolls
Now we get down to the real work—the dough! This is where the magic starts, and listening to what the dough needs is half the battle. If you’ve ever struggled with a tricky yeast dough that just won’t cooperate, don’t worry, because this one is pretty forgiving, provided you pay attention to the temperature of that milk. Getting the milk just warm enough is crucial for waking up that yeast, but too hot and you accidentally cook it, and then we’re heading to the King Arthur site for a new batch!
My secret to keeping things moist? It’s all in the combination of fats—we use both melted butter and eggs to keep these rolls tender long after the first bite. For a deeper dive into keeping your yeast happy, you can check out my thoughts on the secret to moist bread foundations, which really helps here. If you ever want to check out some classic baking tutorials for different dough types, I sometimes peek over at King Arthur Baking when I’m planning a new yeast adventure!
Dough Ingredient Clarity
- Flour: 3 1/4 cups all-purpose flour (We reserve some of this to add slowly while kneading!)
- Sugar: 1/4 cup granulated sugar
- Yeast: 2 1/4 teaspoons instant yeast (That’s one standard packet, easy peasy.)
- Salt: 1 teaspoon
- Milk: 3/4 cup whole milk, and listen closely here—it needs to be warmed just right. Aim for that cozy bathwater temperature, maybe 105\u00b0F to 110\u00b0F.
- Butter: 1/4 cup unsalted butter, melted completely.
- Eggs: 2 large eggs. Make sure these eggs aren’t ice-cold; let them sit out on the counter for about 30 minutes before you start mixing!
Preparing the Cherry Coconut Filling for Your Sweet Rolls
This filling is what separates these from your average morning pastry, and honestly, this is where the magic really happens! When I was first developing this recipe for coconut sweet rolls, I wanted that perfect textural contrast. You get the chewiness from the cherries and the delicate tenderness from the coconut, all held together with a touch of brown sugar.
You’ll notice we use just a little bit of softened butter here, not melted. That’s intentional! When you spread the mixture onto the rolled-out dough, using softened butter prevents the dough from tearing or pooling with liquid fat right away. It helps bind everything together so that when you cut those rolls later, you get beautiful, distinct spirals. Make sure your butter is pliable—nice and easy to spread with the back of a spoon. If you are looking for more recipes that are perfect for dessert time, don’t forget to peek at my dessert collection!
Mixing this up is incredibly quick. Just dump everything into a bowl and stir until combined. Seriously, try not to over-mix here; we just aren’t looking for structure, just a lovely, fruity, sweet topping!
Filling Ingredient List
- Dried Cherries: 1 cup, and they absolutely must be chopped! Big chunks are fun sometimes, but for an even roll, small pieces are best.
- Shredded Coconut: 1 cup of that good, sweetened shredded coconut.
- Brown Sugar: 1/3 cup—the brown sugar adds that little note of molasses that complements the fruit flavor so nicely.
- Butter: 3 tablespoons of unsalted butter, softened to a spreadable consistency. No melting allowed!
Step-by-Step Instructions to Make Cherry Coconut Rolls
Alright, deep breaths—we’re putting it all together now! If you get yourself organized beforehand, this process flows so quickly. Making these cherry coconut pastry rolls is incredibly rewarding because the steps are straightforward, even if you’re a little nervous about working with yeast dough for the first time. Remember, teamwork makes the dream work between your dough, the filling, and the oven!
We’ve mixed the dough, let it have its first big nap, and now it’s time to turn that fluffy mass into beautiful spirals. Don’t forget to check out my guide on mastering those classic cinnamon rolls—the technique is nearly identical and might give you an extra boost of confidence! Sourdough Cinnamon Rolls: A Flavorful Twist on a Classic will give you great tips on handling yeast dough gently. If you ever need a backup idea for technique checks, I sometimes look at Food Network’s tips, too!
Making and Rising the Dough
First things first, we combine all those dry ingredients—flour, sugar, yeast, and salt—right there in the large bowl. Give them a quick whisk just to make sure the yeast is distributed evenly. Remember, we’re using instant yeast, which means we don’t need to bloom it separately, yay!
Next, pour in the warm milk, the melted butter, and those two eggs. Mix it all up until it starts to just come together into a shaggy mass. After that, gradually add the remaining flour. You’re looking for a dough that pulls away from the sides of the bowl but is still soft. Now, time to get messy! Turn it out onto your board and knead it for a good 6 to 8 minutes. You’re done when the dough feels smooth and elastic, not sticky or tough. Pop that baby into a greased bowl, cover it with a damp towel (my favorite trick!), and let it hang out in a warm spot for about 1 hour, or until it has happily doubled in size.
Assembling and Cutting the Cherry Coconut Buns
Once your dough has puffed up nicely, give it a gentle punch down to release all that air. Now, dust your surface with a little flour and start rolling it out. You need an even rectangle, about 12 inches tall and 16 inches long. Roll slow and steady to get that size right; this ensures every single one of your cherry coconut buns is the same size!
Once it’s rolled out, immediately spread that softened butter evenly all over the surface. Leave about a half-inch border clear right along one of the long edges—this little gap helps seal the log tight! Over that butter, sprinkle your amazing cherry coconut mixture evenly from edge to edge. Starting at that long edge *without* the border, roll the dough up tightly into a long log. Make sure you keep the roll snug so you don’t end up with gaps in the middle when they bake.
Use that sharp knife or, my absolute favorite, some unwaxed dental floss, to cut the log into 12 equal slices. Slice clean and quick! Place these beauties into your well-greased 9×13-inch dish. Cover them loosely again and let them rest for their second rise. They need about 30 to 40 minutes to get puffy again before they hit the heat.
Baking and Glazing Your Rolls
When they look nice and puffy after that second rise, it’s time for the oven! Preheat your oven to 350\u00b0F (175\u00b0C). Bake for 25 to 28 minutes. Keep an eye on them; you want the tops golden brown but not dark brown or crunchy. They are done when they smell unbelievably good and look perfectly baked!
While they are baking, whip up that quick glaze. In a small bowl, just whisk together the powdered sugar, vanilla extract, and start with 2 tablespoons of milk. You might need that third tablespoon depending on the humidity, but you want it thick enough to drizzle but thin enough to drip a little down the sides. As soon as the rolls come out of the oven, let them cool for just five minutes—not longer!—then drizzle that sweet glaze right over the warm tops. That little bit of residual heat melts it perfectly into the nooks and crannies. Enjoy!
Tips for Success with Your Cherry Coconut Rolls
I’ve made these rolls probably fifty times now since that first happy accident with the dried cherries, and I’ve definitely learned a few tricks along the way to avoid common pitfalls. Yeast baking shouldn’t be scary, but it does have a few non-negotiable rules. If you follow these little pointers, I promise your dough will behave beautifully and you will get those restaurant-quality soft sides!
My biggest success stories usually came from listening to the dough, not the clock. I often consult my notes on general pastry tips when I’m feeling uncertain, especially when I’m working with sticky doughs like this one. You can find tons of great advice over at my baking tips page if you want the full rundown, but here are the highlights specific to getting these Cherry Coconut Rolls absolutely perfect!
- Milk Temperature Check: This is my number one tip for any yeast recipe! If your milk is too cold, the yeast just sleeps in. If it’s too hot, you shock and kill it. Test it with a thermometer if you have one, aiming for 105\u00b0F to 110\u00b0F. If you don’t have a thermometer, it should feel just slightly warm to the touch—like warm bath water, not hot tea.
- Flour Management While Kneading: When the recipe says gradually add the remaining flour, really mean it! This dough is supposed to be soft. If you dump all the flour in at once, you’ll end up with dense buns instead of wonderfully fluffy ones. Only add enough flour on the board to keep it from sticking terribly while you work it, but keep it softer than a standard bread dough.
- Don’t Skip That Rest Time: Those two rises are vital! Both the first rise (when it doubles) and the second rise (when the cut rolls get puffy in the pan) allow the yeast to create those soft air pockets. If you rush the second proof because you’re hungry, the rolls will bake up tight and chewy instead of soft and pull-apart tender. Be patient; they are worth the wait!
- Sealing the Roll Tightly: When you roll up that beautiful rectangle with the filling, press firmly along the seam where the two ends meet. If you leave a slack or poorly sealed edge there, that side tends to open up while baking, and all your gorgeous cherry coconut filling will ooze out into the pan, making the center rolls a bit bare. Seal it tight for a perfect spiral!
Storage and Reheating Instructions for These Cherry Rolls Recipe
When I make a batch of Cherry Coconut Rolls, they are almost always completely gone by lunchtime. But hey, sometimes you have actual leftovers, or maybe you just want to bake these the day before a big brunch—I totally get it! Knowing how to store them correctly is key to keeping that pillowy soft texture, which is what we worked so hard for, right?
The best place for these sweet treats is actually right on the counter! As long as you’ve got that lovely glaze on top—which acts like a little seal—they stay nice and fresh at room temperature for about two days. Just make absolutely sure they are covered tightly. My go-to when I have leftover breakfast recipes like this is a proper food storage container with a tight lid. If you stack them, try putting a small square of parchment paper between the layers so the sticky glaze doesn’t weld them together overnight!
If you’re not planning on eating them all within 48 hours, the fridge is your next best bet, though I always advise against refrigerating anything that relies on soft yeast dough because it tends to dry them out faster. If you do refrigerate them, always try to reheat them properly before eating. For more general tips on making baked goods last longer, I often look at ideas over at Taste of Home!
Here’s how I ensure every reheat tastes like it just came out of the oven. You have options depending on how many you are saving!
The Quick Microwave Fix (Single or Two Rolls):
- Wrap the roll loosely in a slightly damp paper towel. This adds back the steam that keeps the dough soft.
- Microwave on medium power for about 15 to 20 seconds. It warms them up fast, but watch closely—too long and they get tough!
The Oven Reheat (For a Whole Pan or Many Rolls):
- If they are in their original 9×13 dish, just cover the dish loosely with foil.
- Pop them into a 300\u00b0F oven for about 10 minutes. The foil traps the moisture and gently warms the rolls through. If they look a little dry, you can flick a tiny bit of water onto the bottom of the pan before covering with foil.
Following these steps for this cherry rolls recipe means you can enjoy that perfect combination all week long without compromising texture. Nobody wants a stale sweet roll, and these methods keep mine perfectly fluffy!
Frequently Asked Questions About Cherry Coconut Rolls
I know when I first started messing around with this recipe, I had a million questions floating around in my head. Yeast dough, even the easy kind, can cause some panic! Don’t sweat it. I wrote down the most common things people ask me about making these rolls, especially when they want to play around with the ingredients a bit. You’ll find that this recipe is super flexible, but there are a few key areas where you shouldn’t deviate too much if you want that fluffy texture!
If you want to see more of my general tips for handling trending breakfast ideas—because everyone loves a good sweet roll!—you can check out my dedicated breakfast trends page. Here are the answers to the top things folks ask about making these amazing Cherry Coconut Rolls!
Can I use fresh or frozen cherries instead of dried ones?
Oh, this is a tough one! I really, really recommend sticking to dried cherries for this specific recipe. Fresh or frozen cherries have so much more water content. If you use them, the filling will turn into runny soup, and the moisture will soak right into your dough, making it gummy and preventing it from rising properly. If you absolutely must use fresh cherries, you would need to dry them out slightly first in a very low oven (like 200°F) until they shrink a bit, or perhaps roast them down significantly to reduce the liquid. It’s definitely an extra step, so for the best results on your first try with these coconut sweet rolls, stick to dried!
My dough didn’t rise at all! What did I do wrong?
Nine times out of ten, if your yeast dough refuses to budge, it is the temperature of your milk. Remember how I stressed that warm water temperature? If the milk was too cold (below 100°F), the yeast just didn’t wake up. If it was too hot (over 130°F), sadly, you probably killed the yeast entirely. If you used instant yeast and it still didn’t rise after an hour, the yeast was likely dead when you started, or your kitchen was just too cold! Don’t worry, just make another batch of dough next time using milk that feels just pleasantly warm, not hot, on your wrist. This is a crucial part of any great cherry rolls recipe!
How can I make these rolls dairy-free? I really want to serve these for brunch.
That’s a great question for adapting staple recipes! You can actually make easy swaps here without sacrificing much flavor at all. For the milk in the dough, you can easily substitute any unsweetened plant-based milk like soy, oat, or even almond milk—just make sure they are warmed to the right temperature. For the butter, most major brands offer great plant-based sticks that work beautifully when melted in the dough and softened for the filling. The glaze is the easiest: just swap out the standard milk for your favorite plant milk, and you’re good to go! These breakfast rolls with cherries are very adaptable!
Why do you use plastic wrap instead of a towel for the second rise?
Good catch! I alternate depending on the weather. When the dough is rising the second time—after you’ve cut and arranged the rolls in the baker—I often cover it loosely with plastic wrap. The reason for this is that the rolls are already puffed and tender, and if a damp towel sits directly on them, the moisture and condensation can deflate them slightly by sticking too much to the surface, or leave weird texture marks. Covering them loosely traps the humidity to help them puff up nicely, but it doesn’t press down on the delicate tops. It’s just a little trick to keep those tops looking perfect before they bake!
Estimated Nutritional Data for Cherry Coconut Rolls
I always feel a little nervous sharing nutrition facts because, let’s be honest, these are rich, sweet rolls designed to make you happy, not necessarily count every single calorie! But since baking is also about feeding people well, I ran the numbers for a single, generously iced roll based on the ingredients listed. Keep in mind that this is just an estimate, folks. The exact brand of flour you use or whether you use skim versus whole milk can swing those numbers a bit!
These estimates are based on making 12 rolls, as the recipe suggests. If you cut them smaller, your numbers will obviously decrease! For more reliable, customizable nutrition data when using different ingredient brands, I sometimes cross-reference great online calculators, you can check out resources like Betty Crocker’s nutrition tools to tweak things if you swap out ingredients significantly.
Here is what the typical profile looks like for one of these delicious Cherry Coconut Rolls:
- Calories: Approximately 380 – 420 per roll (This accounts for the richness of the dough and the sweet glaze!)
- Total Fat: Around 14g – 16g per roll (Remember, we use real butter for flavor!)
- Protein: Roughly 7g – 9g per roll (Thanks to the milk and eggs!)
- Carbohydrates: About 60g – 65g per roll (This includes the sugars from the cherries, coconut, and glaze.)
Disclaimer time: Please take these figures as a general guideline only. If you use less sugar in the glaze or swap out some of the butter for applesauce (gasp! Don’t do it!), your numbers will change. But when you bite into that sweet, tart, chewy center, you’ll agree that whatever the exact count, they are worth every single happy bite!
Cherry Coconut Rolls
Equipment
- Large mixing bowl
- 9×13-inch baking dish
Ingredients
For the Dough
- 3 1/4 cups all-purpose flour
- 1/4 cup granulated sugar
- 2 1/4 teaspoons instant yeast (1 packet)
- 1 teaspoon salt
- 3/4 cup whole milk warmed
- 1/4 cup unsalted butter melted
- 2 large eggs
For the Filling
- 1 cup dried cherries chopped
- 1 cup sweetened shredded coconut
- 1/3 cup brown sugar
- 3 tablespoons unsalted butter softened
For the Glaze
- 1 cup powdered sugar
- 2 to 3 milk tablespoons
- 1/2 teaspoon vanilla extract
Instructions
- In a large mixing bowl, combine 2 cups flour, sugar, yeast, and salt. Add warm milk, melted butter, and eggs. Mix until well combined, then gradually add remaining flour until a soft dough forms.
- Knead the dough on a lightly floured surface for 6 to 8 minutes until smooth and elastic. Place in a greased bowl, cover with a damp towel, and let rise in a warm place for 1 hour or until doubled in size.
- While dough rises, prepare the filling by mixing chopped dried cherries, shredded coconut, and brown sugar in a bowl. Set aside.
- Punch down the dough and roll it out on a floured surface into a 12×16-inch rectangle. Spread softened butter evenly over the dough, leaving a 1/2-inch border around the edges.
- Sprinkle the cherry coconut mixture evenly over the buttered dough. Starting from the long side, roll the dough tightly into a log. Cut into 12 equal pieces using a sharp knife or dental floss.
- Place rolls in a greased 9×13-inch baking dish, cover loosely with plastic wrap, and let rise for 30 to 40 minutes until puffy.
- Preheat oven to 350°F (175°C). Bake rolls for 25 to 28 minutes until golden brown on top.
- While rolls bake, prepare the glaze by whisking together powdered sugar, milk, and vanilla extract until smooth and pourable.
- Remove rolls from oven and let cool for 5 minutes, then drizzle with glaze while still warm.
- Serve warm with coffee or tea.