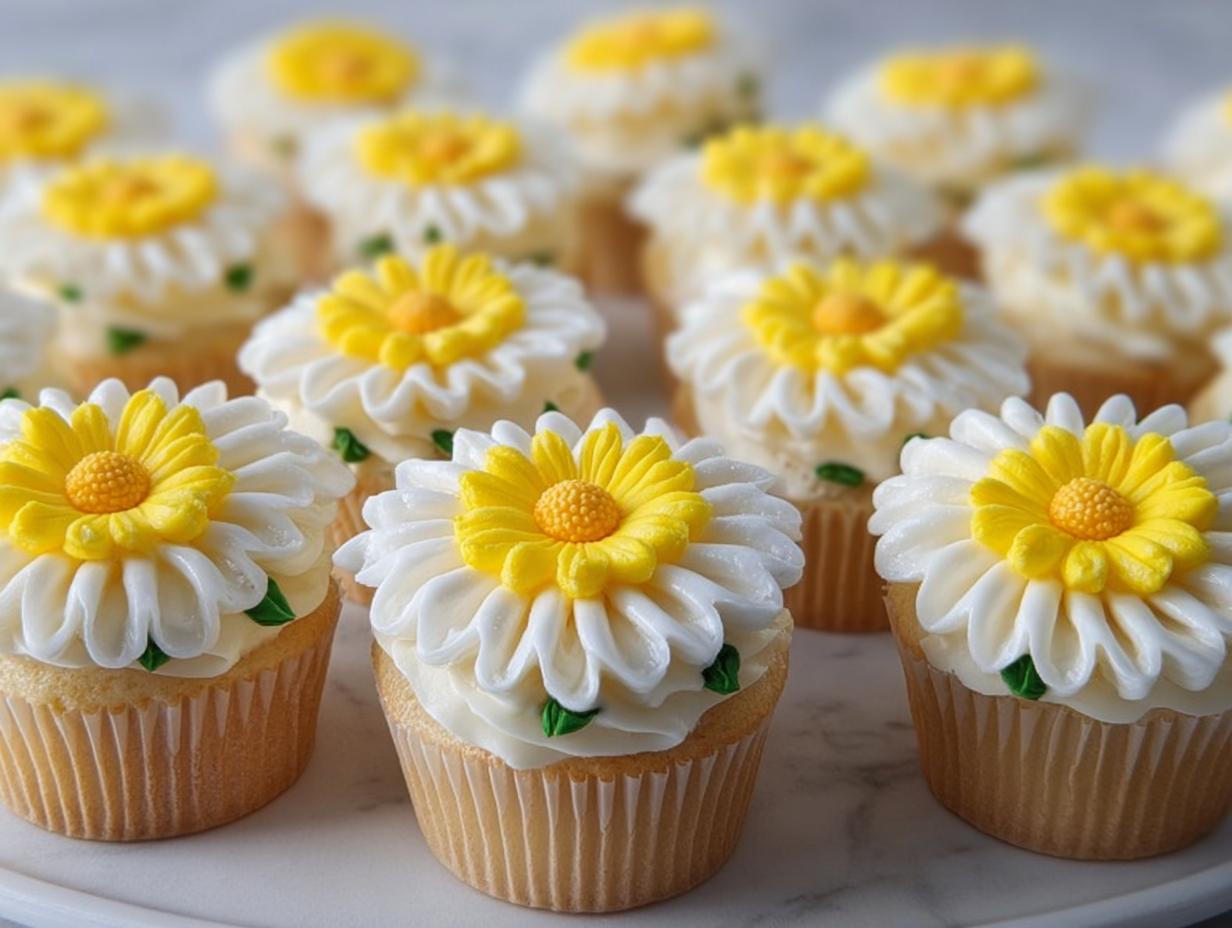
Oh my goodness, when the weather starts to warm up, all I want to do is bake things that scream sunshine and fresh air! Forget those fussy layered cakes; for me, spring baking means getting out the piping bags. These Buttercream Daisy Cupcakes are seriously the prettiest trick you can pull off with about an hour of work.
I know the little piped flowers look intimidating, but trust me, they are deceivingly simple once you have the right tips! That’s the magic here—a perfectly tender, classic vanilla cupcake topped with a bloom that looks like it took forever. My favorite part is that bright pop of yellow center against the stark white petals. It just lifts your spirits!
This specific recipe is actually an adaptation I worked on with Hanna Foster over at Recipes by Betty. She helped me nail the perfect balance in the cake so it stays soft even when refrigerated. Seriously, you are going to want to bookmark this recipe for every party, picnic, or random Tuesday afternoon that needs a little cheer!
If you want to see some other simple baking ideas that deliver big flavor, check out this collection of easy cupcake recipes. But first, let’s get these daisies piped!
Why You Will Love These Buttercream Daisy Cupcakes
Trust me when I say these aren’t just another frosted treat. These Buttercream Daisy Cupcakes manage to look fancy without requiring you to have ten years of cake decorating experience. They are perfect for cheering up a gloomy afternoon!
Here are just a few reasons why I keep coming back to this recipe:
- They have such an incredible visual impact! The contrast of the simple white petals against the bright yellow centers just looks so fresh and cheerful.
- The piping technique is easier than it looks! We’re using basic petal and round tips, so even if you’re new to piping, you’ll master these quick.
- They are the ultimate centerpiece for springtime gatherings—showers, Easter brunch, or just when the first daffodil pops up in the yard. If you enjoy making things look pretty, you might also love my wildflower baby shower cookies!
- The flavor combo is spot on. We have a super light, fluffy vanilla cake base that lets that rich, sweet, but stable buttercream really shine.
- They taste just as good as they look. No dry cake or gritty frosting here—we nailed the moist crumb required!
Essential Equipment for Perfect Buttercream Daisy Cupcakes
You don’t need a whole professional bakery setup for these beauties, but you do need a couple of key tools to get those perfect piped flowers looking just right. If you’re serious about making these Buttercream Daisy Cupcakes look exactly like they came from a fancy shop, pay attention to the tips!
First up, you definitely need your standard mixing bowls and a good electric mixer. Unless you want a serious arm workout, I always recommend a stand or hand mixer for creaming that butter and sugar for the frosting. We need air in there!
For the actual baking, grab your plain old cupcake pan lined with paper cups—nothing complicated there. But here’s where we focus our attention: the piping gear.
You must have piping bags ready to go. For the daisies, you’ll need two specific tips. Grab a petal tip—this is what creates those lovely, distinct white petals radiating out. Then, for the teeny center of the flower, you need a small round tip. Seriously, don’t skip those specialized tips; they are the secret weapon that makes the daisies look instantly professional. If you want great cake recipes to go with your gear, check out these cupcake recipes!
Gathering Ingredients for Your Buttercream Daisy Cupcakes
Okay, let’s talk supplies! When we bake something decorative like these beauties, having all your ingredients measured out and ready to go is half the battle. I like to think of it as prepping my little station before I start mixing—it keeps me from rushing later, especially when that butter threatens to melt!
We have two main missions here: baking a light, fluffy cake that acts as our perfect canvas, and creating that stable, delicious buttercream that holds its shape for piping. Don’t forget the colors for the flowers! You absolutely need white gel color for the petals and a vibrant sunshine yellow for the centers. Gel colors are key because they won’t thin out your frosting like liquid food coloring does.
When everything is lined up, it’s so much less stressful. If you need some inspiration for other sweet toppings, I’ve made tons of frosting tests lately, so check out my sprinkle sugar cookie frosting recipe!
For the Cupcake Base
The cake part is simple, classic vanilla! Remember, we want that crumb nice and tender so it disappears in your mouth.
- 1 1/2 cups all-purpose flour
- 1 1/2 tsp baking powder
- 1/4 tsp salt
- 1/2 cup unsalted butter (softened—this is important!)
- 3/4 cup sugar
- 2 eggs
- 2 tsp vanilla extract
- 1/2 cup whole milk
For the Daisy Buttercream Frosting
This frosting has to be firm enough to hold those petals tall, so make sure your butter is softened but NOT warm or melty. If you use cold butter, you’ll end up with tiny, hard lumps, and we don’t want that struggle!
- 1 cup unsalted butter (softened—I can’t stress this enough!)
- 3 1/2 cups powdered sugar
- 2 tbsp heavy cream
- 1 tsp vanilla
- 1 pinch salt
- As needed gel colors (white and sunshine yellow)
Step-by-Step Instructions for Your Buttercream Daisy Cupcakes
Now for the fun part! Even with the perfect ingredients, the technique makes or breaks your Buttercream Daisy Cupcakes. We need to get that cake nice and light, and then tackle the flowers. Don’t stress about the timing—since the cupcakes bake fast, you can make the frosting while they cool. If you want to get a head start on the recipe itself, Betty Crocker has a great database of cupcake recipes you can browse!
Baking the Perfect Cupcake Base
The goal here is a light, tender crumb that won’t compete with the beautiful frosting on top. It’s all about gentle mixing once the wet and dry ingredients meet up!
- First things first, get your oven humming! Preheat everything to 350°F (175°C). Line your cupcake pan wells—you should get exactly 12 of these beauties.
- In one bowl, give your dry ingredients a quick whisk: the flour, baking powder, and that little bit of salt. You want these well-mixed so you don’t get one weird salty pocket later.
- In your mixer bowl, cream the softened butter and the sugar together. Beat this until it looks genuinely light and fluffy, almost pale. That fluffiness is adding essential air pockets to our cake!
- Next, beat in your two eggs, one at a time—make sure the first one is fully incorporated before dropping in the second. Then mix in your vanilla extract.
- Now, you have to alternate! Add your dry ingredients mixture little by little, alternating with the whole milk. Start with the dry ingredients, then milk, then dry, then milk, and always end with dry.
- Stop mixing just as soon as everything comes together! I’m talking barely combined. If you see a few streaks of flour, that’s okay! Do not overmix, or your cupcakes will be tough as leather.
- Fill those paper liners only two-thirds full—don’t overfill them, or you’ll have cake domes spilling over the tops! Bake for about 18 to 20 minutes. Pop them out and let them cool completely on a wire rack before you even think about frosting. Hot cupcakes melt frosting, and nobody wants soup!
Preparing the Floral Buttercream
This is where we set up our canvas for perfection. Make sure you still have that cup of butter softened perfectly—room temperature soft, not melted and greasy!
Start by beating the butter until it’s creamy smooth all on its own. Then, slowly start adding your powdered sugar, maybe a cup at a time, mixing slowly at first so you don’t wear the sugar dust all over your kitchen! Once most of the sugar is in, beat it vigorously. Then, mix in the heavy cream, vanilla, and salt until it looks like the silkiest frosting you’ve ever seen.
Now for the color separation! Tint the vast majority of your buttercream white—this will be the petals. Take just a tiny, small spoonful and mix that with your sunshine yellow gel color. You want a noticeable difference between the two; the yellow needs to really pop against the white.
Piping the Daisy Cupcakes
This is the payoff! Grab your piping bags—one fitted with the petal tip (usually a slightly larger, V-shaped one) filled with the white frosting, and the second (even just with a snip of the end for a smooth round tip) filled with the yellow for the centers.
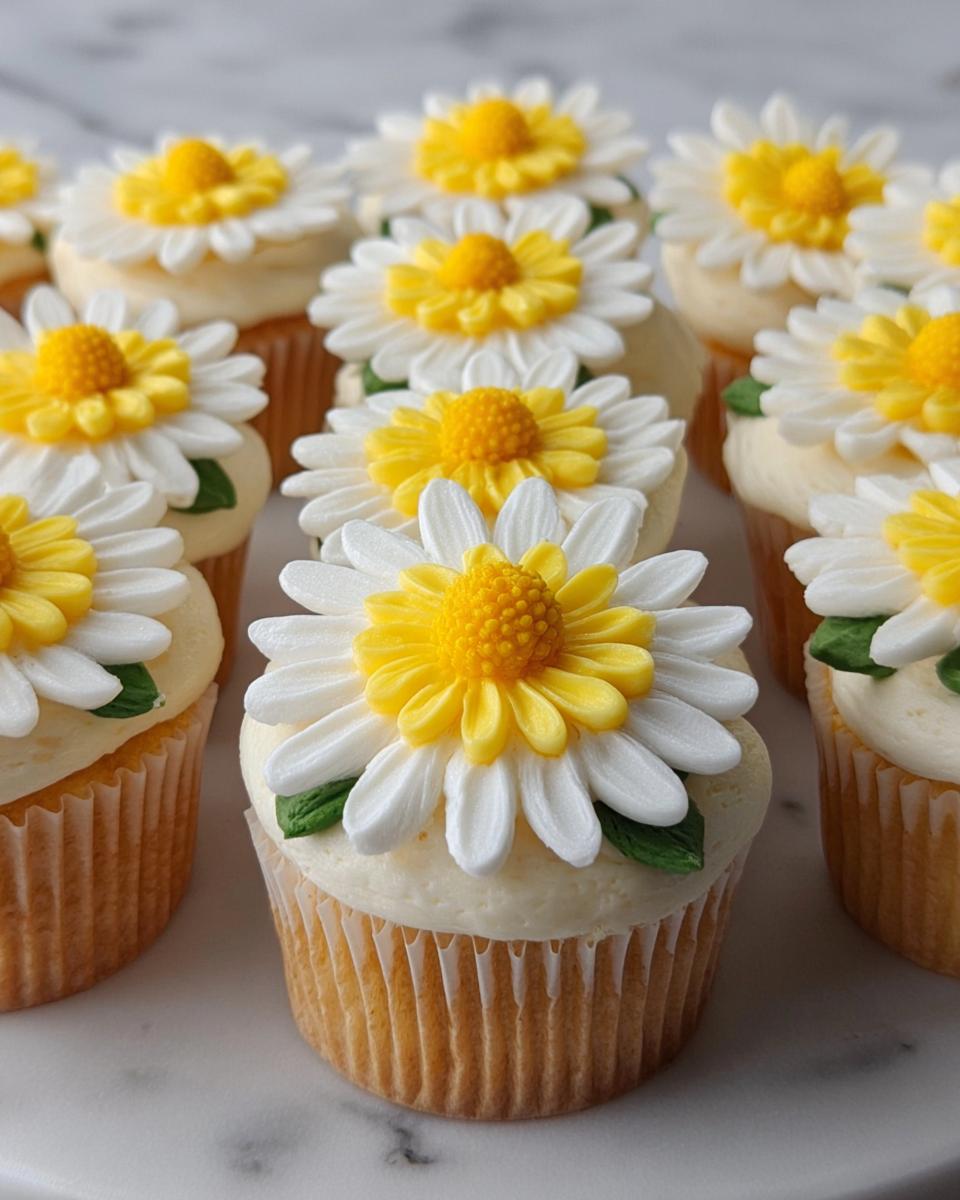
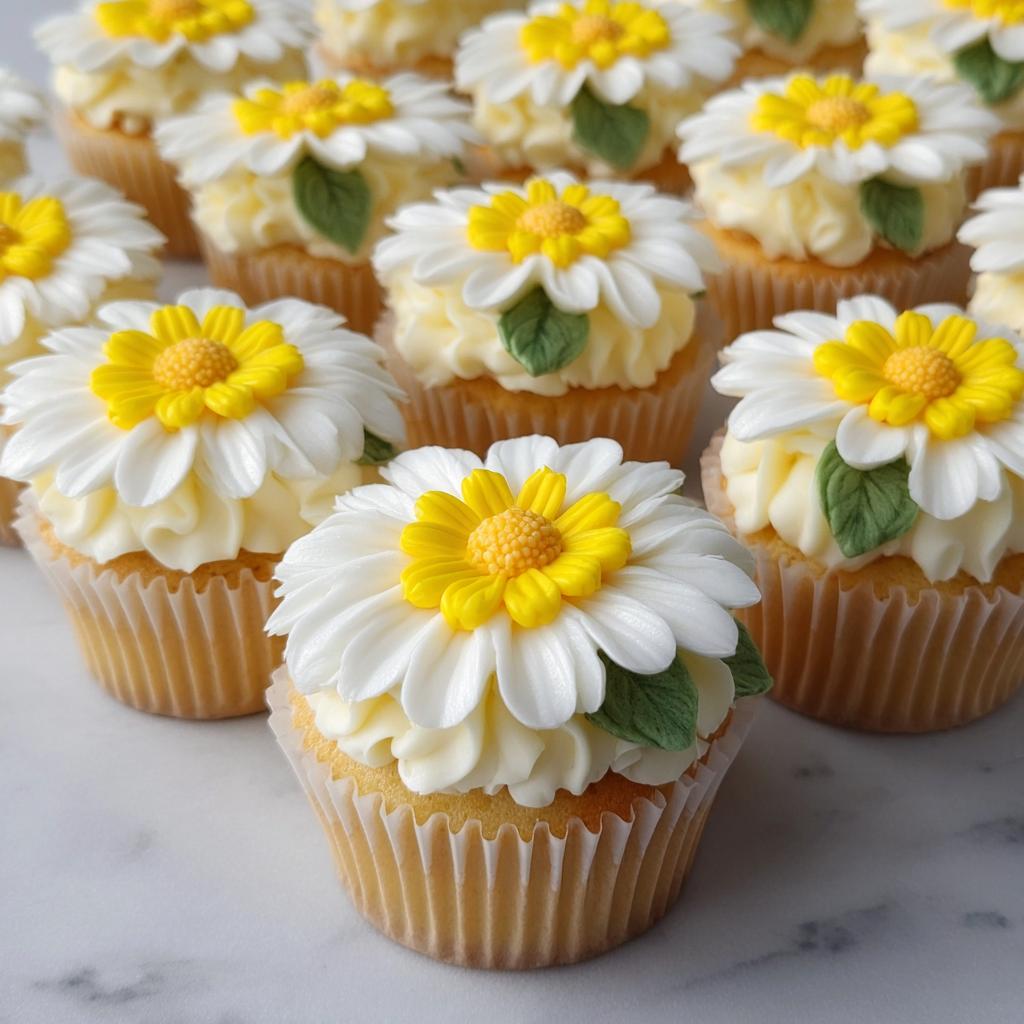
For each cupcake, start with the petals. Hold the piping bag vertically, just barely touching the top of the cooled cupcake. Squeeze firmly to create a nice petal, and then gently pull up and away to make a neat point. You’re just going to pipe one simple petal right on top of the cupcake dome. Then, pipe five or six more petals right next to the first one in a circle until you have one complete, pretty flower shape all around the top. It should look like a simple daisy!
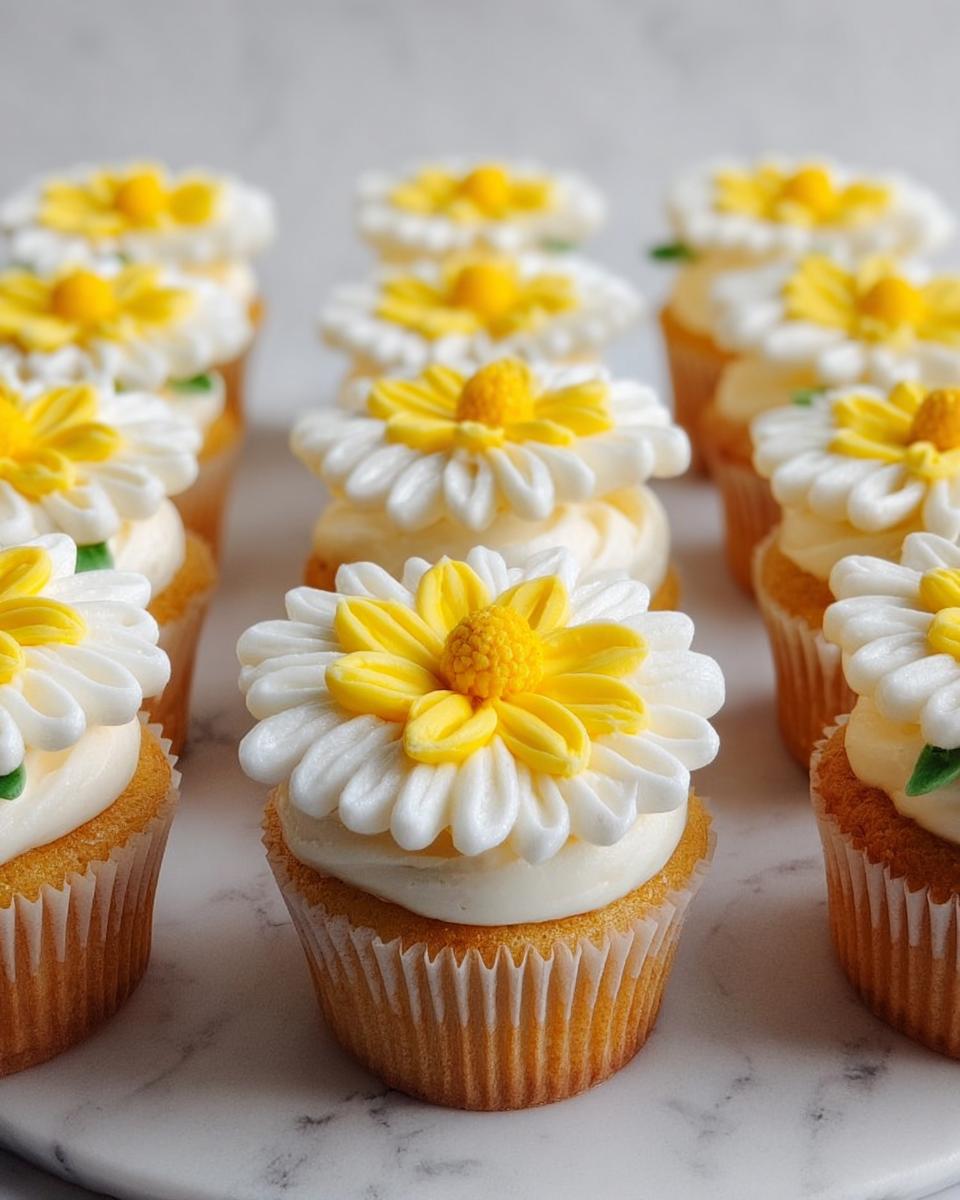
Once the petals are done, take your small yellow tip and gently pipe a small dot right in the middle of those white petals. That little dab of yellow is what makes the whole thing click! For the best presentation, line them up closely together on a tray as if they were in a little bouquet. I sometimes even slip a piece of parchment paper underneath the tray edge to mimic a flower box!
Tips for Success with Buttercream Daisy Cupcakes
I’ve messed up batches of these! Believe me, I have learned the hard way exactly what makes the difference between a slightly floppy flower and a daisy that stands up proudly. If you follow these few little tricks, your Buttercream Daisy Cupcakes will come out looking flawless. This is the stuff I learned through sheer trial and error!
My number one golden rule, which applies to the cake *and* the frosting, is temperature management. You need your butter for the cake batter nice and soft, but for the buttercream, it must be room temperature soft. If it’s too warm, the frosting gets soupy fast, and your daisies will droop right off the top. If it’s too cold, you get those annoying little butter lumps everywhere. Leave it out on the counter for an hour or two before starting the frosting process.
Now, let’s talk about making that buttercream smooth. Achieving that velvety, pipe-able consistency needs patience. After you’ve added the powdered sugar, you really need to beat it on medium-high speed for several minutes—longer than you think. You are whipping air into it, and that air is what gives the petals structure. If it still seems too thick to push through the tip easily, add just one tiny splash more of heavy cream, but honestly, try to skip it if you can. More cream makes for weaker flowers!
Finally, piping takes a little muscle memory. When you are making those petals, the trick is staying consistent with how hard you squeeze *and* how fast you pull away. For the six petals, start and stop your squeeze right at the cupcake edge and pull up quickly to create that sharp point. If you move your hand too slowly, the petal gets too heavy and sinks into the one next to it. For more expert tips on handling doughs and creams, I always recommend looking at Hanna’s awesome advice over at perfect scones. For alternative cupcakes, sometimes I browse BBC Good Food’s collection!
Ingredient Notes and Substitutions for Buttercream Daisy Cupcakes
Hey, I get it! Sometimes you open the fridge and the exact ingredient chart doesn’t match what you have on hand. That’s totally fine, but when we’re making something decorative like these Buttercream Daisy Cupcakes, some ingredients matter more than others. I’ve messed around with swapping things out lots of times, and I want to save you some heartache!
Let’s talk about the liquid in the frosting first—we called for heavy cream, because it’s rich and helps stabilize the buttercream so those petals hold their shape beautifully overnight. If you don’t have heavy cream, you can definitely substitute it, but you need to be super careful. I’ve had success using whole milk in a pinch, but you might need to add an extra tablespoon or two of powdered sugar to maintain the structure. Never use skim milk; it has too much water content, and your frosting will get runny fast! It’s kind of like when figuring out if buttermilk is better than heavy cream for baking—it comes down to fat content!
For the cake part, if you’re out of whole milk, 2% will work fine. It might make the batter slightly less rich, but since the frosting is so decadent, no one will notice a difference in the little cake base once it’s all assembled.
Now, for the vanilla component—please, please, please use real vanilla extract! I know it costs a little more sometimes, but imitation vanilla just tastes artificial, especially when you use a generous amount like we do in this recipe (2 tsp in the cake, 1 tsp in the frosting!). Real vanilla extract blends right into the butter and sugar, giving you that warm, cozy background flavor that makes simple cakes taste sophisticated. If you skip the real stuff, the whole aroma of your beautiful spring floral cupcakes will fall flat. Stick to the quality ingredients where it counts!
Serving Suggestions for Floral Cupcakes for Spring
These cheerful little guys are just begging for a beautiful spring setting! Since the decorating is already doing the heavy lifting, you want to keep everything else light and simple. I love serving my Floral Cupcakes for Spring alongside a crisp, slightly tart lemonade—the acidity cuts right through the rich buttercream, making everything taste fresh!
If you are doing a big brunch spread, they pair beautifully with simple fruit trays. Think strawberries, pineapple spears, and maybe some melon. Skip the heavy chocolate desserts; these daisies deserve the spotlight! For something really unique, you could even arrange them near one of my strawberry and marshmallow dessert bouquets—it doubles down on the garden party vibe!
Storing and Reheating Your Daisy Cupcakes
Once these beauties are frosted with all those perfectly piped petals, storage becomes key! We want that buttercream to stay firm, fluffy, and ready to eat, not melt into a puddle or get crusty. If you happen to have leftovers from your party (which, frankly, I doubt happens often with these Buttercream Daisy Cupcakes!), here is how I handle them.
Because we are using substantial amounts of butter in the frosting, the refrigerator is your best friend if you need them to last more than a few hours. But you can’t just toss them on an open shelf! Airtight storage is essential, or the cake part will dry out immediately. I usually place them carefully in a large plastic container, making sure there is space between the daisies so they don’t smash into each other. If you can find a dedicated cupcake carrier, grab it!
If you keep them refrigerated, they are generally good for about three to four days. However, I never, ever serve them straight from the fridge! That cold temperature makes the buttercream taste hard and slightly waxy. Always plan ahead: pull them out onto the counter about 45 minutes to an hour before you plan to serve them. This lets the butter soften up just enough so the frosting melts beautifully in your mouth alongside that tender cake.
Now, reheating is tricky business, because you have delicate, piped buttercream sitting right there. My general rule for frosted cakes is: don’t reheat them! If you absolutely must separate them later—say, you only want to eat the cake part the next day—you can gently peel the frosting off the cooled cupcakes. Then, wrap the bare cake portions tightly in plastic wrap and warm them up for just 10 to 15 seconds in the microwave. Any longer, and they get chewy! Honestly, though, these cakes are so moist they are actually delicious eaten totally cold!
If you’re looking for ideas on how to freeze cupcakes or how to store filled ones, Taste of Home has some great tips for longer storage situations, though I prefer eating these right away!
Frequently Asked Questions About Buttercream Daisy Cupcakes
It’s only natural to have questions when you are taking on a decorative bake like this! I’ve tried to cover everything, but if you’re still wondering about your next batch of Buttercream Daisy Cupcakes, here are the things people ask me most often. Happy baking!
Can I make the buttercream ahead of time?
Yes, you absolutely can! The buttercream is actually pretty hardy. You can mix up the entire batch of frosting—white and yellow included—and store it in an airtight container in the fridge for up to a week. Just remember, you have to treat it like the cake: let it sit out on the counter to come back to room temperature for an hour or two before you try to pipe with it. If you try piping cold buttercream, it will fight you every second of the way, and you’ll get sad, lumpy daisies!
What makes these daisy cupcakes perfect for spring?
It’s all about the aesthetic, right? There isn’t a heavy winter flavor like chocolate or spice here; the base is a light vanilla that pairs perfectly with light, airy frosting. But visually, nothing screams fresh like a daisy in bloom! They immediately bring sunshine to the table. If you’re setting up a dessert bar, these work wonderfully alongside things like lemon bars or light fruit tarts. They are the quintessential choice when you need beautiful floral cupcakes for spring.
How do I make the yellow centers really pop?
You need two things for a pop: correct color and placement! First, make sure you are using a vibrant, good-quality gel color for that yellow. You want it to be almost neon yellow. Second, when you pipe the yellow center using your small round tip, make sure you aren’t shy! Pipe a nice, solid dome right in the middle of the white petals. Don’t flatten it down; you want that little bit of height so it looks like a real center. As I mentioned earlier, for the best results, you should stick to the full recipe, but if you need general dessert inspiration, check out my category page for all my favorite desserts!
Can I use store-bought cupcakes for this recipe?
Technically, yes, you could top store-bought vanilla cupcakes with my homemade buttercream frosting, but honestly, why would you? The recipe for the cupcake base is so easy and only takes about 20 minutes of active time. Using packaged cupcakes means you miss out on that perfect, tender crumb that mixes so beautifully with the rich, fresh vanilla buttercream. Stick with our recipe for the best results!
How long does this take if I skip the baking part?
If you skip the actual baking time (18–20 minutes) and use pre-baked cupcakes, you’re looking at about 25 minutes of active, focused work. Most of that time goes into making the buttercream and doing the actual piping. The creaming and mixing for the frosting takes about 10 minutes, and then you need another 10 to 15 minutes to carefully pipe all 12 daisies so they look pristine. Plus, you need to factor in the cooling time for the pre-baked cakes, which is usually 30 minutes on a rack before you can frost them without melting the icing!
Buttercream Daisy Cupcakes
Equipment
- Mixing Bowls
- Electric mixer
- Cupcake pan
- Piping bags
- Petal tip
- Round tip
Ingredients
For the Cupcakes
- 1 1/2 cups all-purpose flour
- 1 1/2 tsp baking powder
- 1/4 tsp salt
- 1/2 cup unsalted butter softened
- 3/4 cup sugar
- 2 eggs
- 2 tsp vanilla extract
- 1/2 cup whole milk
For the Buttercream
- 1 cup unsalted butter softened
- 3 1/2 cups powdered sugar
- 2 tbsp heavy cream
- 1 tsp vanilla
- 1 pinch salt
- As needed gel colors white and sunshine yellow
Instructions
- Preheat your oven to 350°F / 175°C.
- Whisk the flour, baking powder, and salt together.
- Cream the butter and sugar until the mixture is light and fluffy.
- Beat in the eggs and vanilla extract.
- Add the dry ingredients alternating with the milk until the batter is just smooth. Do not overmix.
- Fill 12 lined cupcake wells two-thirds full and bake for 18 to 20 minutes.
- Cool the cupcakes completely before frosting.
- Beat the buttercream ingredients until creamy. Add the powdered sugar gradually, then mix in the cream, vanilla, and salt.
- Tint most of the frosting white and tint a small amount yellow for the centers.
- Pipe white petals in a circle using a petal tip, then add yellow centers using a round tip to form the daisies.
- Place the finished cupcakes close together on a tray so the daisies look like a bouquet. Add parchment wrap around the tray for a flower-box appearance.