If you need a dessert that screams fun and seriously delivers on chocolate satisfaction, stop everything you’re doing! Layered desserts are my absolute weakness, especially when they’re this straightforward. We’re talking about the ultimate, easy-to-assemble Brownie Dirt Cake that impresses everyone.
I spent quite a bit of time testing the brownie base for this version, making absolutely sure it was fudgy enough but still sturdy enough to hold those creamy layers without collapsing into a mushy mess. Trust me, once you slice into this, the balance between the rich brownie and the creamy pudding is just *chef’s kiss*! It’s hands-down one of the best homemade desserts you can throw together.
Why This Brownie Dirt Cake is Your New Favorite Easy Treat
Honestly, sometimes you don’t want fussy baking; you just want a guaranteed crowd-pleaser that takes minimal effort. This recipe is exactly that! It’s so simple, it’s practically cheating, but the results look like you spent all day fussing over it. It’s perfect for last-minute parties or when you just need a serious chocolate fix without turning on the oven for a second time.
It hits all the right notes for what I look for in great easy desserts with few ingredients. Here’s why I keep coming back to this one:
- It’s almost entirely no-bake after that initial brownie step! This means less stress, less mess, and more time hanging out with your guests.
- It’s incredibly customizable. Swap out the cookies or use a different flavor pudding—it always turns out great, making it truly versatile among all my easy dessert ideas.
- The layers are so fun! Kids (and let’s be honest, adults too) lose their minds over the gummy worms looking like they are crawling out of the ‘dirt’. It’s pure joy on a plate.
- It’s built for sharing. You can make this in one big dish for a massive crowd, or divvy it into little cups if you’re feeling fancy. These truly are fantastic easy treats.
- The texture contrast is addictive: that slightly fudgy chew from the base meets the cool, silky pudding and the satisfying crunch of the cookies. Wow!
If you’re looking for simple desserts that taste amazing, this is where you start. No complicated techniques required!
Gathering Ingredients for Your Brownie Dirt Cake
Okay, the best part about this recipe being one of those super easy dessert ideas is the list of ingredients is relatively short! It’s shockingly impressive for how delicious this homemade dessert turns out. You want to make sure you have your cooled brownies ready before you start mixing, though. Trying to crush warm brownies just results in a sticky mess, trust me on that one!
Also, when you get to the pudding stage, pay close attention to the milk. The pudding mix needs that cold milk—and only that cold milk—to set up thick enough to support the next layer. We aren’t making soup here; we need it to be firm!
Ingredients for the Base and Layers of the Brownie Dirt Cake
These are the core building blocks for our fudgy, creamy masterpiece. Make sure you get that batch of chocolate brownies baked and completely cooled down before you start layering!
- One batch of chocolate brownies (Remember, cooled completely, cut to fit your 20×20 cm pan).
- Chocolate pudding mix (you’ll need 400g).
- Cold milk (750 ml total for the pudding).
- Whipped topping (about 300 ml).
- Oreo cookies (250g required, and they need a good crush!).
Decoration Ingredients for the Brownie Dirt Cake
This is the fun part that really sells the ‘dirt’ look! Keep these handy for when the chilling time is up.
- Gummy worms—the more colorful, the better!
Expert Tips for the Perfect Brownie Dirt Cake Layers
You know, when you’re making something this cool like a Brownie Dirt Cake, the assembly is almost as important as the ingredients themselves. Trust me, fiddling with the texture here is what separates a good dirt cake from a legendary one. We want that perfect contrast in every single bite, not just a pile of slightly squishy chocolate goo.
My biggest tip, which comes directly from testing this recipe over and over, is managing that brownie base. You need it totally cooled—and I mean cold from the fridge—because warm brownies steam up the pudding layer, making everything slide around. Cut or crumble those brownies into rough, bite-sized chunks before they go in. Even distribution is key!
Achieving the Right Pudding Consistency for Your Brownie Dirt Cake
When you whisk the pudding mix and milk, you really have to stick with it. I know your arm gets tired, but keep whisking until it’s genuinely thick. If you stop too soon, you’ll end up with sloppy pudding that soaks into the brownies too quickly. You can even check what other people suggest over at Pillsbury for general thickening tips, but for this, dedication is the secret weapon!
Once the pudding base is nice and firm, the next step is adding the whipped topping. This is where you have to switch gears! Don’t use the electric mixer here, please. You need to gently fold it in with a big rubber spatula. We are trying to keep all those lovely air bubbles in the topping. If you beat it in, you deflate it, and your creamy layer turns into a dense, heavy layer. We want airy silkiness between those rich brownie and cookie layers!
Best Practices for Layering the Brownie Dirt Cake
Creating clean layers is all about patience. After you put down your first layer of brownie crumbles, gently spoon on about half of your pudding mixture. Don’t dump it in the middle! Spread it carefully to the edges. If you press down, you’ll compress the brownie layer underneath, and we don’t want that compression.
When you add the crushed Oreo cookies, think about texture, not just color. I like to reserve a few chunky cookie pieces for the very top layer before I put the gummy worms in. This gives you that satisfying *crunch* right before you hit the chocolate pudding. For your final topping layer of cookie crumbs, sprinkle sparingly. Remember, the whole point of the Brownie Dirt Cake aesthetic is that the soil looks like, well, soil, not just one giant mound of crushed cookies!
Step-by-Step Instructions to Make Brownie Dirt Cake
Since this is one of those amazing dessert recipes that doesn’t require turning the oven on more than once, our instructions focus heavily on cooling and layering. Get your brownies baked and let them cool completely—I mean, really let them cool down, maybe even toss them in the fridge for 30 minutes just to be safe. That’s the key to this whole operation!
First things first: get that pudding going. Whisk your chocolate pudding mix together with the 750 ml of cold milk. You need to whisk until that mixture is nice and thick, like proper pudding, not runny stuff. Once it’s thick after about five minutes, gently fold in your whipped topping. Remember what I said about being gentle? We are building airiness here!
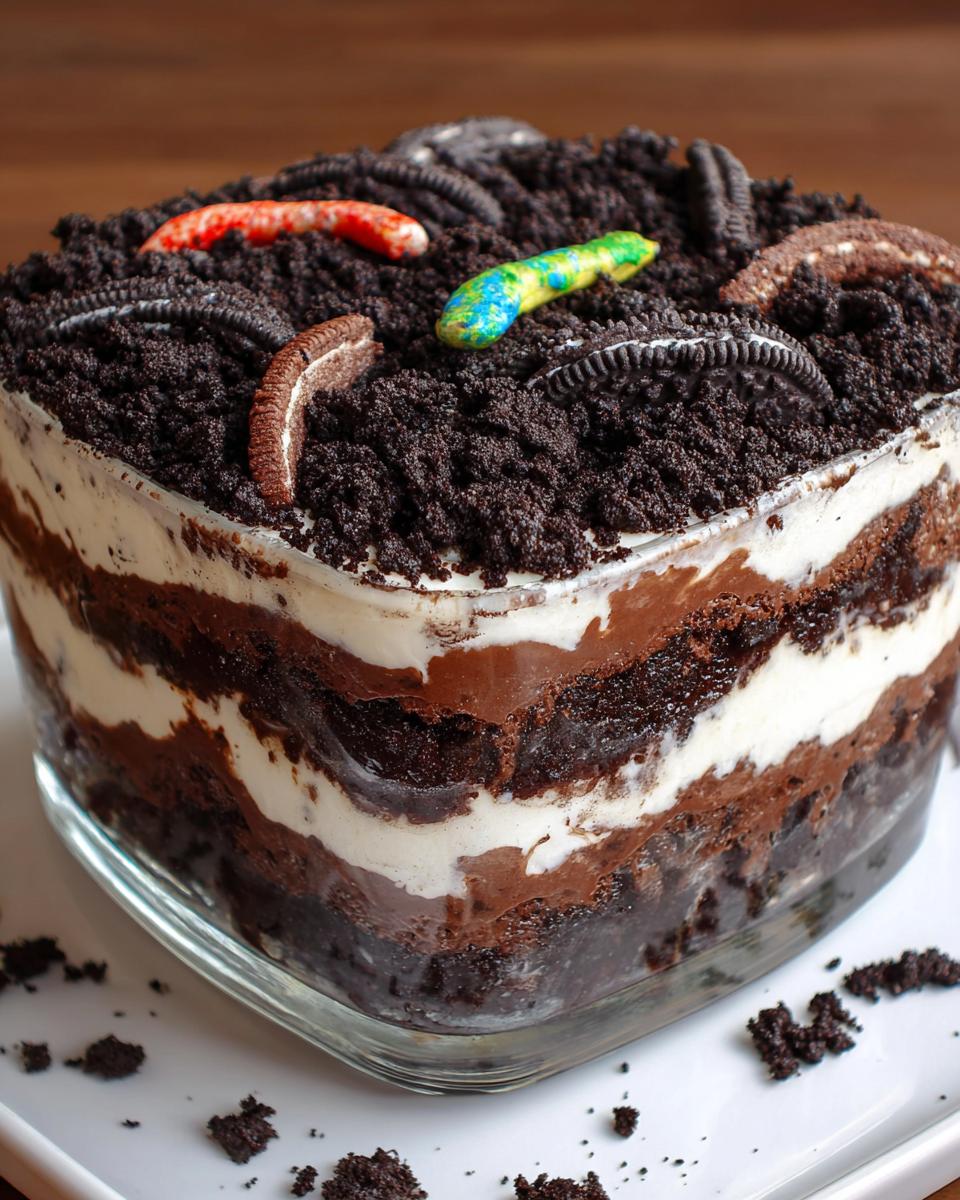
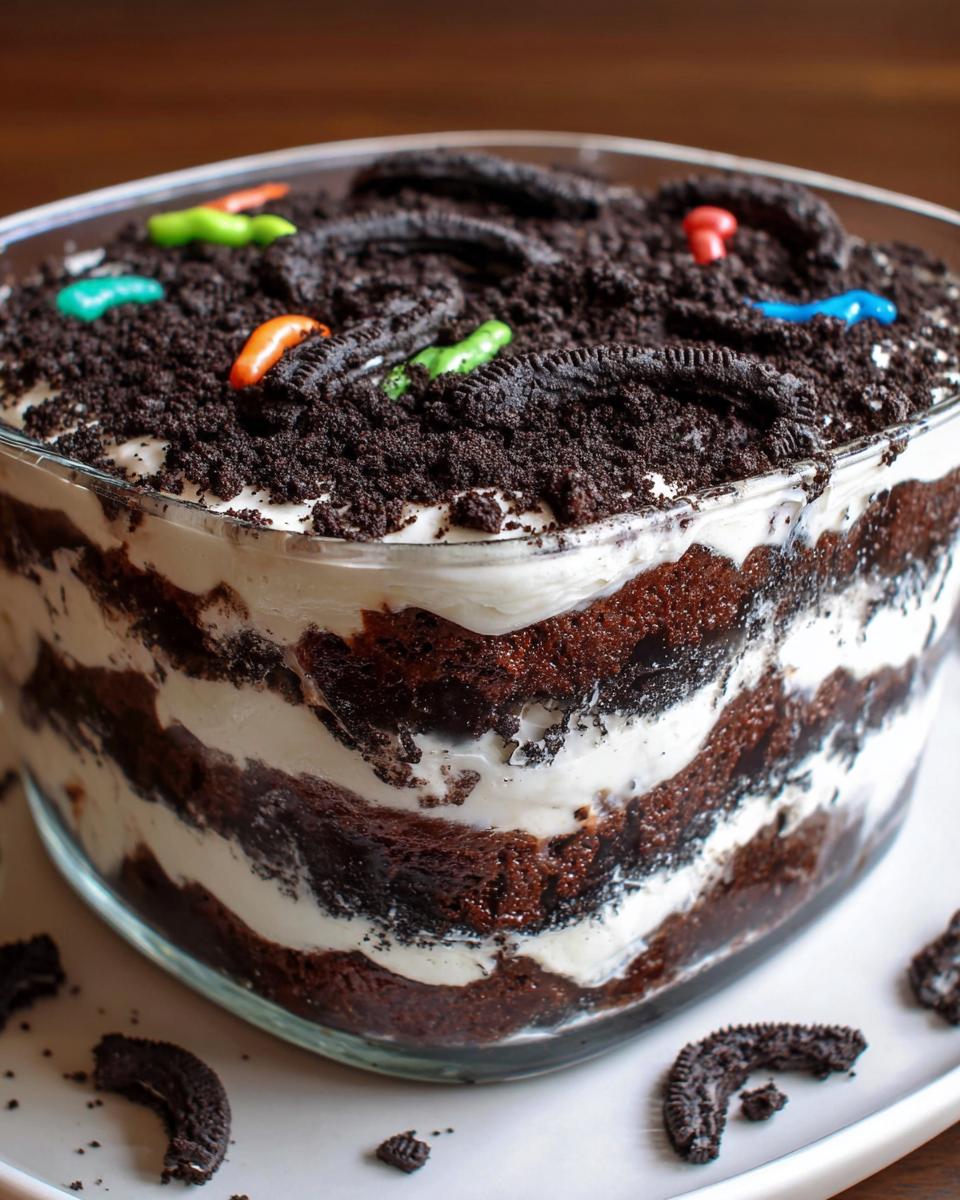
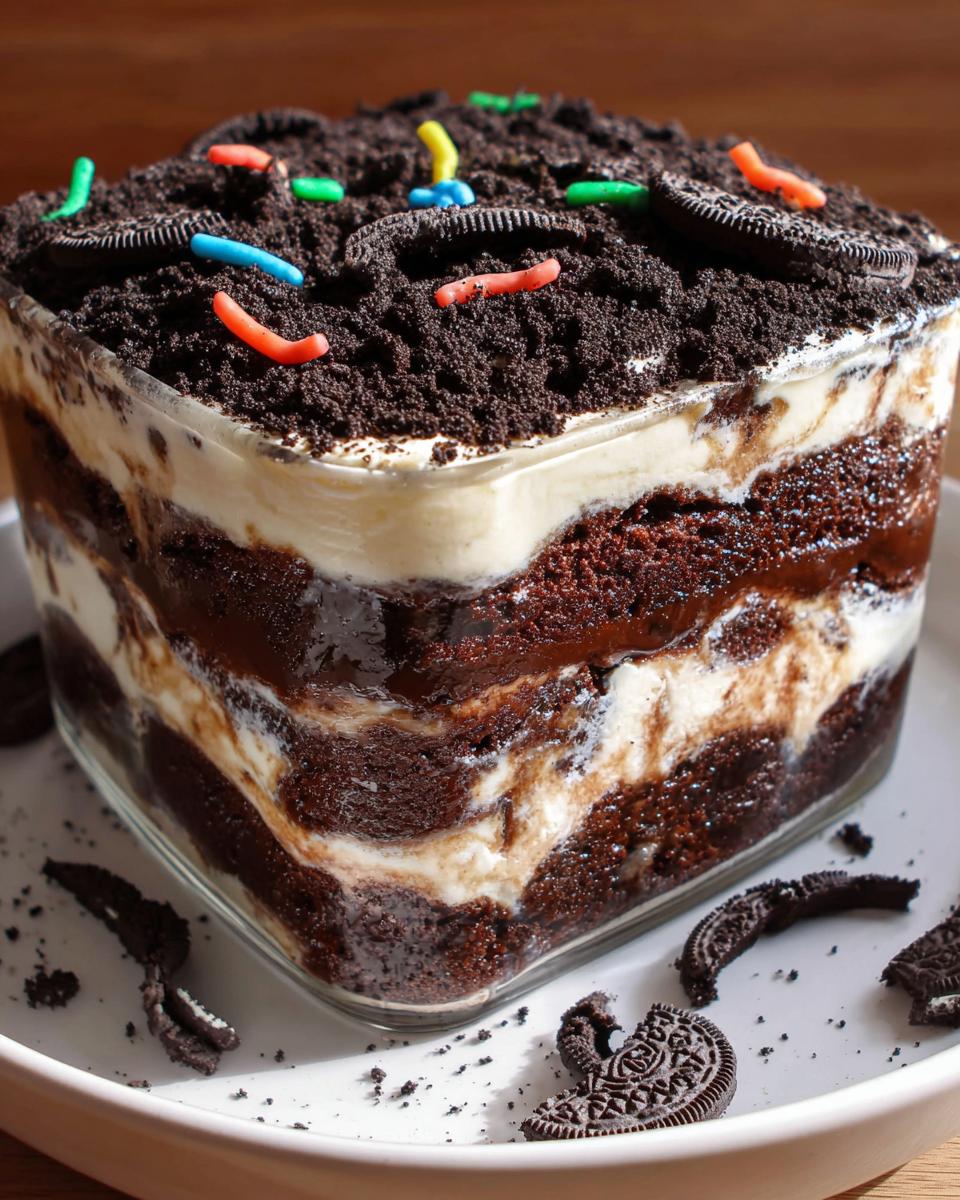
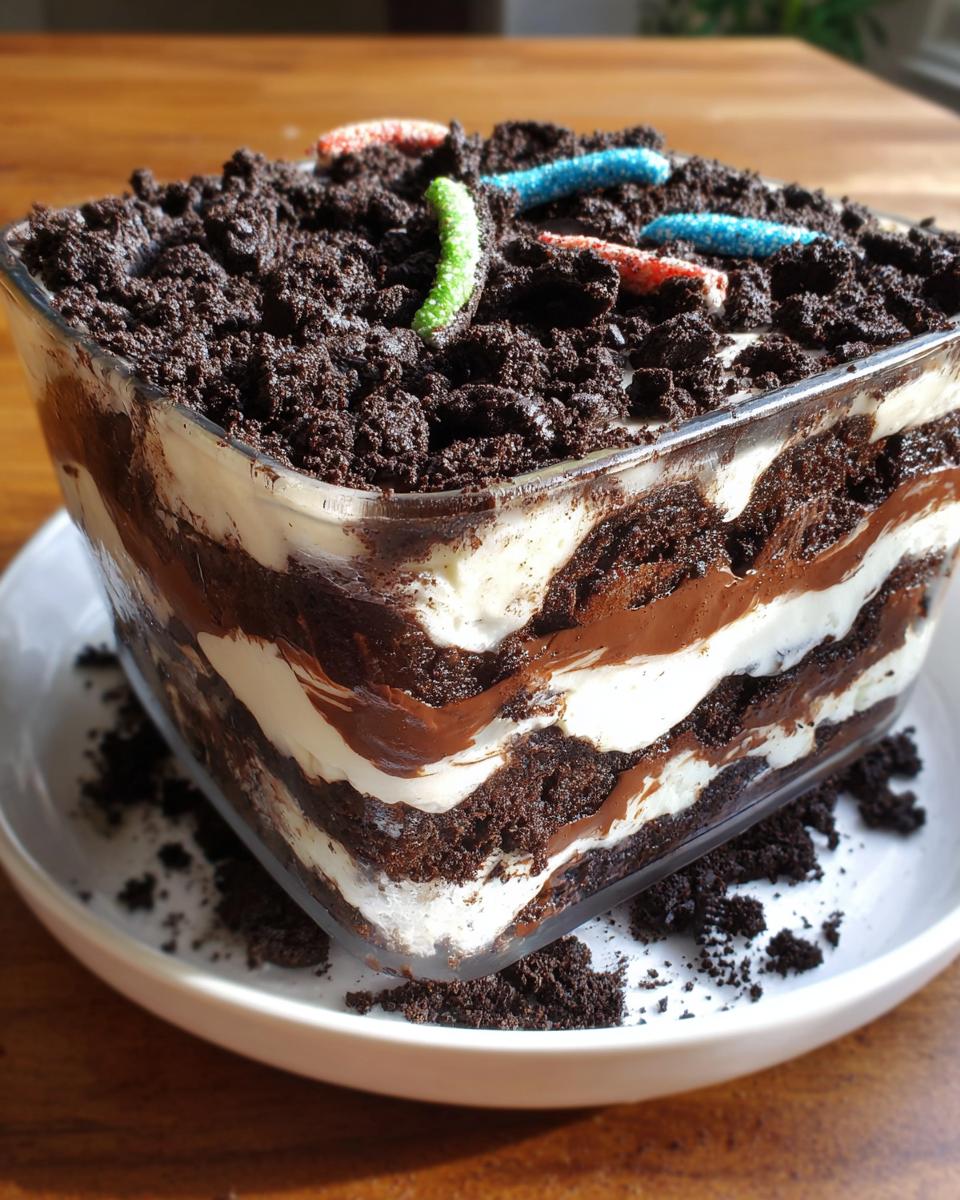
Now we assemble the glorious layers of our Brownie Dirt Cake. In your serving dish, crumble those cooled brownies right across the bottom. That’s Layer One. Then, smooth about half of your creamy pudding mixture right on top of that.
Next up, take those crushed Oreos and add a good, even layer over the pudding. Then, repeat everything! Brownies, then the rest of the pudding mixture, and finish it all off with the remaining cookie crumbs to make it look wonderfully messy and earthy!
Here comes the fun part: stick those gummy worms in the top layer of crumbs so they look like they are wiggling around! This whole dish needs to chill out in the refrigerator for at least 3 to 4 hours. Seriously, don’t skip the chilling time. This waiting period is essential for the layers to set up nice and firm before you attempt to slice and serve this magnificent treat.
Equipment Needed for This Brownie Dirt Cake Recipe
You don’t need a pastry chef’s entire arsenal for this Brownie Dirt Cake, which is part of why it’s such a fantastic choice when you’re whipping up easy desserts for a crowd. Most of what you need is probably already sitting in your cupboards waiting to be used. The key piece of equipment here is what you bake your brownies in, as that dictates the shape of your first layer!
Since we are layering, you definitely need a dish that has deep sides so all those fudgy, creamy, crunchy layers don’t spill out when you go to serve it. A square glass pan is my absolute favorite because you can see the definition between the layers when it’s perfectly chilled.
Here is the short list of tools I relied on when assembling this delicious dessert:
- The Brownie Container: You need a 20×20 cm baking pan for the initial brownie layer. Make sure you line it well so the brownies come out cleanly!
- The Serving Dish: Whatever casserole dish, trifle bowl, or large serving dish you have on hand will work, just make sure it’s sturdy enough once it’s loaded up with layers.
- The Whisk: You’ll need a good, sturdy whisk for incorporating the milk into the pudding mix until it really thickens up properly.
See? That’s it! No fancy offset spatulas or specialized ring molds. Just easy tools for one of the most impressive-looking, easy treats you can make.
Storage and Making Ahead Tips for Brownie Dirt Cake
One of the best things about this Brownie Dirt Cake is that it absolutely requires making ahead! You can’t rush perfection, especially when you are dealing with pudding and cookie crumbs. This isn’t like baking a quick cookie where you eat it warm from the oven; this dessert thrives on planning.
The absolute minimum chilling time I recommend is three hours. However, if you can let this sit in the fridge overnight, that’s even better! Why? Because while the pudding sets up beautifully firm, the moisture from the pudding and the fudgy brownie base starts to mingle slightly. The crumbs soften just enough to integrate with the pudding, making the whole thing feel cohesive rather than just stacked layers. It makes it so much easier to get a clean slice!
When properly stored in an airtight container—and you must keep it covered, or the top layer of cookie crumbs goes stale fast—your finished Brownie Dirt Cake will stay fantastic in the refrigerator for about three to four days. Just cover it tightly with plastic wrap or put the lid on your serving dish.
What about freezing? I’ve tried it, and honestly, I don’t love it. Freezing causes the whipped topping in the pudding layer to separate a bit when it thaws, and the fudgy brownies can get a little crumbly. While you *can* freeze individual layered portions wrapped tightly, I always advise making this recipe fresh, or at most, assemble it the day before you plan to serve it. It stays much nicer when chilled fresh!
Variations on the Classic Brownie Dirt Cake
When you find a winning formula like this Brownie Dirt Cake, the next fun thing to do is play around with it! Just because we have a fantastic recipe doesn’t mean we can’t experiment a little bit. This is where the true joy of homemade desserts comes in—you make it your own. These small tweaks can turn this into entirely new baking ideas without losing that satisfying, easy prep time.
I usually stick to the classic chocolate-on-chocolate, but I keep finding fun ways to switch things up when I’m making it for a non-chocolate lover, or maybe when I run out of Oreos and need an alternative!
Switch Up the Brownie Base
The easiest customization is changing what goes into the bottom layer. If you want something less rich, skip heating up the big pan for homemade brownies and just use a box mix! Or, if you’re feeling bold, grab some blondie mix instead of chocolate. Blondie Dirt Cake? Yes, please! That buttery, vanilla base against the dark chocolate pudding creates a really nice depth of flavor that I love.
You could also chop up some chocolate chip cookies or even those peanut butter sandwich cookies if you have someone in your family who absolutely *needs* peanut butter in everything. Just make sure that whatever you swap in is baked and cooled thoroughly.
Pudding Power Play
If you aren’t a huge fan of intense chocolate flavor, vanilla pudding is a wonderful substitute for the chocolate pudding mix. Vanilla pudding brightens up the whole dessert, and it makes the dark cookie “dirt” look even more dramatic layered next to it. It’s a great way to make this recipe feel lighter, even while keeping the fudgy brownie base!
Another idea that is just so fun for holidays? Use cheesecake-flavored pudding! That little bit of tangy cream cheese flavor running through the layers pairs unbelievably well with the crushed Oreos. It’s one of my favorite ways to elevate this simple dessert idea without adding any extra work.
Cookie Swap for Texture
While Oreos are the traditional dirt, you don’t need to be married to them! If you don’t have Oreos, or if you just want a different texture, think crunchy. Vanilla wafers work beautifully; they dissolve slightly into the pudding over time, creating a smoother, slightly cake-like lower layer. Or, if you want extra crunch, use shortbread cookies. They stay crisp a bit longer than the Oreos do, which is nice if you know the Brownie Dirt Cake is going to sit in the fridge for a couple of days before serving.
Frequently Asked Questions About Brownie Dirt Cake
I know you’re going to love making this Brownie Dirt Cake! Whenever I share super simple desserts, I always get asked a few common questions, so I wanted to save you the trouble and answer them right here. Getting these little details right makes all the difference between a good layered dessert and a truly great one.
Can I use pre-made brownies for this Brownie Dirt Cake?
Oh, absolutely! That’s really the beauty of this whole recipe being one of the best easy dessert ideas. If you don’t have time to bake a batch from scratch—and trust me, I’ve been there—just grab a box of your favorite fudgy brownie mix, bake it according to the package directions, and let it cool completely. The main thing is that texture. You want brownies that are dense and fudgy, not cakey. Cakey brownies tend to crumble apart too much when you try to layer them!
What is the best cookie to use besides Oreos for Easy Desserts?
That’s a fantastic question if you want to mix things up or you just don’t have Oreos hiding in the pantry! For truly simple desserts, you want a sandwich cookie that has a good crunch and a dark color to sell the “dirt” look. My top recommendation, besides just crushing up chocolate chip cookies (which works fine!), is using chocolate wafer cookies. They are very thin and crush down easily into fine crumbs. They blend beautifully with the chocolate pudding and don’t introduce any weird flavors or textures.
How far in advance can I assemble the Brownie Dirt Cake?
This is crucial for success! Because we are dealing with pudding and cookies, you really shouldn’t assemble this more than 24 hours ahead of time. If you wait longer than that, the cookie crumbs on the very top layer might start to absorb too much moisture from the air and lose that essential crunchy texture. My sweet spot for the absolute best flavor and structural integrity is assembling it around two hours after you bake the brownies, letting it chill for that mandatory 3–4 hours, or even chilling it overnight if you’re serving dessert the next day. Any more than 24 hours, and you risk a slightly soggy top, which ruins the fun of this layered treat!
Nutritional Estimates for Brownie Dirt Cake
Now, let’s talk nutrition, because while this Brownie Dirt Cake is certainly indulgent, I know some of you want the lowdown. I tested this recipe using standard store-bought items for the pudding and topping, but please know that exact numbers will change wildly depending on the brands you grab off the shelf and whether you used a super dark, fudgy brownie mix or a lighter cake mix for the base.
Because we are dealing with rich brownies, creamy pudding made with milk, and whipped topping, this is definitely a special-occasion dessert, not an everyday treat! When you calculate your own values based on what you put in, remember to account for the sugar in the cookies and the fat content from whatever brownie recipe you chose. Use whatever nutrition calculator works best for you, but just enjoy this one as the fantastic, fun dessert it is meant to be!
Share Your Brownie Dirt Cake Creations
I absolutely love seeing the fun you all have making my recipes! When you whip up this awesome Brownie Dirt Cake, please snap a picture of those wiggly gummy worms peeking out of the ‘dirt’! I want to see your layers and your serving dishes!
If you loved this recipe, please come back and leave a star rating below—it helps other cooks find these great easy treats. And if you have any burning questions or maybe a cool variation you tried that I haven’t dreamed up yet, please reach out through my contact page! Happy layering!
Nutritional Estimates for Brownie Dirt Cake
Now, let’s talk nutrition, because while this Brownie Dirt Cake is certainly indulgent, I know some of you want the lowdown. I tested this recipe using standard store-bought items for the pudding and topping, but please know that exact numbers will change wildly depending on the brands you grab off the shelf and whether you used a super dark, fudgy brownie mix or a lighter cake mix for the base.
Because we are dealing with rich brownies, creamy pudding made with milk, and whipped topping, this is definitely a special-occasion dessert, not an everyday treat! When you calculate your own values based on what you put in, remember to account for the sugar in the cookies and the fat content from whatever brownie recipe you chose. Use whatever nutrition calculator works best for you, but just enjoy this one as the fantastic, fun dessert it is meant to be!
I absolutely love seeing the fun you all have making my recipes! When you whip up this awesome Brownie Dirt Cake, please snap a picture of those wiggly gummy worms peeking out of the ‘dirt’! I want to see your layers and your serving dishes!
If you loved this recipe, please come back and leave a star rating below—it helps other cooks find these great easy treats. And if you have any burning questions or maybe a cool variation you tried that I haven’t dreamed up yet, please reach out through my contact page! Happy layering!

Brownie Dirt Cake
Equipment
- 20×20 cm baking pan
- Serving dish
- Whisk
Ingredients
For the Base and Layers
- 1 batch Chocolate brownies Baked and cooled (20×20 cm pan)
- 400 g Chocolate pudding mix Prepared according to package directions using milk
- 750 ml Cold milk For pudding
- 300 ml Whipped topping
- 250 g Oreo cookies Crushed
For Decoration
- Gummy worms
Instructions
- Prepare the brownies in a 20×20 cm pan and allow them to cool completely.
- Whisk the chocolate pudding mix with the cold milk until the mixture becomes thick.
- Gently fold the whipped topping into the thickened pudding mixture.
- Crumble the cooled brownies into pieces and place them as the first layer in your serving dish.
- Add a layer of the pudding mixture over the brownies, followed by a layer of crushed Oreo cookies.
- Repeat the layers (brownie, pudding, cookie crumbs) until all ingredients are used, finishing the top layer with cookie crumbs to resemble dirt.
- Decorate the top layer with gummy worms. Chill the cake for 3 to 4 hours before slicing and serving.