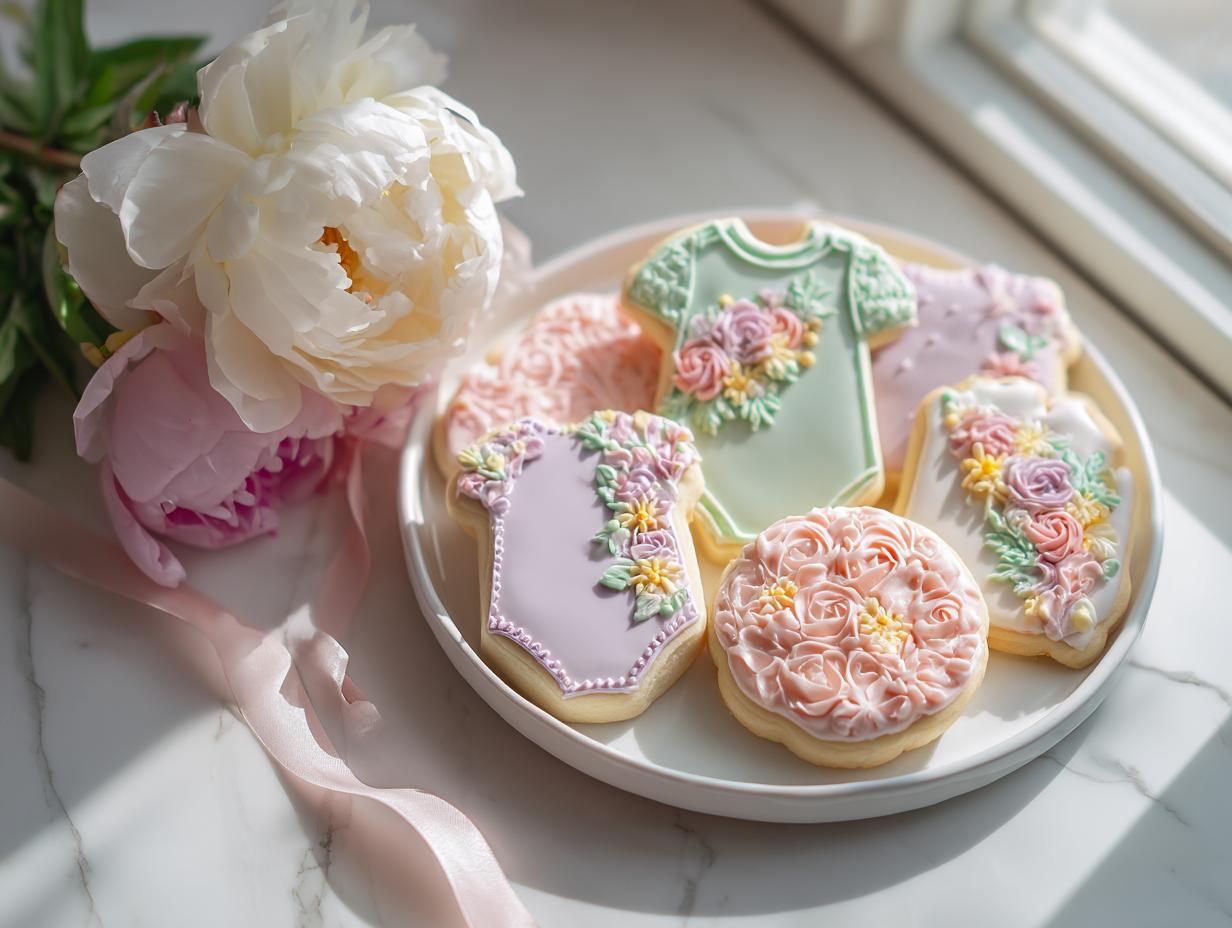
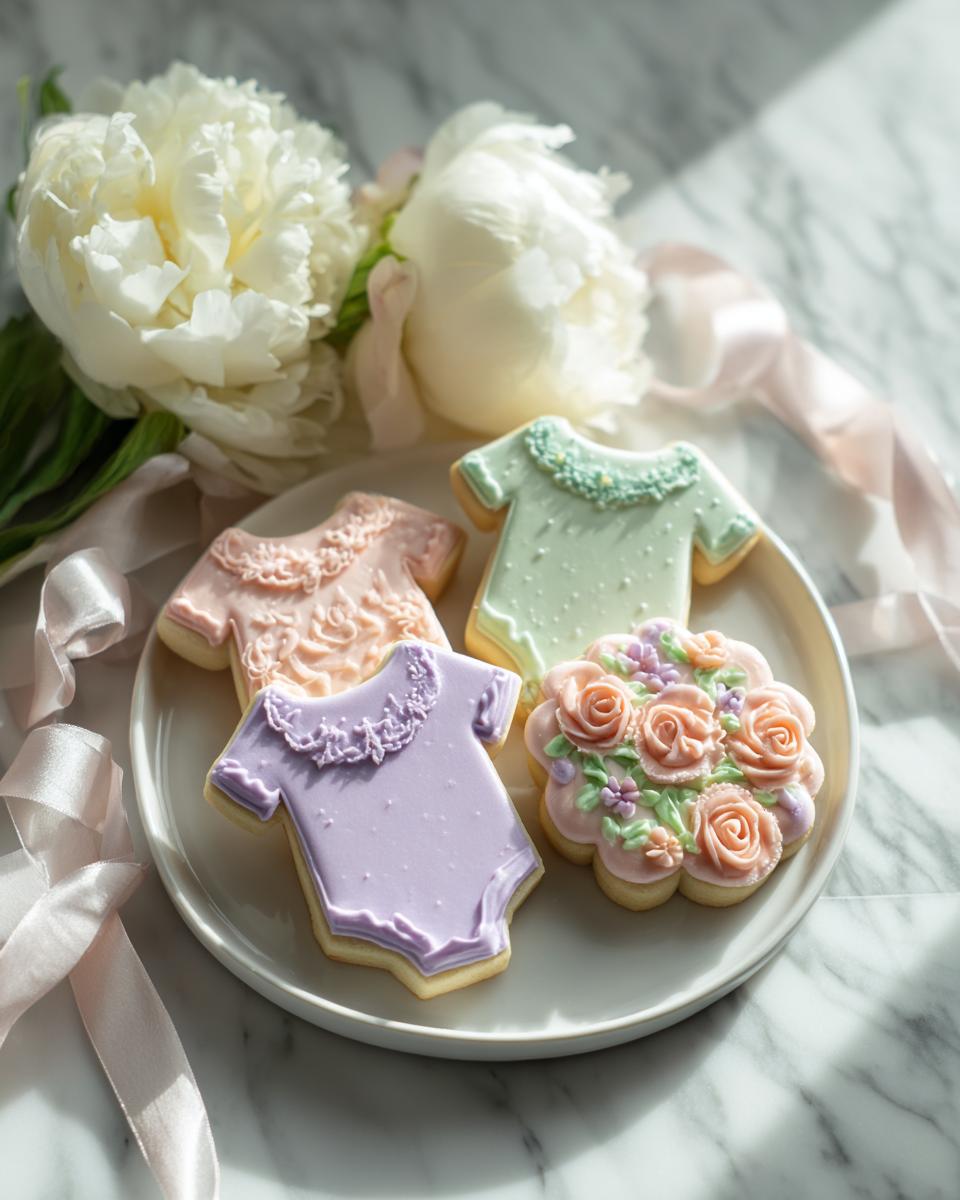
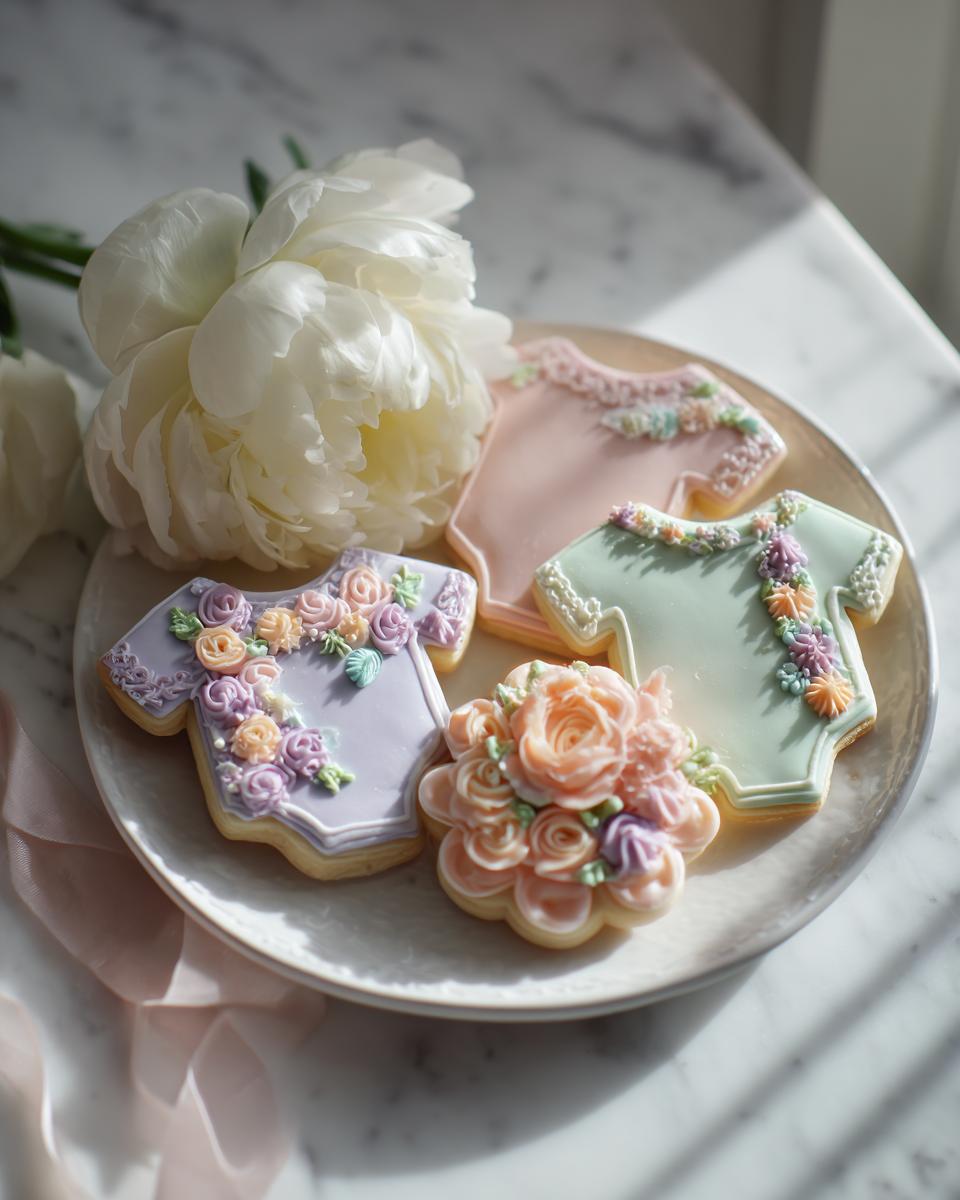
There’s just something so special about a cookie that looks like a little piece of art, isn’t there? When you’re planning something as sweet as a shower for a new little one, you want the baby shower desserts to look just as gorgeous as the decorations.
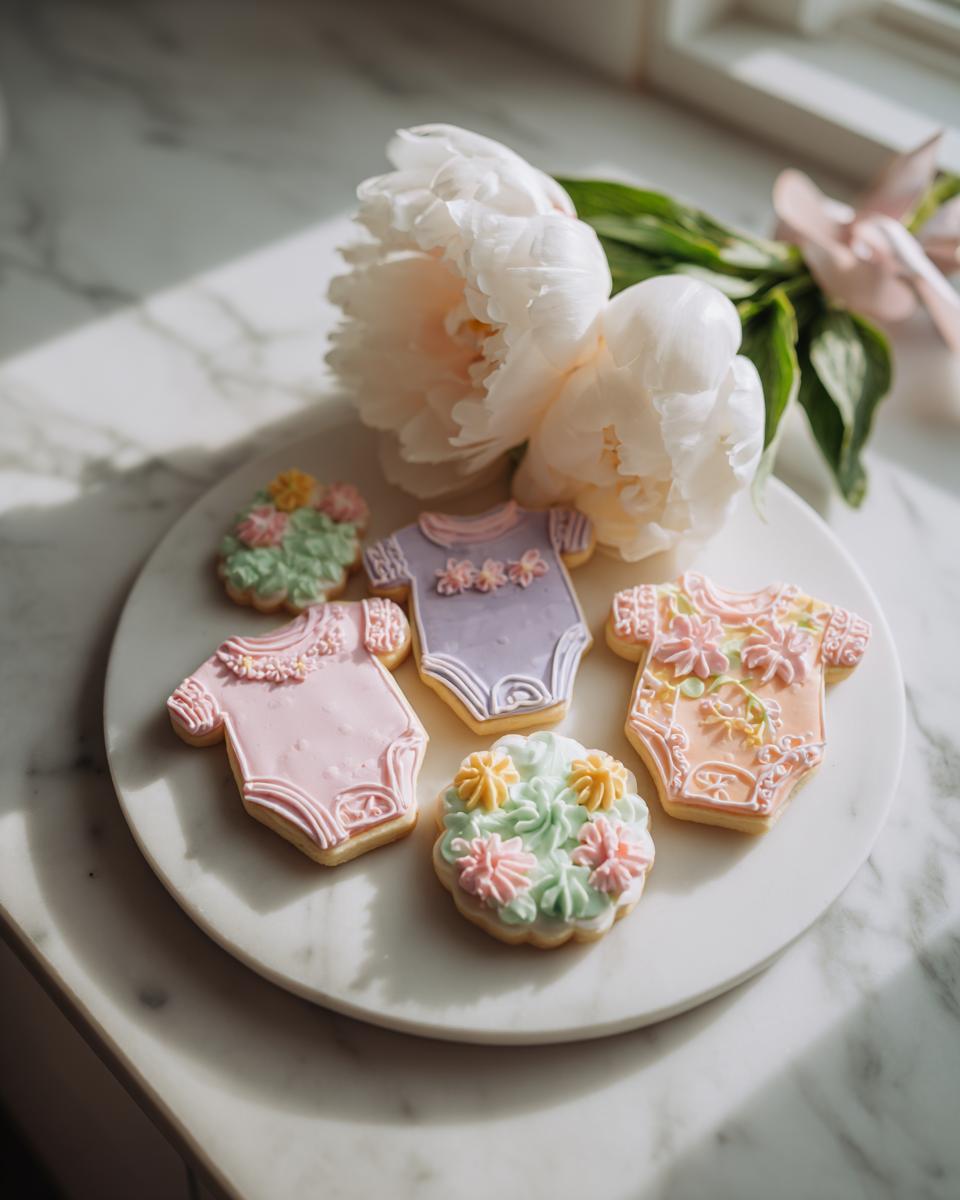
I developed these Baby in Bloom Sugar Cookies for my sister’s baby shower last spring, wanting to create something that felt as fresh and beautiful as the season itself. I aimed for that perfect bakery-quality cookie that holds up beautifully to detailed decorating, without sacrificing that classic vanilla-almond flavor.
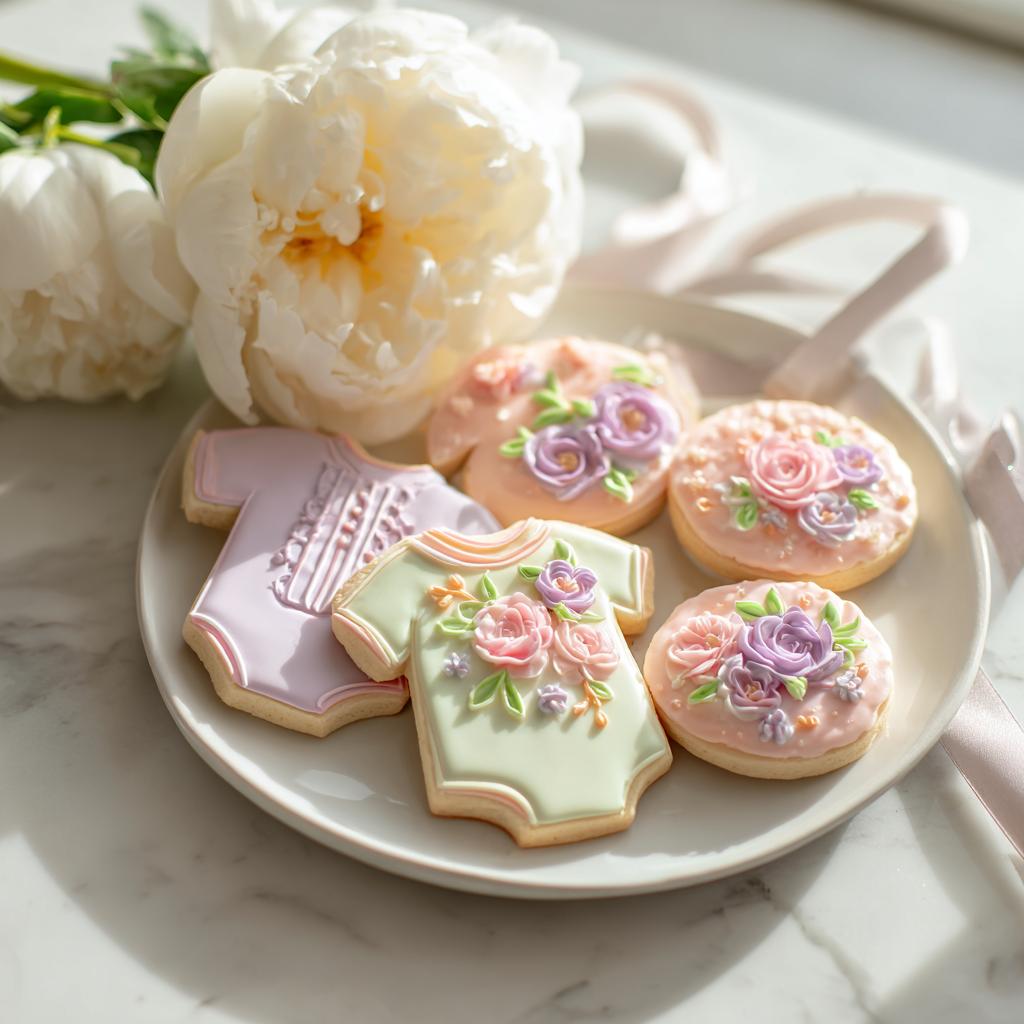
The combination of soft pastels, delicate floral piping, and flavor made these the centerpiece of the dessert table, and guests couldn’t stop photographing them before taking a bite. Since then, I’ve made them for countless showers, each time customizing the colors and designs, but sticking to this base recipe because it’s just so reliable for creating stunning decorated baby cookies.
Why You Will Love These Baby in Bloom Sugar Cookies
Honestly, these are the only decorated baby cookies you’ll ever need for a shower. They tick every single box an expert baker (or a very ambitious first-timer!) could ask for. They aren’t one of those finicky recipes that crumble apart when you look at them wrong.
- They bake up sturdy! These are perfect cut-out cookies that don’t spread, ensuring your intricate floral baby cookies keep their beautiful shape.
- The flavor profile is just dreamy—that warm vanilla perfectly balanced with a hint of almond extract. Everyone asks for the recipe!
- They create stunning baby shower sugar cookies that look like they came straight from a professional bakery, making you look like a decorating genius.
- Two hours of chilling time ensures your dough is firm, which is critical if you plan on using detailed cookie cutters. You absolutely must chill them, trust me!
- The royal icing recipe takes color beautifully, allowing you to achieve those perfect, soft pastel shades ideal for a ‘Baby in Bloom’ theme.
- They are fantastic for practicing decorating! You can start with simple floods and then move on to those tiny, delicate piping details when you feel brave.
Once dried, these truly become the show-stopping baby shower desserts everyone remembers.
Essential Equipment for Perfect Baby in Bloom Sugar Cookies
Okay, listen up, this is the part where getting prepared makes you look like a total pro. You don’t need a million fancy gadgets, but a few things are absolute must-haves if you want these baby shower sugar cookies to keep their perfect shape.
You’ll definitely need a medium bowl for the dry stuff and a good big one for creaming that butter. Grab your baking sheets and line them with parchment paper—don’t skip the paper, it saves so much cleanup!
Most importantly, make sure you have your cookie cutters ready! You need a mix of baby shapes and pretty ones, like those little roses or daisies. And for the decorating, piping bags and small round tips are what you’ll use for that fine work.
Ingredients for Your Baby in Bloom Sugar Cookies Dough
Getting the ingredients right here is 90% of the battle when you’re aiming for those perfect, no-spread sugar cookies. Don’t try to eyeball the flour or use cold butter—that’s how you end up with sad, puffy oatmeal cookies instead of crisp Baby in Bloom Sugar Cookies. We are focusing on precision up front so the decorating step is a breeze later!
Cookie Dough Ingredients
- You absolutely need 3 cups of all-purpose flour. Make sure it’s spooned into the measuring cup and leveled off, don’t just scoop!
- One teaspoon of baking powder and half a teaspoon of salt help give them just enough lift.
- You must use 1 cup of unsalted butter, and it has to be properly softened, not melted.
- One cup of plain white granulated sugar goes in to cream with that butter.
- One large egg provides body.
- For that signature flavor? Two teaspoons of vanilla extract and that tiny bit of secret weapon, half a teaspoon of almond extract. That’s what makes these special!
Royal Icing Ingredients for Decorated Baby Cookies
This is the stuff that makes these cookies look like professional baby shower desserts. You need three cups of sifted powdered sugar.
Next up, three tablespoons of meringue powder—this stabilizes everything so it dries rock hard. The water measurement is key: start with 5 tablespoons, but you’ll adjust it depending on if you are outlining or flooding the base layer of your floral baby cookies.
Don’t forget your gel food coloring for those lovely pastels, and if you want that extra wow factor, grab the edible gold luster dust for accents.
Step-by-Step Instructions for Making Baby in Bloom Sugar Cookies
This is where the magic really happens! Don’t rush these steps, especially the chilling part—it’s the secret weapon for keeping those little ones sharp and beautiful. I always put on my favorite playlist when I start this part because it takes a little focused time to shine.
Preparing and Chilling the Baby in Bloom Sugar Cookies Dough
First things first, let’s get organized. Whisk together your flour, baking powder, and salt in a medium bowl. Set that dry mixture aside for a minute.
Now move to your large bowl for the wet ingredients. Cream together that softened butter and the sugar until it’s genuinely light and fluffy—it takes a good three or four minutes if you’re using a hand mixer, but don’t skimp! Beat in your egg, vanilla, and that splash of almond extract until everything looks happy and combined.
Add the dry stuff to the wet stuff in stages, keeping the speed on low so you don’t make a flour cloud. Once it’s just combined, stop! Divide that dough into two flat disks, wrap them up tight in plastic wrap, and make sure they hit the fridge for at least 2 hours. Over the counter, I always just leave them overnight; that solid chill is why you get perfect Baby in Bloom Sugar Cookies instead of flat puddles.
Rolling, Cutting, and Baking the Cookies
When you’re ready to bake, preheat your oven to 350°F. You want your dough rolled out evenly to about 1/4-inch thick on a lightly floured surface. This thickness is crucial for a cookie that’s soft inside but sturdy enough to decorate.
Grab those baby-themed and flower cookie cutters. Start placing your shapes about two inches apart on baking sheets lined with parchment paper. They bake fast! You’re looking for just 9 to 11 minutes—watch for the edges to turn the faintest shade of gold. Let them sit on the hot pan for about 5 minutes before carefully transferring them to a wire rack to cool completely. You need them totally cool before icing!
Mixing and Coloring the Royal Icing
Royal icing is fussy but worth it! Beat your powdered sugar and meringue powder together first. Then, add water slowly, teaspoon by teaspoon. You need two stages here, so start with 5 tablespoons total.
For outlining, you want a stiff consistency—it should hold a peak when you pull the whisk up. For flooding the middle of your floral baby cookies, you’ll thin a separate batch down until it flows easily off a spoon.
Divide your icing into bowls and use those gel colors—they are better than liquid! Mix up your pale pinks, mints, and lavenders for that perfect ‘Baby in Bloom’ palette.
Decorating Your Floral Baby Cookies
Take your stiff icing and pipe a nice, neat border around the entire cookie. Now, carefully use your thinned flood icing to fill that outline right in. It should settle itself perfectly smooth. Resist the urge to rush this! You need that base coat to dry completely—I usually leave them sit for 4 to 6 hours, or often overnight if I’m doing a huge batch.
Once that base is rock solid, you can go back in with more stiff icing and your smaller tips to pipe those tiny, pretty details—the little green stems, the petals on the flowers, or a sweet name. If you’re feeling fancy, mix that gold luster dust with a drop of vodka or lemon extract and use a clean, dry brush to paint tiny gold accents onto your decorated baby cookies. Let everything set before you put them anywhere near a storage container!
Tips for Perfect Baby in Bloom Sugar Cookies Every Time
Listen, even with the best recipe, sometimes things go a little sideways, especially when you’re dealing with icing that needs to behave! These tips are the ones I picked up over years of making baby shower sugar cookies so they look incredible right out of the box. Don’t let a little hiccup stress you out; we can fix almost anything.
First big one: Dough Temperature. If your dough is too warm when you cut the shapes, they’ll spread into little puddles in the oven, losing all that hard work you did with the cookie cutters. If you notice they start looking a little puffy or soft around the edges right out of the oven? Put the second batch of dough back in the freezer for 15 minutes before rolling. That chilling time is non-negotiable!
Next secret is icing consistency. If your flood icing is too thin, it runs right over your outline and melts into one big mess—ruining those perfect little floral baby cookies. If the flood icing breaks when you try to smooth it (like dragging a scribe tool through it leaves a channel that doesn’t fill back in), you need to add just a few drops more water. It should flow like thick honey, not like tap water.
Also, remember that royal icing dries hard, so if a section doesn’t seem dry enough after 6 hours, DO NOT try to pipe on top of it. You’ll just push right through it. Wait longer! If the cookie edges get too brown during baking, next time check on them around the 8-minute mark. For these delicate, light cookies, we want zero browning.
Finally, to keep the color bright on your decorated baby cookies, try to use clear vanilla extract instead of standard brown vanilla in your dough. It doesn’t change the flavor much, but it keeps that beautiful dough color pale so your pastel icing really pops!
Storing Your Beautiful Baby Shower Desserts
Alright, you’ve survived the decorating marathon, and your Baby in Bloom Sugar Cookies look absolutely magazine-worthy! The last thing you want is for all that hard work to get soggy or for the icing to get sticky before the party even starts. Don’t worry, storing these beauties is surprisingly simple, but you do have to respect the royal icing!
First and foremost, they absolutely must be completely, 100% dry. I mean rock hard. If you try to stack them while they are even slightly tacky, they will glue themselves together instantly, and you’ll pull off a beautiful flower detail right along with the cookie underneath. Seriously, wait until the next day if you have to!
Once fully set, you want an airtight environment, but you need to be careful about stacking. If you have lots of different shapes, use parchment paper or wax paper layers between each tier of cookies. This stops the delicate icing work on your floral baby cookies from smudging onto the treats above them.
I always use large, flat storage containers—the kind with a good seal. Keep them in a cool, dry place. A pantry or a closed cabinet is perfect. If it’s super humid where you live, I sometimes put a single slice of plain white bread in the container with the cookies. Weird, right? But the bread absorbs any extra moisture, keeping the cookies crisp!
If you’ve made these Baby in Bloom Sugar Cookies ahead of time for your baby shower, they will honestly stay gorgeous and taste perfect for about a week, sometimes even ten days if they are sealed up really well. If you need them longer, you can freeze them! Just make sure they are wrapped tightly in plastic wrap first before putting them in the freezer. When you defrost them, let them come to room temperature *before* unwrapping them so condensation doesn’t form on the icing. Trust me on that one—condensation is icing death!
Frequently Asked Questions About Baby in Bloom Sugar Cookies
It’s totally normal to have questions when you’re tackling detailed decorating! I’ve put together the questions I get asked most often from bakers preparing for major celebrations like baby showers. Don’t hesitate to ask if you have another concern; we’re all learning together!
Can I use a different frosting instead of royal icing?
You absolutely can, but you run into a trade-off, which is a bummer because royal icing is what makes these baby shower sugar cookies so professional-looking. Royal icing dries completely hard, which means you can stack them, transport them easily, and paint on details without everything smearing.
If you use a simple glaze or a standard American buttercream sugar cookies frosting, they will stay soft, which is nice for eating, but they will also stay tacky. That means you can’t stack them, and any detailed piping will likely smudge if you move them too much. For really delicate decorated baby cookies, I stick to the royal icing for structure, but for a simple look, a thicker buttercream works if you have a shorter timeline!
How far in advance can I make these decorated baby cookies?
This is the key to party planning sanity! You can actually break this down into three stages, and it takes all the pressure off the night before the shower. For the dough: that can be made up to 3 days ahead. Just wrap those disks tight and keep them cold.
For the baking part: Once they’re baked and completely cool (no icing yet!), the plain sugar cookies freeze fantastic for up to 2 months. If you are short on time, bake them 2 days before the event and store them in an airtight container.
For the decorating: Since the royal icing needs ample time to dry, I like to decorate mine about 24 hours before the party. This gives that final layer of detail plenty of time to set properly. If you plan well, you only have to worry about setting out the platter the morning of. It makes a huge difference!
Why are my cookies spreading while baking?
Oh, the dreaded cookie spread! It instantly ruins that crisp edge we worked so hard to achieve when cutting the dough. Nine times out of ten, it’s dough temperature or flour measurement. If the dough isn’t cold enough when it hits the 350°F heat, the butter melts out before the structure can set, causing everything to puff outward.
Seriously check your dough temperature, but if that’s fine, check your flour. Are you scooping the flour straight from the bag with the measuring cup? If you are, you are packing way too much flour in there! Try the spoon-and-level method, or better yet, use a kitchen scale because that’s the gold standard for these kinds of Baby in Bloom Sugar Cookies. Too much flour usually makes them dry, but if you’re using a butter substitute or a low-quality butter, that can also encourage spreading. Stick to the full cup of cold butter!
Estimated Nutritional Data for Baby in Bloom Sugar Cookies
I put together this little chart using the standard measurements we used, but I want to be super honest: this is just an estimate, okay? When we make these gorgeous Baby in Bloom Sugar Cookies, we aren’t worried about counting calories—we’re worried about how cute the tiny gold luster dust swirls look!
The finished cookies, especially with that rich royal icing we used for the decorations, might vary slightly depending on how thick you flood them or if you add an extra layer of piping detail. Please know this is just a rough guide for those of you who like to keep track.
- Calories: About 250 per cookie
- Total Fat: Around 10 grams (and 6g of that is saturated fat, thank you butter!)
- Carbohydrates: Roughly 40 grams
- Protein: Expect about 3 grams
- Sugar: This is where the fun is—about 25 grams, mostly from the icing!
These are meant for celebrations, not daily snacks, so enjoy the artistry! If you use a different type of butter or swap in a different sweetener, your numbers will shift. It’s all part of the fun of creating your own perfect holiday baby shower sugar cookies!
Share Your Beautiful Baby in Bloom Sugar Cookies Creations
Well, you did it! You’ve pulled off some stunning Baby in Bloom Sugar Cookies, and I would honestly just love to see the amazing art you created. When I finish a batch of these detailed decorated baby cookies, I immediately want to show them off, and I know you feel the same way!
Your little floral creations are perfect baby shower desserts, and the world needs to see them! Did you use peach and mint for your color scheme, or did you go classic pink and blue for a surprise reveal?
Please, don’t be shy! Head down below and leave a comment telling me if the almond extract knocked your socks off, and whether your chilling time stuck to the required 2 hours or if you went overnight like I usually do. Sharing tips and tricks helps everyone else nail their next batch of baby shower sugar cookies.
If you snapped a picture of your beautiful work, take it over to social media and tag me! Seeing your perfectly piped flowers and sharp little cookie shapes makes my day every single time. Happy baking, and sending all my love to the new little bloom joining your family!
Baby in Bloom Sugar Cookies
Equipment
- Medium bowl
- Large bowl
- Baking sheets
- Parchment paper
- Wire Rack
- Cookie cutters (baby-themed and flower shapes)
- Piping bags
- Small round tips
Ingredients
For the Cookies
- 3 cups all-purpose flour
- 1 teaspoon baking powder
- 1/2 teaspoon salt
- 1 cup unsalted butter, softened
- 1 cup granulated sugar
- 1 large egg
- 2 teaspoons vanilla extract
- 1/2 teaspoon almond extract
For the Royal Icing
- 3 cups powdered sugar
- 3 tablespoons meringue powder
- 5 tablespoons water Use 5-6 tablespoons total, adjust for consistency
- 1 package Gel food coloring (pastel pink, lavender, mint green, peach)
- 1 package Edible gold luster dust Optional
Instructions
- Whisk together flour, baking powder, and salt in a medium bowl. Set the dry mixture aside.
- In a large bowl, cream the butter and granulated sugar until the mixture is light and fluffy, which takes about 3 to 4 minutes. Add the egg, vanilla extract, and almond extract. Mix until these wet ingredients are combined.
- Add the dry ingredients to the wet ingredients gradually, mixing on low speed until everything is just combined. Divide the dough into two disks, wrap each disk in plastic wrap, and refrigerate for a minimum of 2 hours or overnight.
- Preheat your oven to 350°F. Roll out the dough on a floured surface until it is 1/4-inch thick. Cut out cookies using baby-themed and flower cookie cutters, such as onesies, bottles, daisies, or roses.
- Place the cut cookies 2 inches apart on baking sheets lined with parchment paper. Bake for 9 to 11 minutes, or until the edges are barely golden. Let the cookies cool on the baking sheet for 5 minutes before moving them to a wire rack to cool completely.
- Make the royal icing by beating the powdered sugar and meringue powder together. Add water one tablespoon at a time until you reach the desired consistency; use a stiff consistency for outlining and a thinner consistency for flooding.
- Divide the icing into separate bowls and tint them with gel food coloring in soft pastel shades. Fill piping bags fitted with small round tips.
- Outline each cookie using the stiff icing, then flood the center with the thinned icing. Let the base layer dry for 4 to 6 hours or overnight.
- Once the base layer is dry, pipe delicate floral designs, baby details, and other decorative elements using contrasting pastel colors.
- For a final touch, brush dried flowers or accents with edible gold luster dust mixed with a drop of vodka or lemon extract. Allow all decorations to set completely before you serve or package the cookies.