
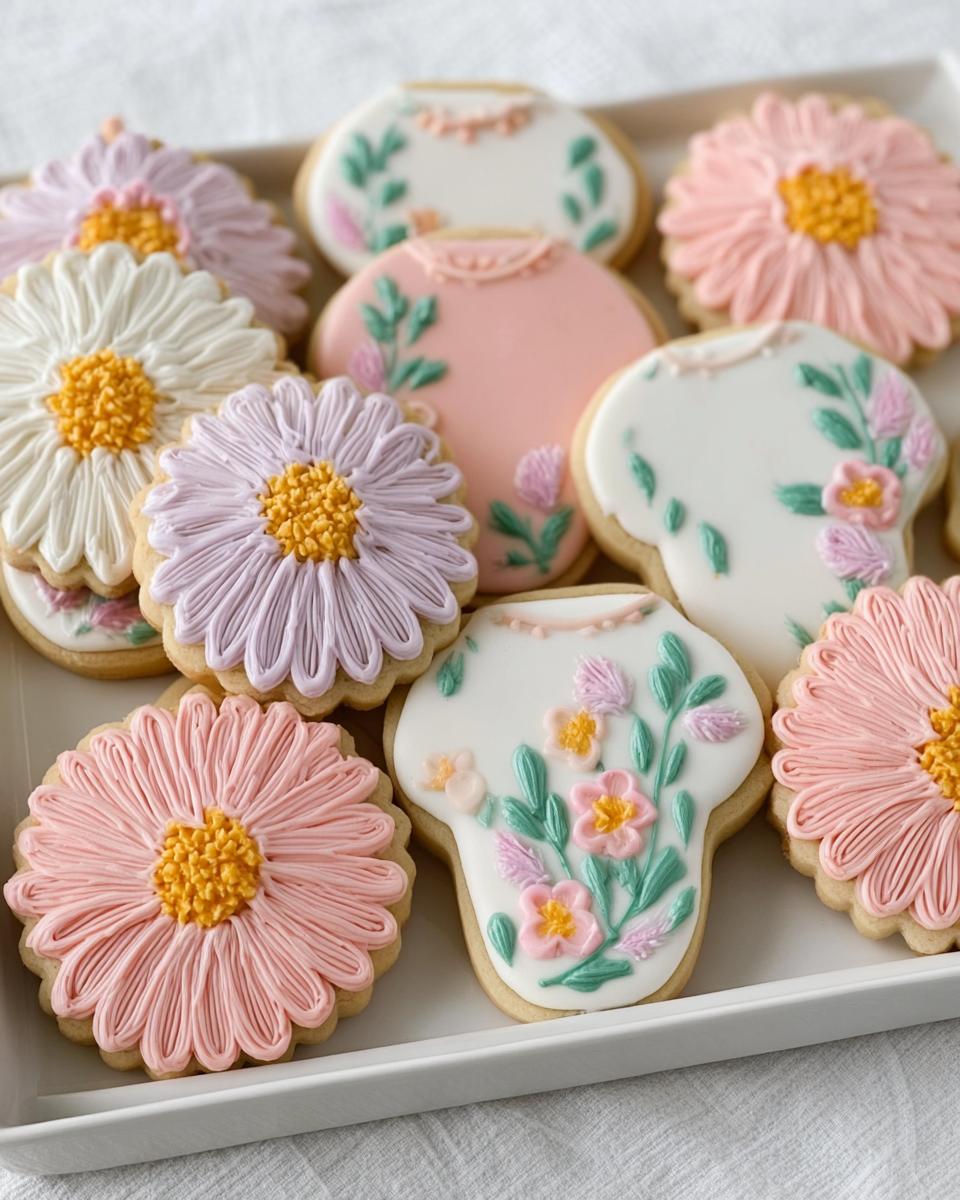
If you’re planning a baby shower or just adore making things look absolutely precious, you need these cookies in your life! Honestly, there is nothing sweeter than setting out plates piled high with perfectly decorated treats. These Baby in Bloom Royal Icing Cookies are my absolute go-to when I need something elegant and delicate. The floral icing adds such a refined touch to every single cookie. They look like they belong in a fancy bakery display, but trust me, they are totally doable right in your kitchen. They truly steal the show!
Why You Will Love These Baby in Bloom Royal Icing Cookies
When you’re hosting an event, you want desserts that look stunning but don’t require a week of work, right? These are the perfect compromise. Here’s why they fly off the plate every single time I make them:
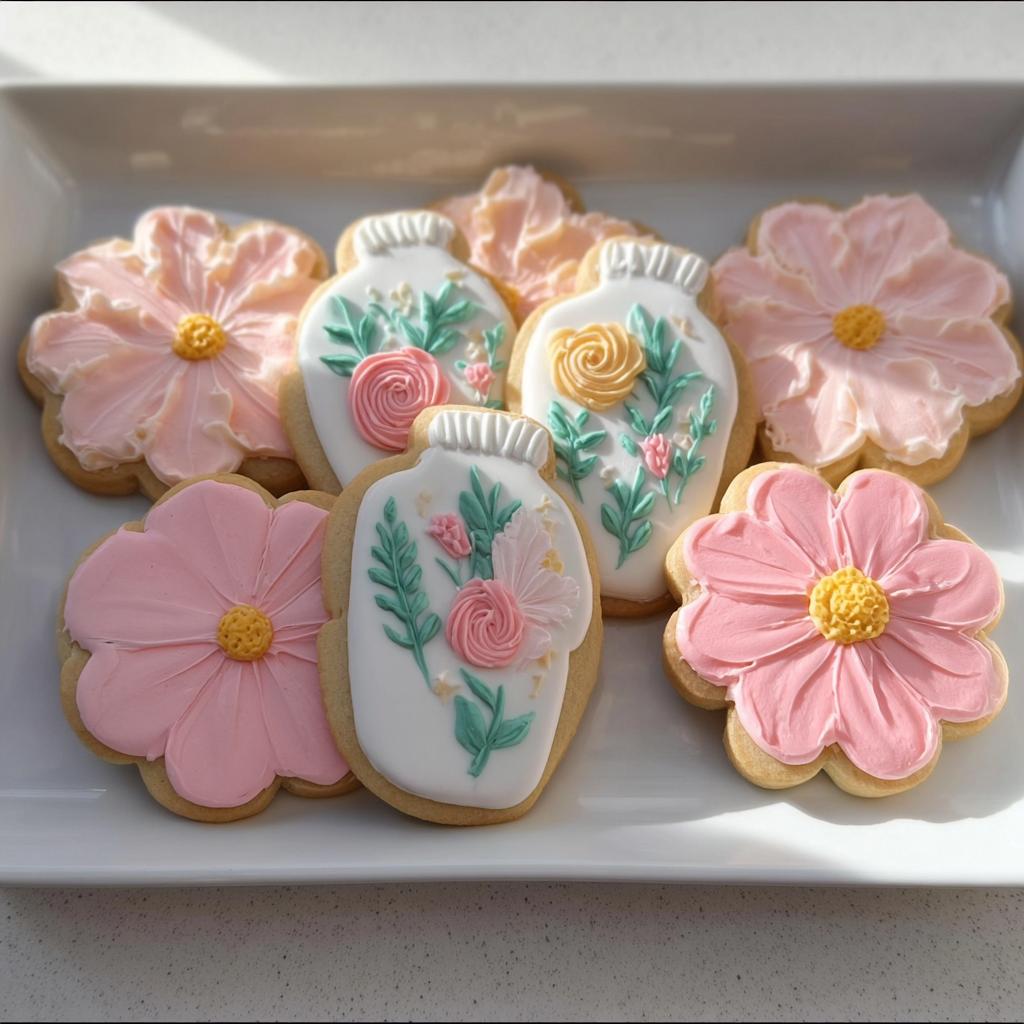
- Unmatched Elegance: The delicate floral designs bring a sophisticated, almost antique look that elevates any dessert table score.
- Perfect for Showers: They fit that ‘Baby in Bloom’ theme beautifully without being overly theme-y. They look refined for any guest!
- Durable Decorations: Because we harness the power of royal icing, your beautiful designs will stay crisp and perfect until the very last guest leaves. No melting worries!
- The Joy of Decorating: Yes, it takes patience, but watching those flowers come to life on the cookie base is just incredibly satisfying. It’s almost therapeutic!
- Great for Practice: If you’ve been wanting to try your hand at piping different flower tips, these cookies give you the perfect, low-stakes canvas to play around with your floral sugar cookies skills.
Essential Equipment for Perfect Baby in Bloom Royal Icing Cookies
Seriously, you need the right tools for this job, or you’ll end up frustrated! Thank goodness most of this stuff is standard baking gear. You’ll need your mixing bowls, of course, and an electric mixer for getting that cookie dough smooth. Make sure your baking sheets are ready, and definitely have a good rolling pin and those special cookie cutters handy. Piping bags and tips are non-negotiable for those tiny flower details!
Ingredients for the Base and the Floral Royal Icing
Okay, let’s talk ingredients. Like any great decorated cookie, the flavor of the base has to be spot-on before we even think about adding piping! We need two separate collections of supplies here: the sturdy cookie dough that holds up to all that detail, and the magical royal icing that lets us paint a tiny garden on top. Pay close attention to the state of your ingredients here; it makes a real difference!
For the Sugar Cookie Base
This is the blueprint for our floral sugar cookies. Make sure your butter is truly soft, not melty, and your egg has time to come up to room temperature. That helps everything mix beautifully without stressing the dough.
- Two and three-quarters cups of all-purpose flour—always measure this right!
- One teaspoon of baking powder, just for a tiny lift.
- Half a teaspoon of salt to balance the sweetness.
- One full cup of unsalted butter that is nice and softened.
- One cup of granulated sugar for that classic sweet snap.
- One large egg, and please put it on the counter earlier so it’s at room temperature.
- One and a half teaspoons of pure vanilla extract—don’t skip this; it smells divine!
For the Baby in Bloom Royal Icing
Royal icing seems intimidating, but it’s really just three main things coming together. For the best, brightest colors for your flowers, you absolutely need gel food coloring. Liquid drops just won’t cut it here!
- Two cups of powdered sugar, sifted well if possible.
- One and a half tablespoons of meringue powder—this is your structural secret weapon!
- Three to four tablespoons of warm water. I put three to start, and you add more slowly until it looks like thick, luscious Greek yogurt. Consistency is everything!
- As needed gel food coloring in all the soft pastels you can find.
We’ll talk more about icing consistency later, but for now, just get these organized. If you want fantastic frosting bases for other projects, check out this great frosting guide!
Step-by-Step Instructions for Baby in Bloom Royal Icing Cookies
Alright, here’s where the actual magic happens! Baking perfect sugar cookies that hold their shape is one thing; mastering the icing technique is another skill entirely. But don’t sweat it! Just follow these stages, and you’ll end up with stunning decorated cookies that are worthy of any celebration.
Mixing and Chilling the Cookie Dough
We start by getting our dry stuff prepped. Take your flour, baking powder, and salt and give them a good whisk together in one bowl. That’s your first mixing bowl done. Now for the real work: grab your electric mixer, or if you want an arm workout, use a sturdy wooden spoon! Cream the softened butter and the sugar together until it goes from dense to fluffy and pale yellow. This usually takes about two or three minutes—don’t rush this, it builds the structure.
Next, beat in your room-temperature egg and the vanilla until everything looks smooth again. Then, we add the dry mixture in slow stages, mixing just until you see the dough *just* come together. Stop when you don’t see flour streaks anymore! Pop that dough into a plastic wrap cocoon and insist that it chills in the fridge for a full hour. Seriously, don’t skip that hour! Chilling prevents spreading, and we need those sharp edges for our floral design.
Cutting and Baking the Floral Sugar Cookies
Once chilled, dust your counter lightly—I mean *lightly*—and roll that dough out evenly until it’s exactly a quarter inch thick. Thicker cookies can crack the icing later, so be precise! Use your cutters to press out your shapes and move them gently onto your lined baking sheets.
Get your oven preheated to 175°C (that’s about 350°F for my fellow American bakers). Bake them for a short 8 to 10 minutes. You are looking for edges that look set, but they absolutely shouldn’t be brown. If they brown, they’ll taste too crisp. Cool them on the sheets for a few minutes before moving them carefully to a wire rack to cool down completely. And when I say completely, I mean stone cold. Seriously, icing warm cookies is a recipe for a melted mess!
Preparing and Applying the Royal Icing Base
Now for the royal icing! In a clean bowl, whisk your powdered sugar and meringue powder. Slowly stream in the warm water, mixing until it looks glossy and smooth—you want it to hold a soft peak if you lift the whisk out. Remember, this is your first icing layer, the *flood* icing. It needs to be thin enough to settle flat, but thick enough not to run right off the side. If it’s too thick, add a *tiny* bit of water. If too thin, add a little more sugar.
Color your icing for the base color (maybe a soft blush or pale green). Use a piping bag with a small round tip to outline the very edge of the cookie. Then, use a scribe tool or toothpick to gently spread the icing toward the outline, letting it settle flat and smooth. This is the ‘flood.’ Set these aside to dry. This is the hardest part, I know, but you MUST let them dry for a good six to eight hours, or until the surface is hard to the touch. You want that base rock hard before the next step!
Piping the Final Floral Details on Your Baby in Bloom Royal Icing Cookies
Once that base layer is dry, it’s time to bring out the artistry! For this, you need a *thicker* icing—this is your piping icing. It should be much stiffer than the flood icing so it holds its shape perfectly when you pipe it. Mix a small batch of white, pinks, and greens, aiming for consistency like toothpaste.
Switch your piping bag to a small star tip (#13 or #21 are great starters) for roses, or a leaf tip for greenery. This is where your beautiful baby shower flower cookies come alive! Remember: flood icing is for filling, piping icing is for decoration. Take your time, trust your hand, and let the flowers sit proud on top of that dry base layer. They cure beautifully together!

Tips for Success with Floral Sugar Cookies
You’ve got the dough chilling and the base icing dry—that’s the hard part done! But decorating is where things can go sideways if you aren’t careful. I’ve had runny icing bleed all over cookies that were supposed to be pristine white backgrounds, so I learned a few things the hard way so you don’t have to!
Here are my top secrets for transforming these sugar cookies into little pieces of art:
- Humidity is Your Enemy: Seriously, if it’s raining outside, wait a day if you can! Royal icing hates high humidity. It won’t dry right, and your perfect flood might slump or never set properly. If you must bake, use a dehumidifier if you have one nearby.
- The ‘Scribe’ Tool is Your Best Friend: After flooding, you *must* use a scribe tool—or even a clean toothpick—to gently drag the icing across the surface to get it smooth and force out any sneaky air bubbles. Bubbles lead to craters, and craters look messy.
- Keep That Icing Covered: Royal icing sets up like concrete if left exposed to the air for five minutes. Use a damp paper towel over the top of any bowls of icing you aren’t actively using. And I mean *covered*.
- Practice Piping Consistency: Remember I said the piping icing has to be stiff? Test it on a scrap piece of parchment paper first. If you pipe a simple line and it immediately sinks into itself and flattens out, it’s too thin. You want that line to stand up proud!
- Work in Stages: Never try to outline, flood, and detail all in one sitting. You need that base layer totally dry before you pipe flowers on top, or the pressure from the piping tip will crack that foundation. Patience pays off!
For more general baking wisdom that stops things from falling apart, you absolutely should check out this guide for perfect scone tips—a lot of the temperature and mixing rules overlap perfectly in baking!
Storage and Make-Ahead for Baby in Bloom Royal Icing Cookies
Once you’ve put in all that careful work piping those gorgeous flowers, the last thing you want is for them to get stale or damaged, right?
The good news is that these cookies, because they use that hard-setting royal icing, are actually amazing for making ahead of time. I almost always bake and decorate for showers a few days in advance!
Storing the Finished Decorated Cookies
Once the final floral details are totally dry—and I mean rock hard, which might take overnight depending on humidity—you can stack them! Store your finished Baby in Bloom Royal Icing Cookies in an airtight container at room temperature. Keep a layer of parchment paper between each layer just to be safe, especially if you have any raised 3D piping. They stay looking perfect and tasting great for about a week this way. Do *not* put them in the fridge, though! The moisture in the fridge can make the royal icing look weepy and dull, and we absolutely don’t want that for these pretty little things.
Can I Freeze the Cookie Dough?
Yes, absolutely! This is my trick for staying sane during big preparations. You can easily freeze the sugar cookie dough either as a whole disk wrapped tightly in plastic wrap or, even better, cut the shapes out before freezing.
If you freeze the cut-out shapes: Lay them on a parchment-lined baking sheet and freeze them until they are solid. Then, transfer them to a freezer bag. When you’re ready to bake, just pull them out and bake them from frozen—you’ll just need to add about two extra minutes to the bake time. They hold their shape perfectly!
Freezing Iced Cookies? (A Word of Caution)
I have tried freezing the fully iced cookies, and honestly, I don’t recommend it for these detailed floral ones. The expansion and contraction during the freezing and thawing process can make the royal icing crack, which ruins that delicate look. If you have plain, undecorated cookies you want to save, those freeze beautifully. But for the finished, decorated sugar cookies, keep them on the counter! They last long enough at room temperature anyway that freezing just isn’t worth the risk of cracking your hard work.
Frequently Asked Questions About Decorated Cookies
I get so many questions when people see these lovely creations for the first time! I totally get it; royal icing can look a little mysterious if you haven’t worked with it much. Here are a few things that always come up when folks are trying to make their own decorated cookies debut.
Can I use simple buttercream instead of royal icing for these baby shower flower cookies?
Oh, you certainly *can* use buttercream on your baby shower flower cookies, but they will behave very differently! Buttercream is soft and lovely to eat right away, but it doesn’t dry hard. That means stacking them is hard, they smudge if you look at them wrong, and you can’t get those crisp, fine lines for delicate floral details.
For these specific floral sugar cookies, I really push royal icing because it sets up hard like candy. It keeps the pretty details sharp for days under an airtight lid. If you want that intricate, elegant look, stick with the royal icing; it’s worth the drying time!
How do I prevent my floral sugar cookies from puffing up during baking?
Puffing is the nemesis of a good, flat canvas! If your cookies puff up in the middle or the edges curl up, it means the dough wasn’t cold enough or your leavening agent is too strong for the amount of fat we have in there. For these cookies, the single best tip I have is just to stress the chilling step: make sure that dough chills for the full hour!
Also, when you’re rolling the dough out to that 1/4 inch thickness, try chilling the cut-out shapes on the baking sheet for another 15 minutes right before they go into the oven. That super-cold dough hits that hot oven and sets fast before it has a chance to spread or puff! It makes all the difference in keeping them flat enough for our detailed icing work.
Estimated Nutritional Information
Since these are special occasion treats, we aren’t focusing on daily nutrition, but I know some of you are curious! Please remember that this data is just an estimate calculated based on standard ingredient amounts for one single cookie serving (24 cookies total). This is a guide, not a certified nutritional document, especially since how thick you ice can really change the numbers!
- Estimated Calories: 200-240 per cookie
- Total Fat: 9g – 11g
- Carbohydrates: 30g – 35g (mostly sugar from the icing!)
- Protein: 1g – 2g
They are rich, sweet, and designed to be enjoyed slowly with a cup of tea while admiring your beautiful handiwork!
Share Your Baby in Bloom Royal Icing Cookies Creations
I truly hope you had as much fun making these as I do every time I pipe them out. There’s just something special about creating these delicate baby shower flower cookies for happy occasions!
If you made these, please leave me a note in the comments below telling me what colors you chose for your florals! Did you have any trouble with the flood consistency? I love hearing about everyone’s process. And if you snapped a picture of your gorgeous finished tray, please tag me on social media! Your feedback helps me know which recipes to bring to you next, and reading your success stories just makes my day.
For more about what we do here at Recipes by Betty, you can always check out our About Page!
By Clara Bennett, Lead Plate Designer at Recipes by Betty.
Baby in Bloom Royal Icing Cookies
Equipment
- Mixing Bowls
- Electric mixer
- Baking sheets
- Rolling Pin
- Cookie cutters
- Piping bags and tips
Ingredients
For the Cookies
- 2 3/4 cups all-purpose flour
- 1 tsp baking powder
- 1/2 tsp salt
- 1 cup unsalted butter, softened
- 1 cup granulated sugar
- 1 large egg, room temperature
- 1 1/2 tsp vanilla extract
For the Royal Icing
- 2 cups powdered sugar
- 1 1/2 tbsp meringue powder
- 3 to 4 warm water Use enough to reach desired consistency
- As needed gel food coloring
Instructions
- Whisk the flour, baking powder, and salt together in one bowl.
- Cream the butter and sugar in a separate bowl until the mixture is light and fluffy, about 2 to 3 minutes.
- Add the egg and vanilla extract to the creamed mixture and mix until smooth.
- Gradually add the dry ingredients to the wet ingredients until the dough forms.
- Chill the dough for 1 hour.
- Roll the dough out to 1/4 inch thickness, cut your desired shapes, and place them on a lined baking sheet.
- Bake at 175°C for 8 to 10 minutes, or until the edges are set but not browned.
- Cool the cookies completely.
- Prepare the icing by mixing the powdered sugar, meringue powder, and water until the mixture is smooth and glossy.
- Divide the icing and color it as desired.
- Outline the cookies with icing, then flood the centers. Let the flooded icing dry for 6 to 8 hours.
- Pipe the floral details onto the dried cookies using thicker icing.